
Setup an AWS KMS custom key store using AWS CloudHSM
- Hendrik Hagen
- Aws
- March 19, 2025
Table of Contents
Introduction
In today’s digital landscape, data is constantly being stored, shared, and transmitted—often including highly sensitive information such as personal details, financial records, and medical data. Protecting this data from both external threats and internal vulnerabilities is crucial. Encryption serves as a powerful safeguard, ensuring that only authorized individuals can access and interpret sensitive information.
At the core of encryption lies cryptographic keys, which must be securely stored to prevent unauthorized access. If these keys fall into the wrong hands, it can lead to severe data breaches, financial loss, and reputational damage. This is where key management services, such as AWS Key Management Service (KMS), come into play.
While AWS KMS provides a standard key store that balances security, scalability, and cost-effectiveness, some organizations require even greater control over their cryptographic operations. For those with strict compliance, regulatory, or security requirements, AWS offers CloudHSM-backed custom key stores, allowing businesses to manage their own hardware security modules (HSMs) while still leveraging AWS KMS’s powerful encryption capabilities.
In this blog, I’ll walk you through how you can leverage a CloudHSM custom key store to gain full control over your cryptographic keys and operations, ensuring compliance with stringent security standards while maintaining the flexibility of AWS cloud services.
Overall Architecture
To begin, let’s explore the architecture we’ll be deploying in this example. The high-level diagram below provides an overview of the components involved. Our objective is to set up a custom key store in AWS KMS, backed by AWS CloudHSM.
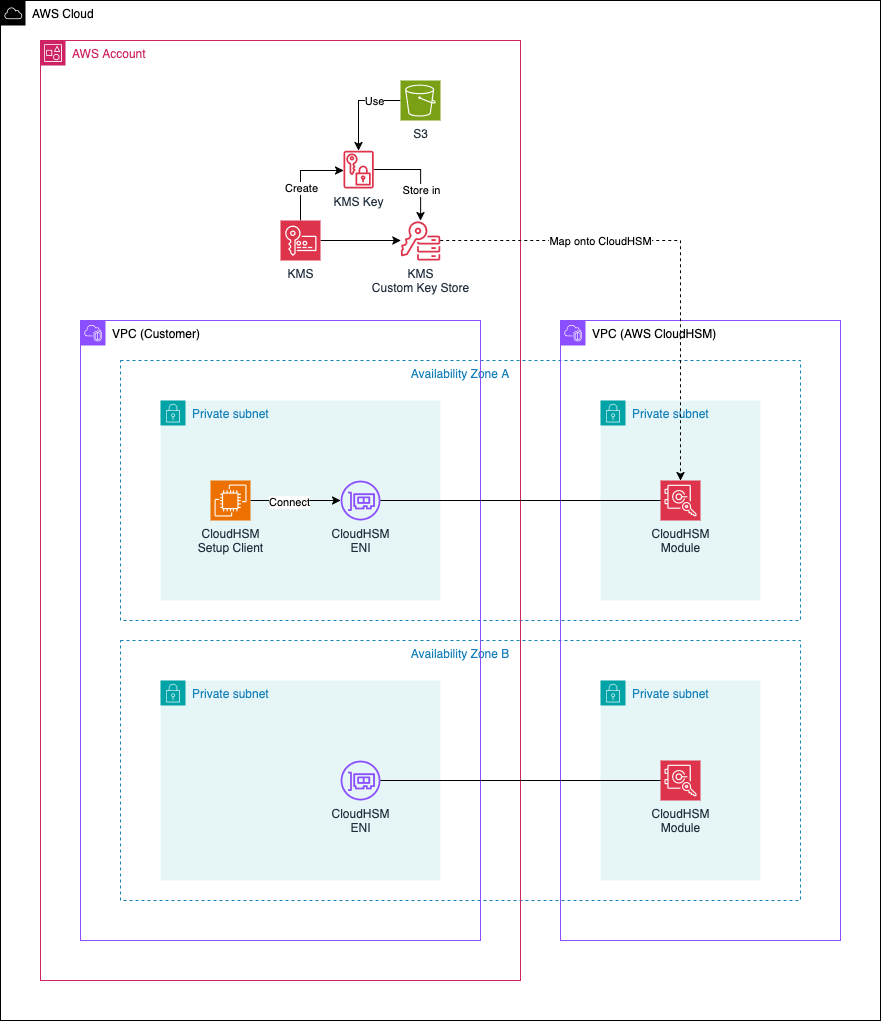
The architecture consists of two main parts: the customer infrastructure, which is managed by the user, and the AWS-managed infrastructure, which is handled by AWS. When you create an HSM, AWS CloudHSM provisions an Elastic Network Interface (ENI) within the specified subnet of your AWS account. This ENI serves as the primary interface for interacting with the HSM. However, the HSM itself resides in a separate AWS-owned VPC, as shown in the diagram under AWS CloudHSM.
On the customer side, we deploy a Virtual Private Cloud (VPC) containing the CloudHSM ENIs (created by AWS CloudHSM) and the CloudHSM Setup Client, which uses the ENIs to connect to CloudHSM and perform activation and initial configuration. Additionally, we set up a KMS Custom Key Store, backed by CloudHSM, allowing us to securely store KMS keys within CloudHSM modules and perform cryptographic operations directly on CloudHSM.
To validate our setup, we will create a simple Amazon S3 bucket at the end of this guide. This bucket will be encrypted using a KMS key stored on CloudHSM, ensuring that all encryption operations are performed securely within our CloudHSM-backed custom key store.
Walkthrough
Step 1: Deploy CloudHSM cluster
The code for this blog post is available on GitHub. Feel free to clone the repository or manually copy the code to your local machine.
Within the provided directory, you’ll find multiple Terraform files. Since the infrastructure needs to be deployed in multiple steps, the Terraform code is divided into three files: step_1.tf, step_2.tf, and step_3.tf. While step_1.tf can be deployed immediately, step_2.tf and step_3.tf are currently commented out and must be applied later.
Each step deploys the following components:
step_1.tf – Sets up the initial infrastructure, including the CloudHSM cluster, one HSM module, and the CloudHSM client EC2 instance.
step_2.tf – Adds the second CloudHSM module, a requirement for the KMS Custom Key Store. This step must be applied separately after the CloudHSM cluster is activated. Additionally, it deploys the KMS Custom Key Store infrastructure.
step_3.tf – Deploys the KMS keys and an S3 bucket for testing purposes.
Creating a Key Pair
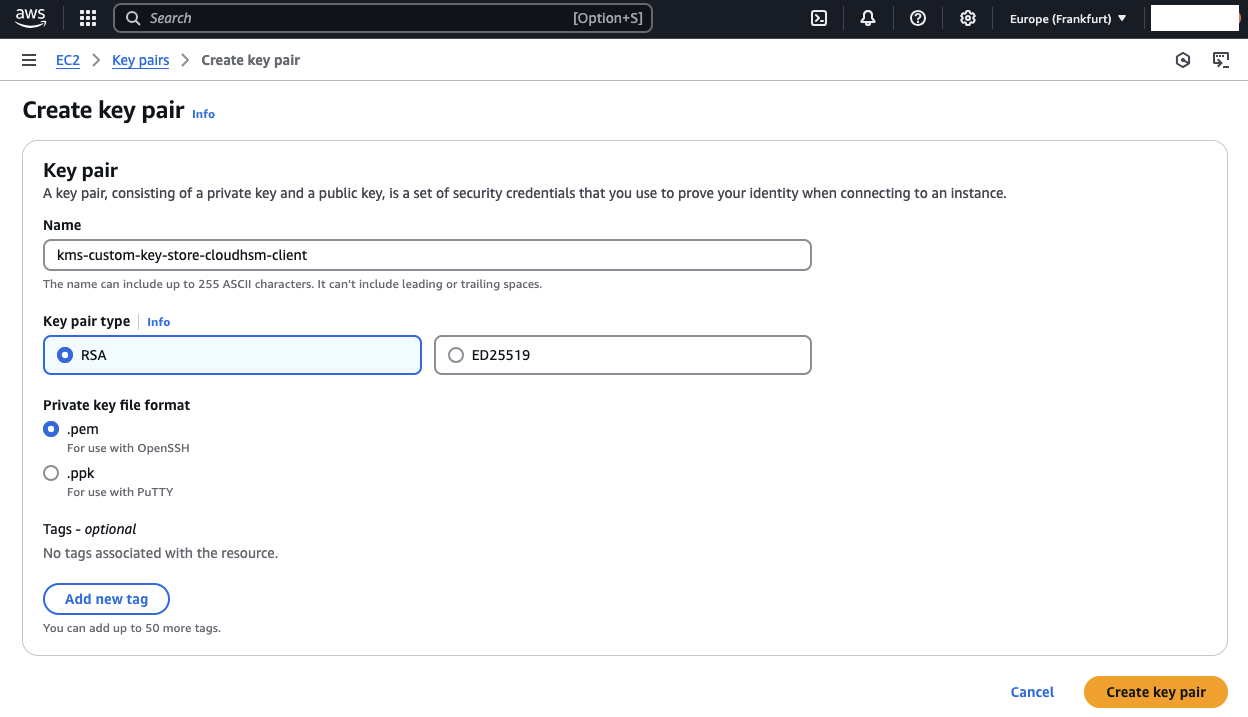
Before deploying the CloudHSM infrastructure, you need to create a Key Pair in the AWS EC2 console.
Log in to your AWS account and navigate to the EC2 service.
In the left-hand menu, find and select Key Pairs.
Click Create Key Pair and use the following configuration:
- Key pair type – RSA
- Private key file format – .pem
- Choose a name of your preference.
Updating Terraform Variables
Next, update the Terraform variables. Open the terraform.tfvars file and modify the following variables:
application_name      = "kms-custom-key-store"
key_store_password    = "supersecretpassword"
kms_user_password    = "newkmsuserpassword"
public_ip = "xxxxxxxxxxx/32"
key_name = "xxxxxxxxxxx"
The only variables you need to update are:
public_ip – Replace xxxxxxxxxxx/32 with your public IP in CIDR notation. This is necessary to allow SSH access from your machine to the CloudHSM EC2 client.
key_name – Set this to the name of the key pair you just created.
Deploying the Infrastructure
Once you’ve updated the variables, run the following commands:
terraform init
terraform apply
This initializes the required Terraform providers and deploys the initial CloudHSM infrastructure, including the cluster client EC2 instance.
Warning
For this example, we use AWS’s default VPC and deploy the infrastructure into the three default public subnets. Additionally, we assign simple passwords (key_store_password and newkmsuserpassword) that do not meet modern security standards.
Using the default VPC and weak passwords should be avoided in production environments. We are using them here only to simplify the setup and minimize unnecessary complexity while demonstrating CloudHSM’s functionality as a KMS Custom Key Store.
Step 2: Initialize CloudHSM Cluster
Download Certificates and CSR
After deploying the initial CloudHSM cluster, we will verify the identity of our cluster and perform the initialization process. The steps for Identity Verification can also be found in the official AWS documentation.
Open the AWS console and navigate to the CloudHSM service. You will find that a new cluster has been created. The state of the cluster should be Uninitialised.

Select Actions, then choose Initialize from the dropdown menu. You will be directed to the Download Certificate Signing Request page. Download the Certificate Signing Request (CSR) as well as the three Cluster Verification Certificates.
The Cluster CSR needs to be signed later using a self-signed certificate and then uploaded to CloudHSM to claim ownership of the cluster.
The Cluster Verification Certificates can be used along with the AWS CloudHSM root certificate and the HSM manufacturer root certificate to construct two certificate chains. These chains allow you to verify that both AWS CloudHSM and the hardware manufacturer attest to the identity and authenticity of the HSM.
Next, download the AWS CloudHSM root certificate and the HSM manufacturer root certificate:
HSM Manufacturer Root Certificate
Note
Overview of components used in this step:
AWS Root Certificate - This is AWS CloudHSM’s root certificate.
Manufacturer Root Certificate - This is the hardware manufacturer’s root certificate.
AWS Hardware Certificate - AWS CloudHSM created this certificate when the HSM hardware was added to the fleet. This certificate asserts that AWS CloudHSM owns the hardware.
Manufacturer Hardware Certificate - The HSM hardware manufacturer created this certificate when it manufactured the HSM hardware. This certificate asserts that the manufacturer created the hardware.
HSM Certificate - The HSM certificate is generated by the FIPS-validated hardware when you create the first HSM in the cluster. This certificate asserts that the HSM hardware created the HSM.
Cluster CSR - The first HSM creates the cluster CSR. When you sign the cluster CSR, you claim the cluster. Then, you can use the signed CSR to initialize the cluster.
Note
Store all downloaded certificates in a single directory to simplify the next steps.
Perform Identification Process
Once the certificates have been downloaded, we will perform the identification process. Open a CLI terminal and navigate to the folder where the certificates from the previous step were stored.
We will start by verifying the HSM certificate with the AWS CloudHSM root certificate. Use the following commands to create a certificate chain that includes the AWS hardware certificate and the AWS CloudHSM root certificate, and to verify the HSM certificate with the AWS certificate chain.
Replace CLUSTER_ID with the ID of the cluster that you created previously.
cat cluster-CLUSTER_ID_AwsHardwareCertificate.crt AWS_CloudHSM_Root-G1.crt > cluster-CLUSTER_ID_AWS_chain.crt
openssl verify -CAfile cluster-CLUSTER_ID_AWS_chain.crt cluster-CLUSTER_ID_HsmCertificate.crt
You should receive an OK output when executing the verification command.

Next, we will repeat this process for the manufacturer certificate. Use the following command to create a certificate chain that includes the manufacturer hardware certificate and the manufacturer root certificate, and to verify the HSM certificate with the manufacturer certificate chain.
Replace CLUSTER_ID with the ID of the cluster that you created previously.
cat cluster-CLUSTER_ID_ManufacturerHardwareCertificate.crt liquid_security_certificate.crt > cluster-CLUSTER_ID_manufacturer_chain.crt
openssl verify -CAfile cluster-CLUSTER_ID_manufacturer_chain.crt cluster-CLUSTER_ID_HsmCertificate.crt
You should receive an OK output when executing the verification command.

To conclude the identification process, we will use OpenSSL to extract and compare the public keys in the HSM certificate and the cluster CSR to ensure they are the same.
Use the following commands to extract the public key from the HSM certificate and the cluster CSR, and then compare the public keys.
openssl x509 -in cluster-CLUSTER_ID_HsmCertificate.crt -pubkey -noout > cluster-CLUSTER_ID_HsmCertificate.pub
openssl req -in cluster-CLUSTER_ID_ClusterCsr.csr -pubkey -noout > cluster-CLUSTER_ID_ClusterCsr.pub
diff cluster-CLUSTER_ID_HsmCertificate.pub cluster-CLUSTER_ID_ClusterCsr.pub
If the public keys are identical, the following command will produce no output.
Perform Initialization Process
Once the identification process has been completed, we will proceed to initialize the CloudHSM cluster. The steps for Initialization can also be found in the official AWS documentation.
To initialize the cluster, we need to create a self-signed signing certificate and use it to sign the CSR for your cluster. Afterward, we will upload both the signed CSR and the self-signed certificate in the AWS console to complete the initialization process.
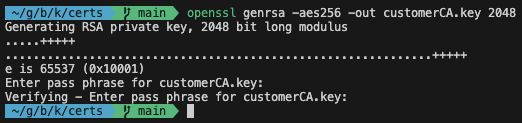
Let’s start by creating a private key using the CLI.
openssl genrsa -aes256 -out customerCA.key 2048
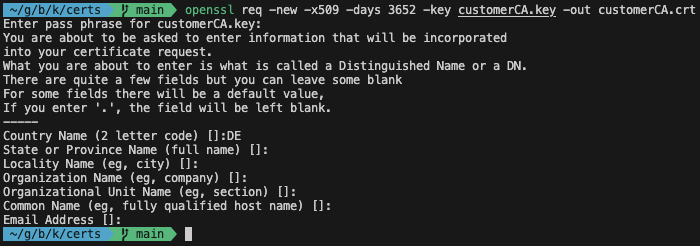
Next, we will use the private key to create a self-signed certificate.
openssl req -new -x509 -days 3652 -key customerCA.key -out customerCA.crt
Afterward, we will use the self-signed certificate to sign the cluster CSR. Replace CLUSTER_ID with the ID of the cluster that you created previously.
openssl x509 -req -days 3652 -in cluster-CLUSTER_ID_ClusterCsr.csr -CA customerCA.crt -CAkey customerCA.key -CAcreateserial -out cluster-CLUSTER_ID_CustomerHsmCertificate.crt

To finish off, upload both the signed CSR and the self-signed certificate in the AWS console. Click Upload and Initialize to complete the initialization process.

Step 3: Activate CloudHSM Cluster
Copy Self-Signed Certificate
After initializing the CloudHSM cluster, we need to perform the activation process. To activate the CloudHSM cluster, we need to turn the current unactivated-admin role into an activated role. The steps for the Activation Process can also be found in the official AWS documentation.
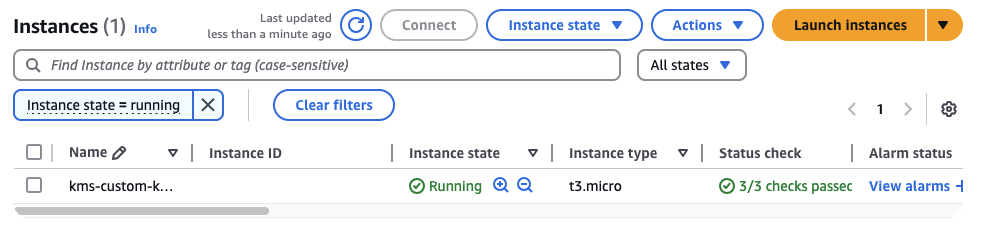
To activate our CloudHSM cluster, we will use the EC2 client. Navigate to the EC2 console, select the EC2 CloudHSM client, click on Connect and select the tab called SSH client. Select the Public DNS string mentioned under step 4.
Next, navigate to the local folder on your machine where you stored your previously created Key Pair file. Use the following command to copy the self-signed certificate to the EC2 instance using scp. Replace the following three values:
Replace KEY_NAME with the name of the key pair you defined.
Replace PATH_TO_customerCA.crt with the absolute path to your self-signed certificate.
Replace EC2_PUBLIC_DNS with the public DNS of your EC2 you wrote down previously.
chmod 400 "KEY_NAME.pem"
scp -i KEY_NAME.pem PATH_TO_customerCA.crt ec2-user@EC2_PUBLIC_DNS:~/
Next, connect to the EC2 instance and move the self-signed certificate into the correct directory.
ssh -i KEY_NAME.pem ec2-user@EC2_PUBLIC_DNS
sudo mv customerCA.crt /opt/cloudhsm/etc/customerCA.crt
Activate CloudHSM Cluster
While connected to the EC2 instance, switch into the CloudHSM CLI interactive mode.
/opt/cloudhsm/bin/cloudhsm-cli interactive
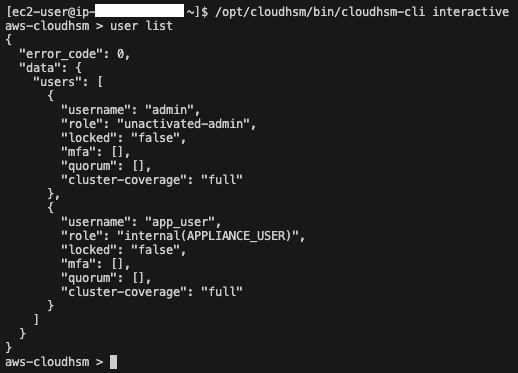
Once in interactive mode, list the current users of the CloudHSM cluster using the following CloudHSM CLI command:
user list
You will see the Unactivated Admin Role listed.
Next, activate the cluster using the following CloudHSM CLI command:
cluster activate

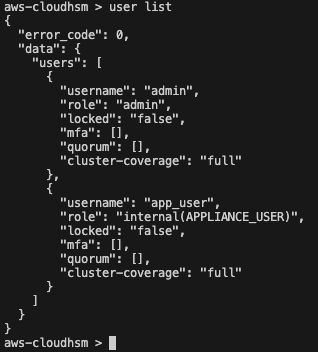
To verify that the cluster has been activated, check the user list again using the following CloudHSM CLI command:
user list
You will now see that the admin role has been activated.
Step 4: Create CloudHSM KMS-User
After activating the CloudHSM cluster and before creating the KMS Custom Key Store, we will create a CloudHSM user called kmsuser. This user will later be used by the AWS KMS service to communicate with the CloudHSM cluster.
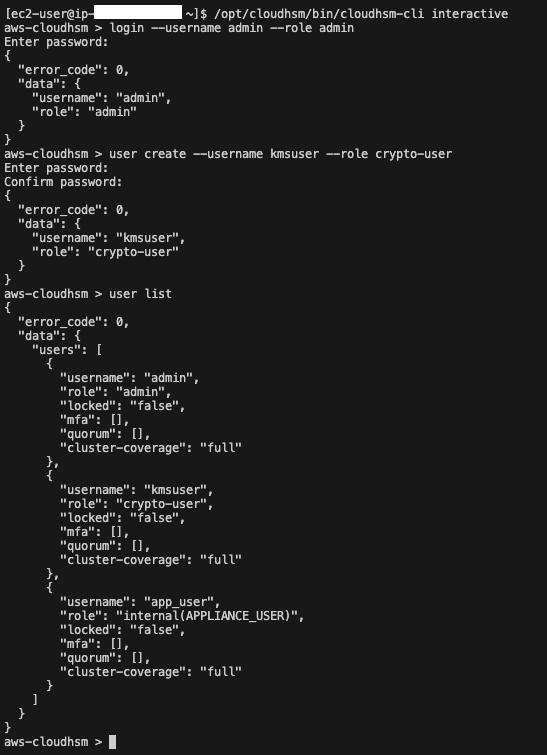
Use the following CloudHSM CLI commands to log in as the recently activated admin role and create a new user called kmsuser with the rypto-user role. Afterward, log out of the admin role.
login --username admin --role admin
user create --username kmsuser --role crypto-user
logout
Step 5: Create and Connect KMS Custom Key Store
After creating the kmsuser in the CloudHSM cluster, we will proceed with deploying the infrastructure for the KMS Custom Key Store and connecting it to the CloudHSM cluster.
Deploy Infrastructure
Remove the comments in the Terraform file step_2.tf. Next, copy the self-signed certificate customerCA.crt into a folder called certs. The structure should look like this:
├── certs
│   └── customerCA.crt
├── step_1.tf
├── step_2.tf
├── step_3.tf
├── data.tf
├── variables.tf
├── version.tf
├── terraform.tfvars
Then, run terraform init to initialize the necessary Terraform providers, followed by terraform apply to deploy the infrastructure.
After the infrastructure is deployed, you will notice that a second HSM has been added to the cluster. This is required in order to create a KMS Custom Key Store.
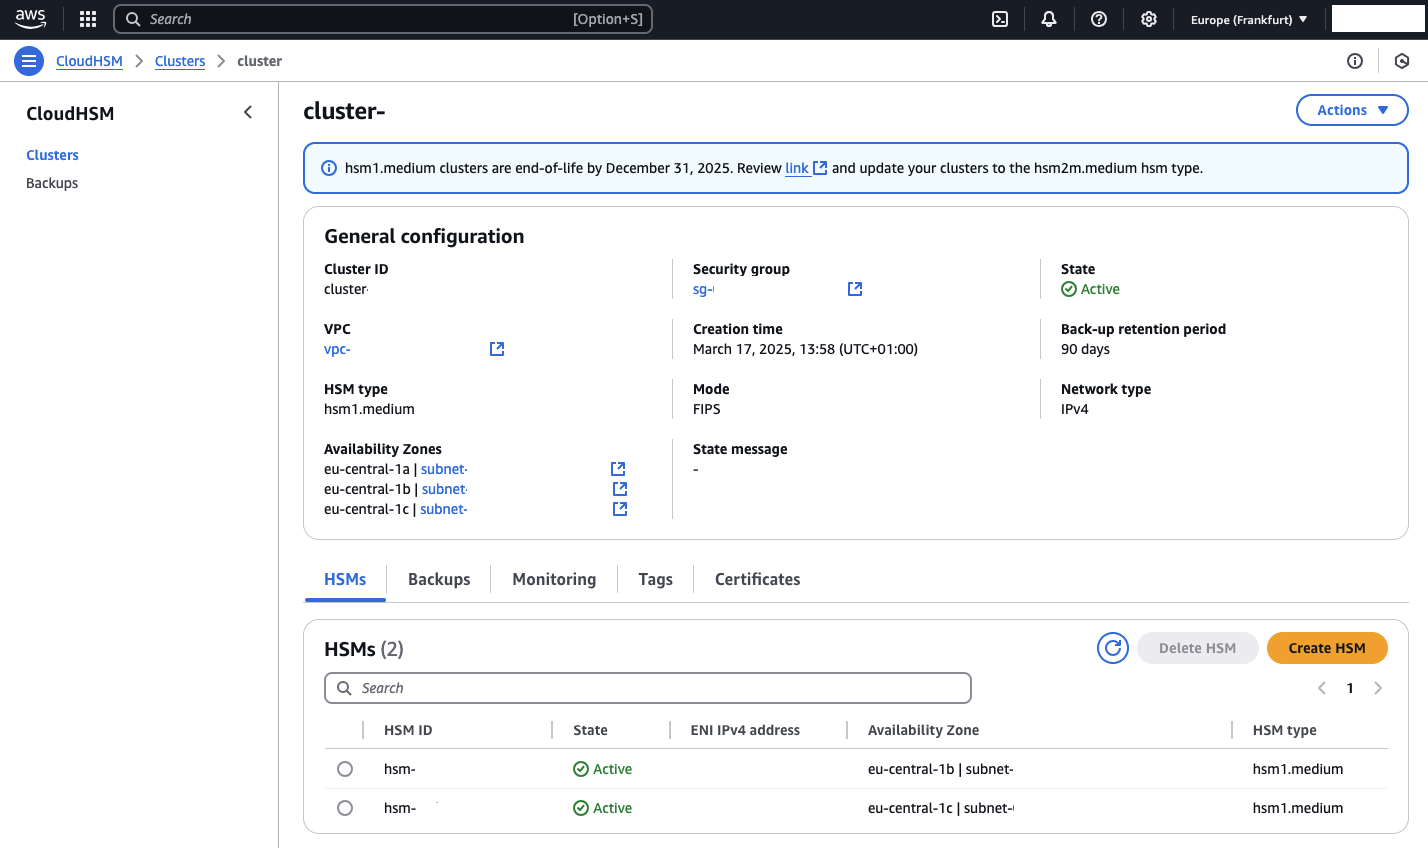
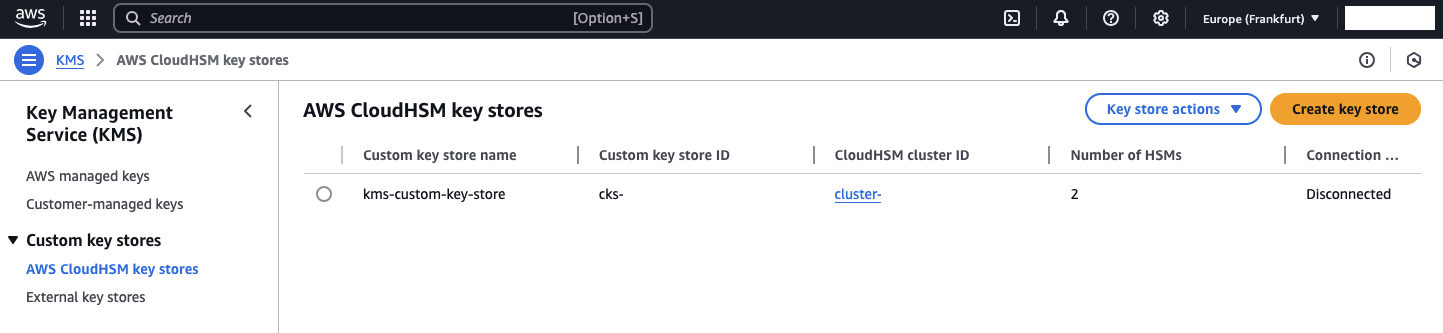
You will also see that a new KMS Custom Key Store has been created in KMS.
Connect KMS Custom Key Store
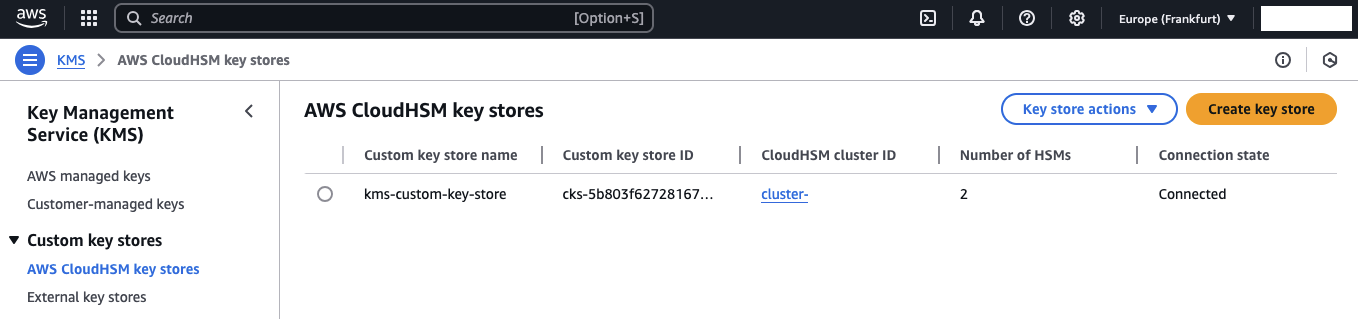
Before we can fully utilize the KMS Custom Key Store, we need to connect KMS to our CloudHSM. Once connected, KMS will use the CloudHSM user kmsuser to communicate with the CloudHSM cluster and perform operations. To begin, select AWS CloudHSM key stores and then choose the KMS Custom Key Store that was created. Afterward, click on Key store actions and select Connect. Once the connection is established, the Custom Key Store will be displayed as Connected.
Note
Please note that the connection process may take a few minutes to complete.
Step 6: Create KMS Key in KMS Custom Key Store
Create KMS Key
After connecting the KMS Custom Key Store to the CloudHSM cluster, we will create a KMS key within the CloudHSM cluster and use it to encrypt objects in an S3 bucket. Begin by removing the comments in the Terraform file step_3.tf. Then, run terraform init to initialize the necessary Terraform providers, followed by terraform apply to deploy the infrastructure.
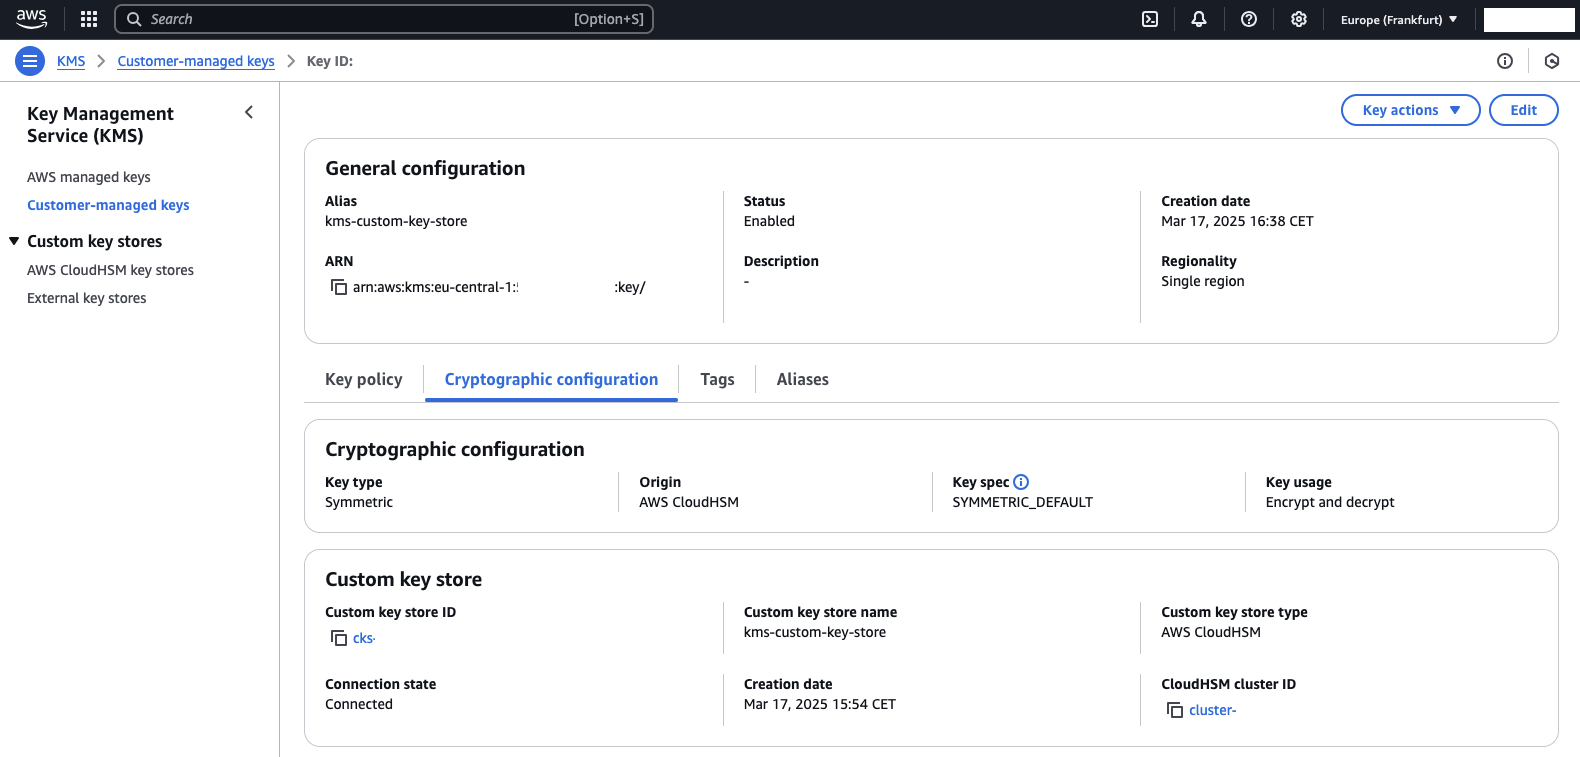
Once deployed, you will find a new KMS key in the KMS console. If you navigate to the Cryptographic configuration, you will see that the Custom key store type is configured as AWS CloudHSM. This indicates that the KMS key is stored within the CloudHSM.
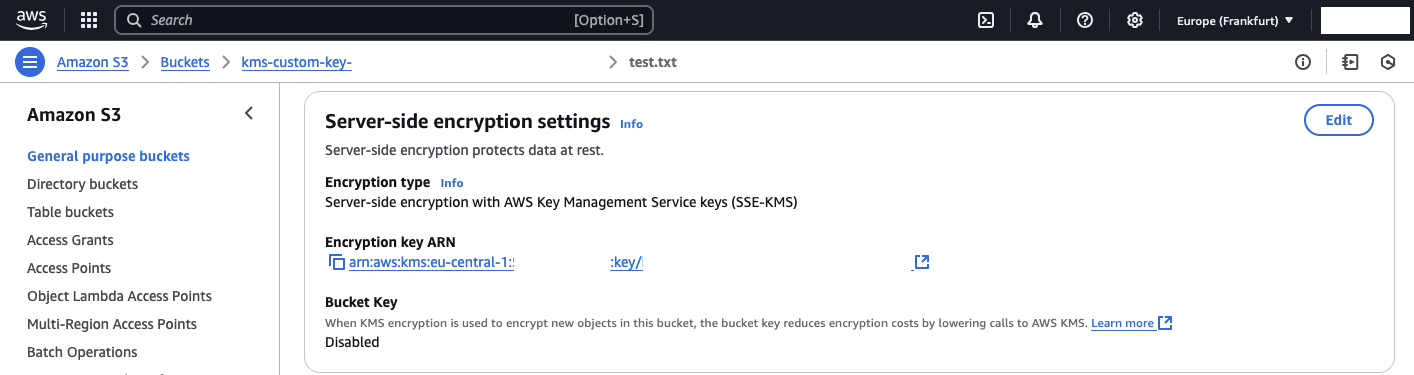
Validate KMS Custom Key Store functionality
To validate the functionality of the KMS Custom Key Store and the newly created KMS key, navigate to the S3 console in AWS and locate the newly created S3 bucket. Afterward, upload an object to the bucket. Once the object has been successfully uploaded, open the object details and check the Server-side encryption settings. You will see that the object has been encrypted using the newly created KMS key.
Step 7: Verify KMS Key creation on CloudHSM
To complete this example, we will inspect the KMS key in the CloudHSM. In order to connect to the CloudHSM and view the KMS key that was created, we first need to disconnect the KMS Custom Key Store from the CloudHSM. This will release the CloudHSM user kmsuser. We will then need to log in to the kmsuser using the EC2 client to list all the keys owned by this user.
Select AWS CloudHSM key stores and choose the KMS Custom Key Store that was created. Next, click on Key store actions and select Disconnect. Once this process is complete, the Custom Key Store will be displayed as Disconnected.
Next, open the CLI terminal that is connected to the EC2 client using SSH. If the EC2 instance has been disconnected or the terminal was closed, open a new terminal and establish an SSH connection using the following command:
ssh -i KEY_NAME.pem ec2-user@EC2_PUBLIC_DNS
Replace KEY_NAME with the name of the key pair you defined.
Replace EC2_PUBLIC_DNS with the public DNS of your EC2 instance that you noted earlier.
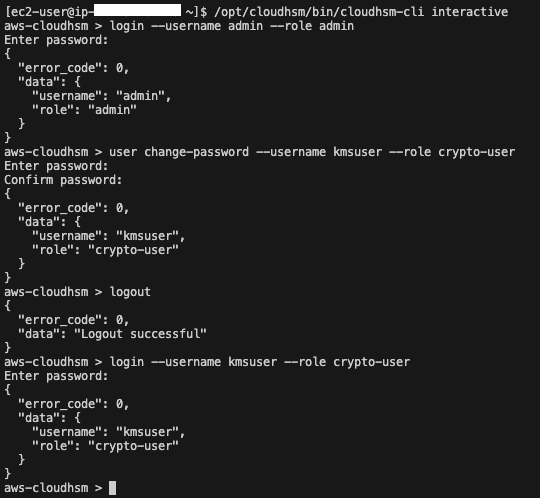
Once connected, use the following commands to start the CloudHSM CLI in interactive mode and log in as the admin user. We will also need to change the password for the kmsuser CloudHSM user. This is necessary because KMS changes the password the first time the connection between the KMS Custom Key Store and CloudHSM is established.
/opt/cloudhsm/bin/cloudhsm-cli interactive
login --username admin --role admin
user change-password --username kmsuser --role crypto-user
Note
For simplicity, feel free to reuse the password defined in the Terraform terraform.tfvars file called kms_user_password.
Once logged in as the CloudHSM admin, and the kmsuser password has been changed, use the following commands to log out of the admin role, log in as kmsuser, and list the currently available KMS keys.
logout
login --username kmsuser --role crypto-user
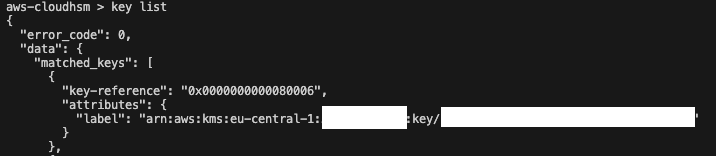
After logging in as kmsuser, use the following command to list the keys owned by the user:
key list
You will see a key that is owned by the user. When working with KMS keys, the label will match the ARN of the KMS key.
Step 8: Wrap Up
Congratulations! You’ve successfully created a CloudHSM cluster in AWS and used it as a KMS Custom Key Store. You created a KMS key within your CloudHSM and utilized KMS in combination with CloudHSM to offload cryptographic operations from KMS to CloudHSM.
Feel free to continue experimenting with the current setup. Once you’re finished, run terraform destroy in the cloned folder to tear down the infrastructure and reduce costs.
Summary
In this blog, we explored how to use AWS CloudHSM as a custom key store with AWS Key Management Service (KMS) to enhance the security and control of your cryptographic keys. By integrating CloudHSM with KMS, you gain the ability to manage your own hardware security modules (HSMs), providing a higher level of control and compliance for organizations with strict security requirements. With this setup, you can safeguard sensitive data while benefiting from the scalability and flexibility of AWS cloud services.
I hope you enjoyed this example and learned something new. I look forward to your feedback and questions. For the complete example code, please visit my Github.
— Hendrik
Title Photo by Sophie Turner on Unsplash