
Using IAM Roles Anywhere to Eliminate Static AWS Credentials
- Hendrik Hagen
- Aws
- April 24, 2025
Table of Contents
Introduction
As organizations continue their journey to the cloud and adopt cloud-first strategies, many still maintain substantial workloads running on-premises or outside the cloud. While some of these workloads will eventually migrate to the cloud, others are likely to remain on-premises for their entire lifecycle.
However, just because a workload is outside the cloud doesn’t mean it won’t need to interact with it. In fact, many on-premises workloads still need to communicate with cloud-based applications or directly access AWS services. This raises an important question: How should these external workloads securely obtain credentials to access AWS?
Traditionally, this was often handled by creating IAM users with static credentials. While functional, this approach introduces significant security risks. Static credentials, once compromised, can be misused by attackers to gain unauthorized access to your AWS environment. That’s why the use of temporary credentials via IAM roles is now the recommended practice.
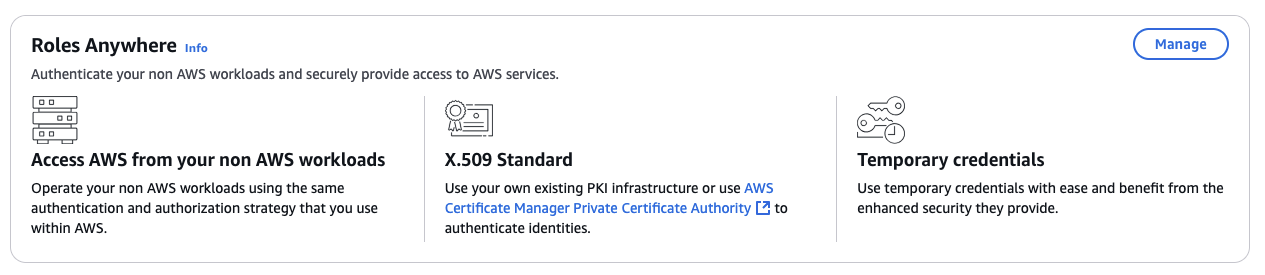
One powerful solution for enabling external workloads to assume IAM roles and obtain temporary credentials is AWS IAM Roles Anywhere. This service allows you to extend IAM role-based access to workloads running outside of AWS—such as on-premises clients, containers, or applications.
IAM Roles Anywhere works by establishing trust between your existing public key infrastructure (PKI) and AWS. You register your certificate authority (CA) as a trust anchor, enabling workloads to use X.509 certificates issued by that CA to request temporary AWS credentials.
In this blog post, I’ll walk you through the process of setting up AWS IAM Roles Anywhere to securely provide temporary AWS credentials for external workloads.
Workflow
Before diving into the hands-on walkthrough, let’s first take a look at the infrastructure we’ll be setting up to demonstrate the functionality of AWS IAM Roles Anywhere. The diagram below outlines both the architecture and the steps we’ll follow throughout this guide.
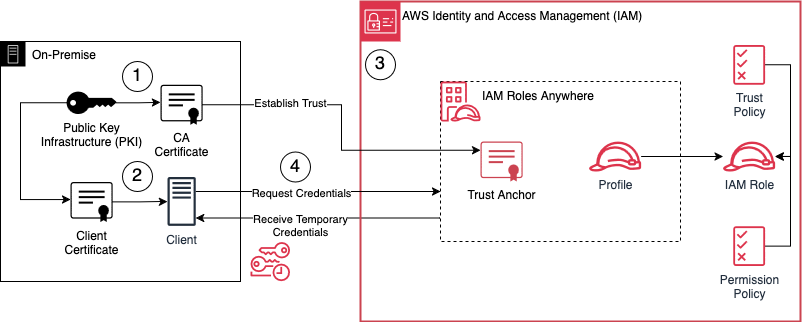
Set up a Public Key Infrastructure (PKI) using OpenSSL - We’ll generate a private key and a certificate for our Certificate Authority (CA). This CA certificate will later serve as the trust anchor in IAM Roles Anywhere and will be used to sign the client certificate.
Generate a client certificate - This certificate, signed by the CA, will be used by our external workload to request temporary credentials from IAM Roles Anywhere.
Configure IAM Roles Anywhere - With the PKI in place, we’ll register the CA certificate as a Trust Anchor in IAM Roles Anywhere. We’ll also create a Profile, which specifies the IAM roles that can be assumed and what actions the temporary credentials allow.
Request and test temporary credentials - Finally, we’ll use the client certificate to request temporary AWS credentials via IAM Roles Anywhere. With those credentials, we’ll perform a few AWS API calls to validate everything is working as expected.
Walkthrough
The next sections will walk you through the steps necessary to setup your own private CA and IAM Roles Anywhere in AWS. The code and files needed for this blog post is available on GitHub. Feel free to clone the repository or manually copy the code to your local machine.
Step 1: Create Private CA
We’ll begin by setting up our own private Certificate Authority (CA). This involves generating a private key for the CA and then creating the CA certificate.
After cloning the repository mentioned earlier, navigate to the /certs directory. Inside, you’ll find two configuration files: rootCA.config and client.config. These files help streamline the process of generating keys and certificates.
Open a terminal and change into the /certs directory. Once you’re there, run the following commands to create your CA’s private key and self-signed certificate:
# Create the CA private key
openssl genrsa -out rootCA.key 4096

# Create the CA certificate using the private key and config file
openssl req -x509 -new -key rootCA.key -out rootCA.pem -days 3650 -config rootCA.config
After running these commands, you’ll see two new files in the /certs folder: rootCA.key (your CA’s private key) and rootCA.pem (the corresponding certificate).
Step 2: Create Client Certificate
With the private CA key and certificate now in place, the next step is to create the client key and certificate. Using the same terminal session as before, stay within the /certs directory and execute the following commands:
# Create the client private key
openssl genrsa -out client.key 4096

# Generate a Certificate Signing Request (CSR) using the client key
openssl req -new -key client.key -out client.csr -config client.config

# Sign the CSR with the CA to generate the client certificate
openssl x509 -req -in client.csr -CA rootCA.pem -CAkey rootCA.key -CAcreateserial -out client.pem -days 3650 -sha256 -extfile client.config -extensions v3_req

# Verify the client certificate against the CA
openssl verify -verbose -CAfile rootCA.pem client.pem
These commands perform the following steps:
Generate a private key for the client.
Create a Certificate Signing Request (CSR) using the client key and the client.config file.
Sign the CSR using your CA’s certificate and key, producing a valid client certificate.
Verify that the client certificate is correctly signed and trusted by your CA.
After completion, you’ll have a signed client certificate (client.pem) that can be used to request temporary credentials from IAM Roles Anywhere.
Step 3: Setup IAM Roles Anywhere
Next, we’ll deploy the IAM Roles Anywhere setup using Terraform. Navigate to the root directory of the repository you cloned from GitHub—you should find the Terraform configuration files there.
The Terraform setup will create the following AWS resources:
An IAM Roles Anywhere Trust Anchor, using your private CA certificate
An IAM Roles Anywhere Profile
An IAM Role with full Amazon S3 access
For the IAM Role to be assumable via IAM Roles Anywhere, it must include the following Trust Policy:
{
    "Version": "2012-10-17",
    "Statement": [
        {
            "Effect": "Allow",
            "Principal": {
                "Service": [
                    "rolesanywhere.amazonaws.com"
                ]
            },
            "Action": [
              "sts:AssumeRole",
              "sts:TagSession",
              "sts:SetSourceIdentity"
            ]
        }
    ]
}
To deploy the resources, run the following Terraform commands from the project root:
terraform init
terraform apply
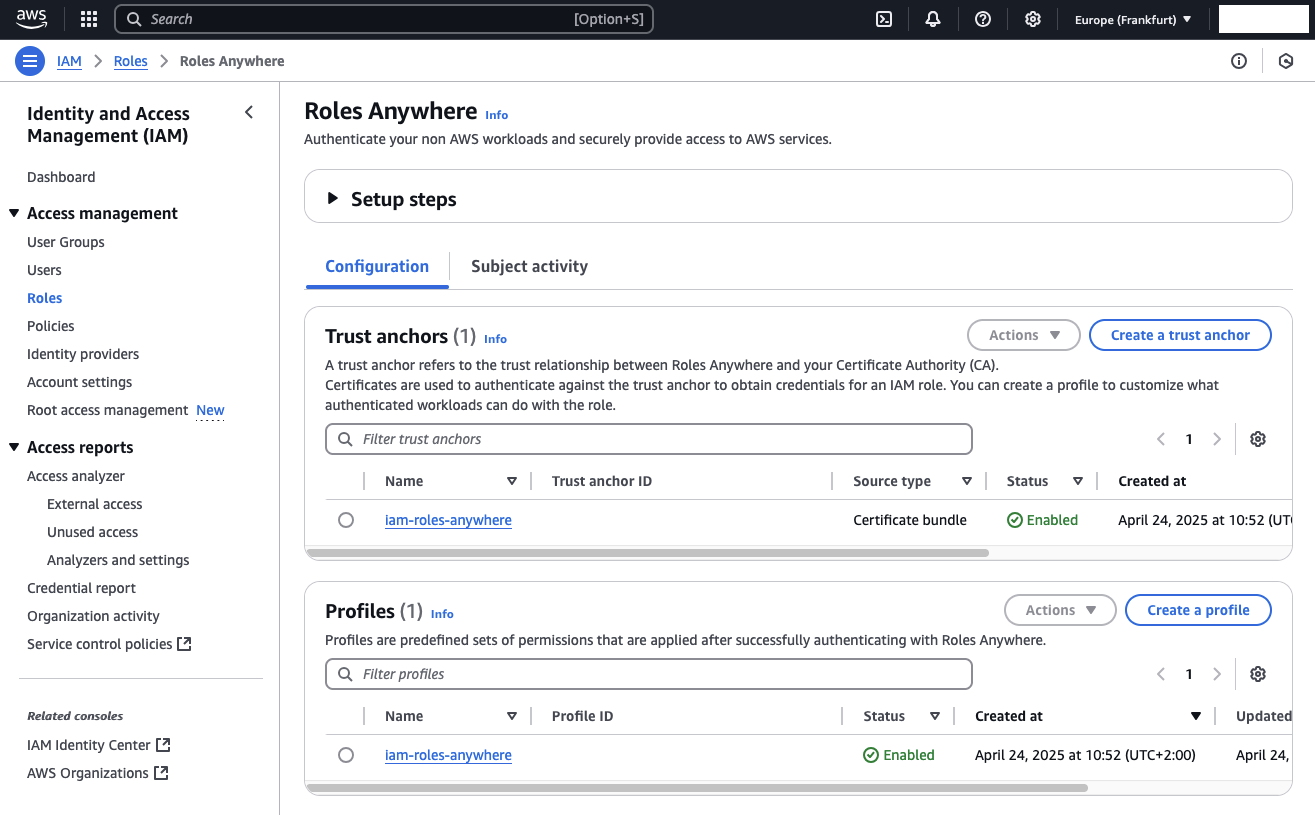
Once the deployment is complete, you can verify the setup in the AWS Management Console:
Navigate to IAM > Roles.
Scroll to the bottom of the sidebar and click on Manage under the IAM Roles Anywhere section.
You should see both the Trust Anchor and Profile listed and enabled, as created by Terraform
To confirm the IAM Role creation:
Go back to the Roles section in IAM.
Search for the role named iam-roles-anywhere.
Open the role and verify that it contains the correct Trust Policy and full access to Amazon S3.
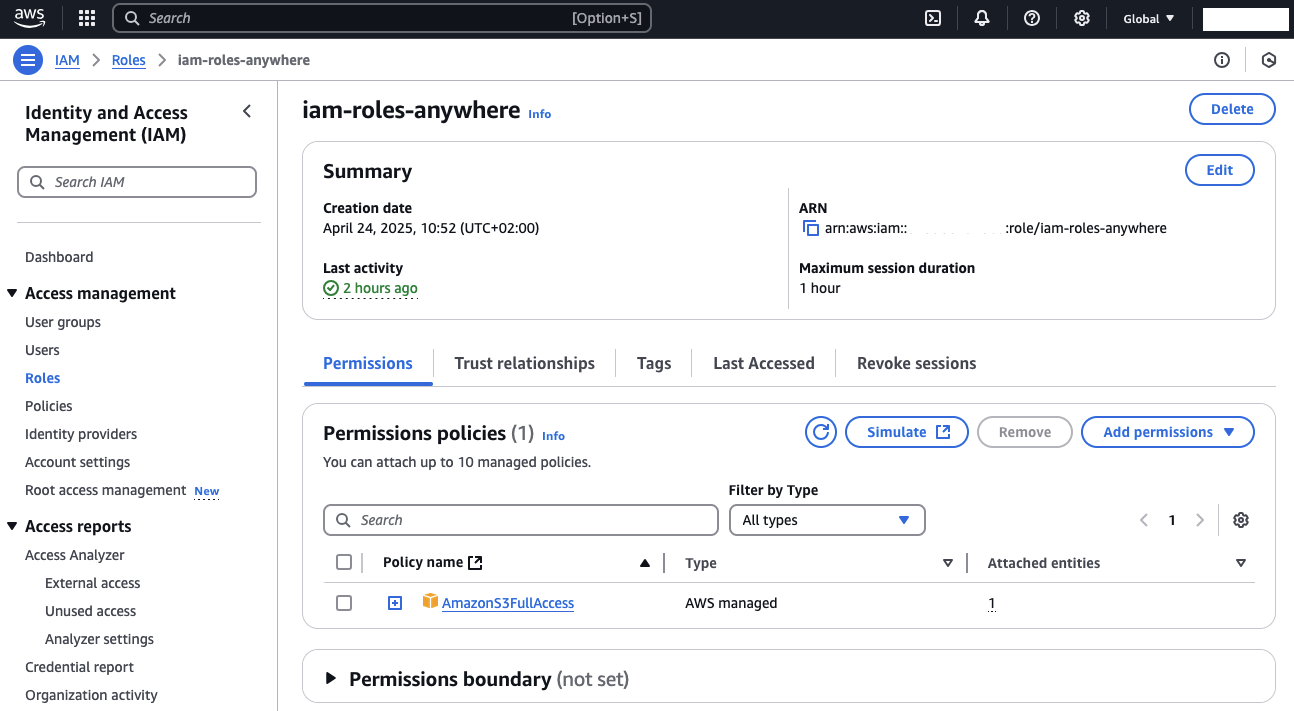
We’ll use this role’s S3 access later in the demo to validate the functionality of IAM Roles Anywhere.
Setp 4: Request Temporary AWS Credentials
Once the private CA, client certificate, and IAM Roles Anywhere are set up, the next step is to request temporary AWS credentials. To do this, we’ll use an AWS tool called the aws_singing_helper.
Download the aws_signing_helper for your operating system from the provided link.
If you’re using Linux or macOS, move the binary into the /certs directory.
Make the binary executable by running the following command:
chmod +x aws_signing_helper
Once the binary is ready, you can request temporary credentials from IAM Roles Anywhere using the client certificate. Replace the placeholders ROLESANYWHERE_TRUST_ANCHOR_ARN, ROLESANYWHERE_PROFILE_ARN, and IAM_ROLE_ARN with the corresponding Terraform output values (rolesanywhere_trust_anchor_arn, rolesanywhere_profile_arn, iam_role_arn). These values can also be retrieved from the AWS Console.
Execute the following command to request the temporary credentials:
# Request temporary credentials using aws_signing_helper
CREDENTIALS_JSON=$(./aws_signing_helper credential-process \
  --certificate client.pem \
  --private-key client.key \
  --trust-anchor-arn ROLESANYWHERE_TRUST_ANCHOR_ARN \
  --profile-arn ROLESANYWHERE_PROFILE_ARN \
  --role-arn IAM_ROLE_ARN)
To verify that the credentials have been successfully retrieved, run:
echo $CREDENTIALS_JSON
You should see a JSON output containing the following attributes:
AccessKeyId
SecretAccessKey
SessionToken
Now, we will extract these values and export them as environment variables for making AWS API calls. Run the following commands to set the environment variables:
export AWS_ACCESS_KEY_ID=$(echo $CREDENTIALS_JSON | jq -r '.AccessKeyId')
export AWS_SECRET_ACCESS_KEY=$(echo $CREDENTIALS_JSON | jq -r '.SecretAccessKey')
export AWS_SESSION_TOKEN=$(echo $CREDENTIALS_JSON | jq -r '.SessionToken')
With these environment variables set, you’re now ready to perform AWS API calls using the temporary credentials obtained via IAM Roles Anywhere.
Setp 5: Test AWS Credentials
The final step is to test the temporary AWS credentials we’ve obtained. You can run any AWS S3 CLI command to verify functionality. In this example, we’ll:
Create a new S3 bucket
List all buckets in the account
Delete the created S3 bucket
Use the following command to create a new S3 bucket. Replace BUCKET_NAME with your desired bucket name and AWS_REGION with the AWS region where you want the bucket to be created.
aws s3api create-bucket --bucket BUCKET_NAME -region=AWS_REGION --create-bucket-configuration LocationConstraint=AWS_REGION
To confirm the new bucket was created, run the following command to list all buckets in your account. The output should include your newly created bucket.
aws s3api list-buckets
To clean up, delete the bucket with the following command. Replace BUCKET_NAME with the name of the bucket you created.
aws s3api delete-bucket --bucket BUCKET_NAME
You can verify the bucket was deleted by listing the buckets again.
To ensure the IAM Role assigned to your temporary credentials has the correct permissions, let’s test an API call to a different AWS service. Since the role was configured with S3 access only, it should not allow operations on other services. Run the following command to list all VPCs in your account. Replace AWS_REGION with the region you want to check.
aws ec2 describe-vpcs -region=AWS_REGION
You should receive an error like the following:
An error occurred (UnauthorizedOperation) when calling the DescribeVpcs operation: You are not authorized to perform this operation. User: arn:aws:sts::xxxxxxxxxxxxxx:assumed-role/iam-roles-anywhere/xxxxxxxxxxxxxxx is not authorized to perform: ec2:DescribeVpcs because no identity-based policy allows the ec2:DescribeVpcs action
This confirms that the temporary credentials we received—along with the assumed role—are correctly restricted to S3, as expected.
This walkthrough ensures that the credentials you’ve obtained via IAM Roles Anywhere are functioning as intended, and it also verifies that the role permissions are properly scoped. Feel free to try more AWS S3 commands or other API calls to further test your configuration.
Step 6: Wrap Up
You’ve successfully set up IAM Roles Anywhere and used the temporary credentials to create AWS resources within your AWS account!
Feel free to continue experimenting with the current setup and explore additional use cases. When you’re done, remember to clean up your resources by running the following command in the cloned directory to tear down the infrastructure and avoid incurring any additional costs:
terraform destroy
This will remove all the resources you’ve created during this tutorial.
Summary
In this blog, we explored how to securely provide temporary AWS credentials to external workloads using AWS IAM Roles Anywhere. By leveraging your existing certificate authority and establishing trust with IAM, workloads running outside of AWS—such as on-premises servers and containers—can assume IAM roles without relying on long-term static credentials. This approach enhances security, reduces credential management overhead, and aligns external systems with AWS best practices for identity and access management. With IAM Roles Anywhere, you can confidently extend secure AWS access beyond the cloud.
I hope you enjoyed this example and learned something new. I look forward to your feedback and questions. For the complete example code, please visit my Github.
— Hendrik
Title Photo by Ronda Dorsey on Unsplash