
Building a transactional data lake using Lake Formation and Apache Iceberg Part 2
- Hendrik Hagen
- Aws
- February 16, 2025
Table of Contents
Introduction
Welcome to Part 2 of our series on building a transactional Data Lake using AWS LakeFormation and Apache Iceberg! In the first post, we laid the foundation for our Data Lake by setting up AWS LakeFormation and ingesting data from a source database with AWS Database Migration Service (DMS). This provided us with a scalable, reliable structure for storing raw data in S3.
In this post, we’ll take our Data Lake to the next level by focusing on the Extract, Load, and Transform (ELT) process using AWS Glue. ELT is essential for transforming raw data into a format that can be efficiently queried and analyzed. AWS Glue will help clean, organize, and transform the ingested data into Apache Iceberg tables, which are optimized for high-performance analytics.
Apache Iceberg provides a modern table format that enables schema evolution, time travel, and ACID transactions in our Data Lake, making it ideal for managing large, complex datasets. By the end of this post, you’ll have a deep understanding of how to use AWS Glue to create efficient Iceberg tables and how to transform raw data into structured, query-ready formats for downstream analytics.
This blog post is the second in a three-part series on building a transactional Data Lake using AWS LakeFormation and Apache Iceberg.
Part 1: “Building a transactional data lake using Lake Formation and Apache Iceberg Part 1” – We laid the foundation by setting up the Data Lake using AWS LakeFormation and ingesting data from a sample source database with AWS Database Migration Service (DMS).
Part 2 (This Post): We’ll expand the Data Lake by setting up ELT pipelines with AWS Glue. These jobs will clean and transform the raw ingested data into Iceberg tables, making it ready for downstream analytics.
Part 3: “Building a transactional data lake using Lake Formation and Apache Iceberg Part 3” – We’ll complete the series by integrating a Business Intelligence (BI) workload. This includes consolidating data stored in Iceberg tables and using it as the foundation for a QuickSight dashboard for visualization and insights.
Architecture
Before diving in, let’s take a moment to review the architecture we will be working with in this part of the series. As outlined earlier, the focus of this blog post is to define AWS Glue ETL jobs that will transform the raw data into Apache Iceberg tables—tables that are optimized for downstream workflows and high-performance analytics.
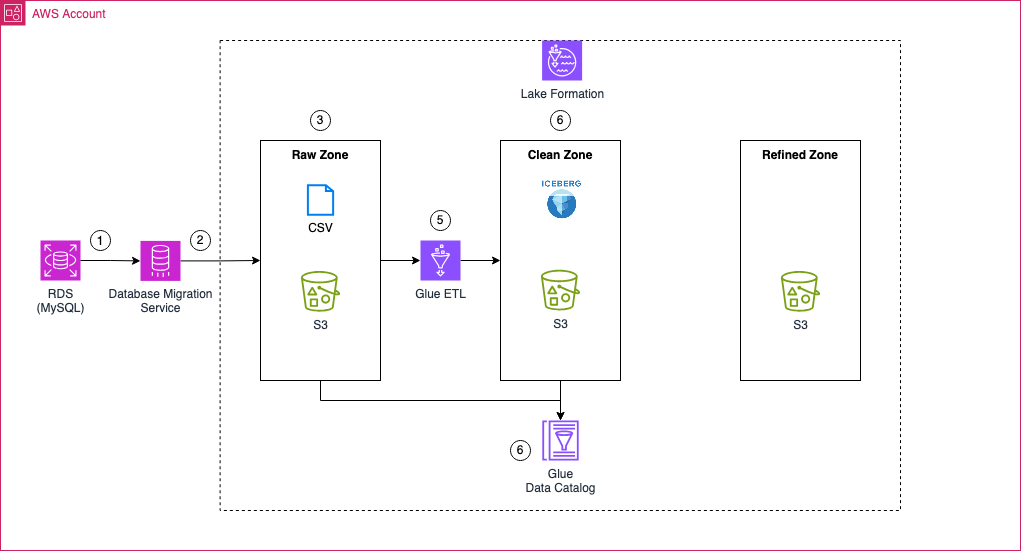
To achieve this, we’ll begin by creating multiple AWS Glue ETL jobs that will process the AWS DMS full load files as well as the change data capture (CDC) files. These jobs will be responsible for creating the initial Apache Iceberg tables and for making any adjustments as new data flows into the system.
Metadata for the Apache Iceberg tables, as well as data in the raw zone S3 bucket, will be managed and stored in the AWS Glue Data Catalog. This catalog serves as the metadata repository that keeps track of the structure and properties of the tables, making it easier to manage and query the data.
Once the transformation is complete, the clean zone S3 bucket will house the Apache Iceberg files. These tables will serve as the foundation for further data processing and analytics workloads.
Note
Steps 1 to 3 have already been completed in Part 1 of this series. You should have a fully functional AWS DMS ingestion pipeline in place. If not, please return to Part 1 and complete the prerequisite steps before proceeding.
ETL Workflow
To manage the ETL workflow, we’ll utilize an AWS Step Functions state machine. The Step Functions workflow will orchestrate the execution of AWS Glue ETL jobs and the invocation of an AWS Glue crawler to process the data contained in the raw zone. The following diagram illustrates the Step Functions workflow and its detailed steps:
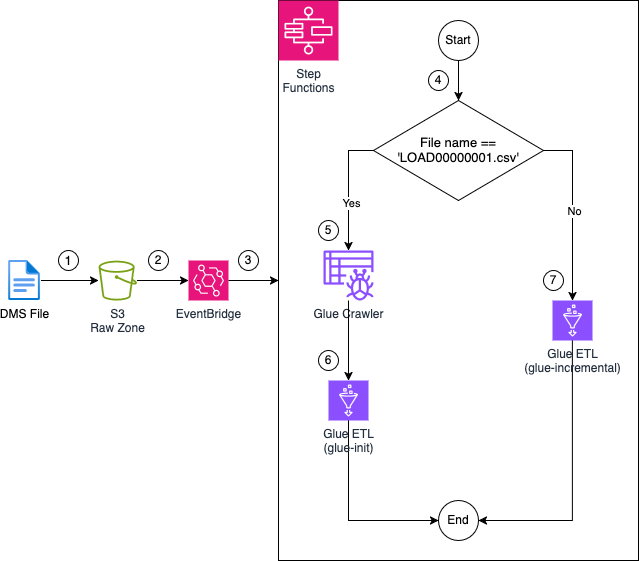
1: Files are uploaded to the Raw Zone S3 Bucket by AWS DMS. These files could be part of the initial full load or generated by the CDC process.
2: Upon upload, the files trigger an EventBridge rule that listens for Object Created events in the S3 bucket.
3: The EventBridge rule triggers an AWS Step Functions state machine. This state machine will orchestrate the entire AWS Glue ETL job workflow.
4: Once the state machine is triggered, a Choice state is evaluated. The choice state checks the name of the file that triggered the workflow. If the file is named LOAD00000001.csv, the state machine will follow the glue-init path, signifying an initial full load performed by AWS DMS. If the file has a different name, this indicates a CDC event, and the glue-incremental path will be triggered.
5: If the glue-init path is taken, an AWS Glue crawler is triggered. The crawler scans the files in the raw zone, creating a table in the AWS Glue Data Catalog.
6: Once the crawler finishes, the glue-init AWS Glue job is executed. This job uses the tables created by the Glue crawler to read and transform the raw data, creating the initial Apache Iceberg table in the Glue Data Catalog. The transformed data is then stored in the Clean Zone S3 Bucket.
7: If a CDC file triggers the workflow, the glue-incremental job is executed. This job reads the CDC file, updates the Apache Iceberg table in the Glue Data Catalog, and stores the transformed data in the Clean Zone S3 Bucket.
Bootstrap Environment
Note
The Terraform code in this example is not divided into multiple parts. Instead, deploying the Terraform configuration will provision all components required for Part 1, Part 2, and Part 3 of this blog series.
The environment should already be set up as part of Part 1 of this series. If not, please return to Part 1 and complete the prerequisite steps before proceeding. This includes setting up AWS DMS for data ingestion and ensuring the initial pipeline is operational. Once those steps are completed, you’ll be ready to continue with Part 2.
To avoid unnecessary costs, please ensure that you destroy the infrastructure once you have completed the deployment and testing.
Recap
As mentioned earlier, the infrastructure for all three parts of this blog series is deployed in one go. This includes the AWS StepFunctions state machine and the AWS Glue jobs used in Part 2. As a result, no additional infrastructure needs to be created in this section.
Additionally, multiple workflows have already been executed successfully due to the steps completed in Part 1. To recap, we initially created three tables — sales, book, and ustomer — in our database. We then inserted sample data into each table and performed a full load using AWS DMS. Afterward, we:
- Inserted a new record into the book table and updated an existing one.
- Performed a schema change by adding the publisher column to the book table.
- Inserted an additional record to reflect the schema changes into the book table.
At this point, you should have the following files in your data lake:
- bookstoredb/sales/LOAD00000001.csv – Full load file for the sales table.
- bookstoredb/book/LOAD00000001.csv – Full load file for the book table.
- bookstoredb/customer/LOAD00000001.csv – Full load file for the customer table.
- bookstoredb/book/TIMESTAMP_INSERT_UPDATE.csv – File generated when inserting and updating entries in the book table.
- bookstoredb/sales/TIMESTAMP_ALTER_TABLE_INSERT.csv – File generated when altering the book table and adding a new entry.
This means your data lake should contain five files in total.
Glue ETL Workflow
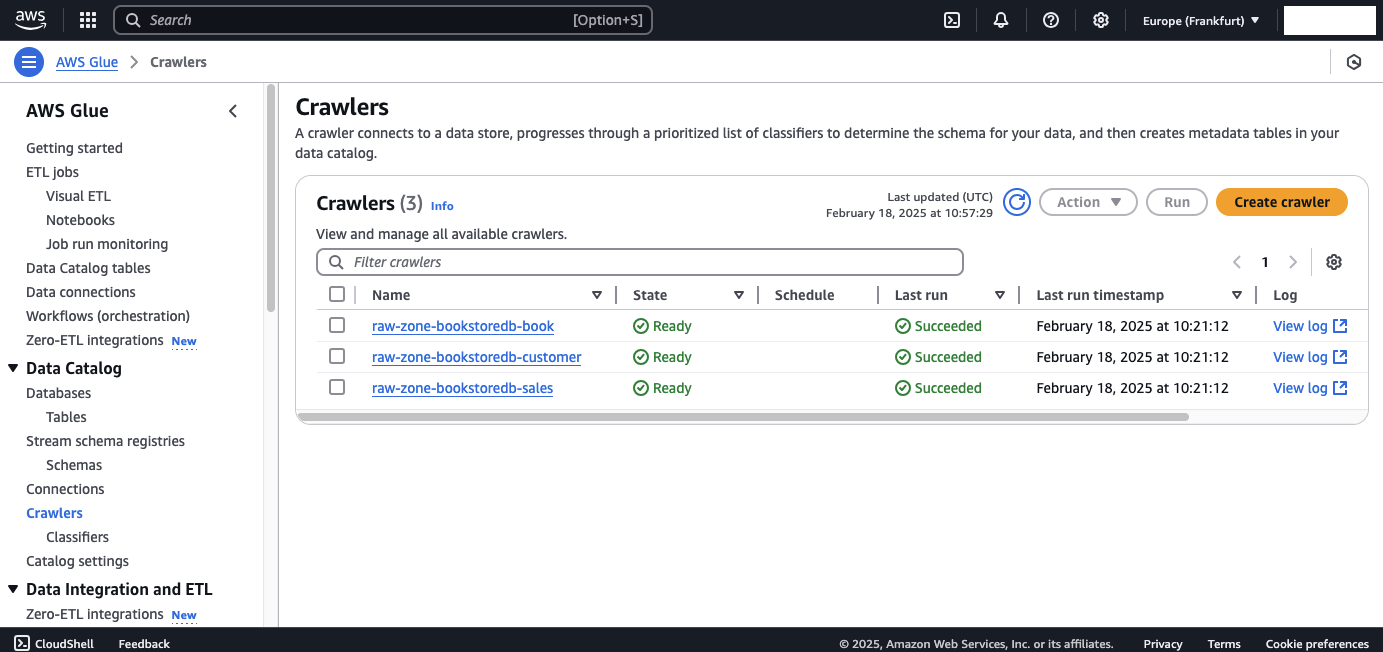
Now, let’s inspect the AWS Glue components to confirm they were triggered correctly. Each of the LOAD00000001.csv files should have triggered the AWS StepFunctions state machine, which in turn should have started the AWS Glue Crawlers to process the raw files.
Navigate to the AWS Glue console → Crawlers tab. You should see three crawlers, one for each table, that have successfully completed their runs. These crawlers were created during the initial setup in Part 1.
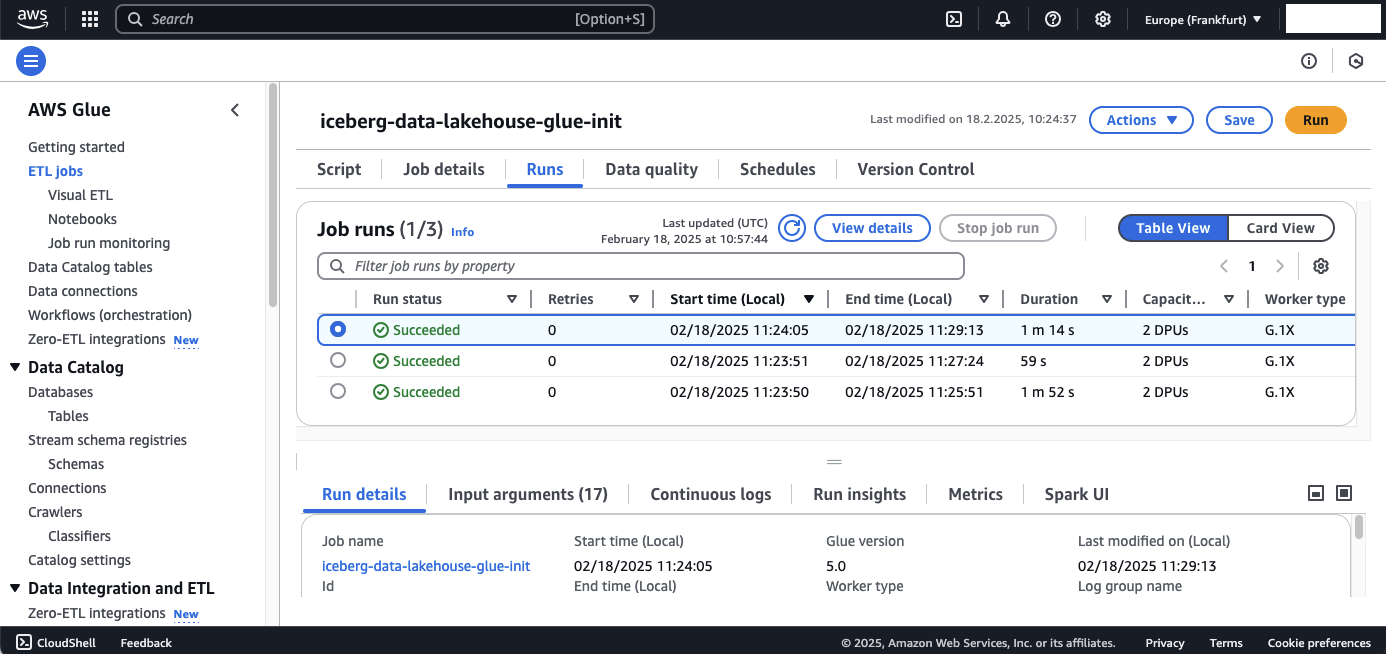
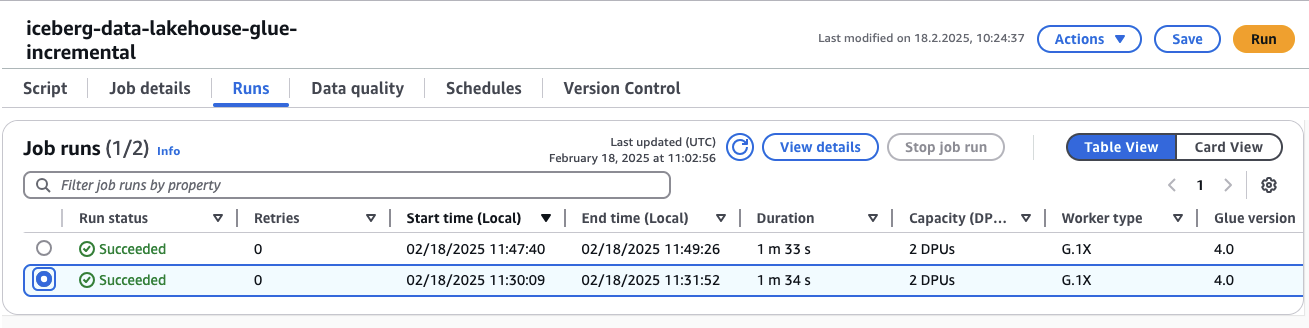
Once the crawlers have completed their runs, the glue-init job should be triggered. To check this, navigate to the AWS Glue console → Jobs tab and select the glue-init job. You should see that it has been executed three times—once for each LOAD00000001.csv file.
To better understand the workflow of the glue-init job, lets take a look at the code.
import sys
from awsglue.transforms import *
from awsglue.utils import getResolvedOptions
from pyspark.context import SparkContext
from pyspark.sql import SparkSession
from pyspark.sql.types import *
from awsglue.context import GlueContext
from awsglue.job import Job
from pyspark.sql.functions import col

args = getResolvedOptions(sys.argv, [
    'JOB_NAME',
    'raw_zone_bucket_name',
    'object_key',
    'source_database_name',
    'source_table_name',
    'source_file_name',
    'glue_database_name',
    'clean_zone_bucket_name',
    'catalog_name'
    ])

rawZoneBucketName = args['raw_zone_bucket_name']
objectKey = args['object_key']
sourceDatabaseName = args['source_database_name']
sourceTableName = args['source_table_name']
sourceFileName = args['source_file_name']
glueDatabaseName = args['glue_database_name']
cleanZoneBucketName = args['clean_zone_bucket_name']
catalog_name = args['catalog_name']

# Define Iceberg Table Name and Storage Location
tableSuffix = f"{sourceDatabaseName}_{sourceTableName}"
glueDataCatalogTableName = tableSuffix.lower()
icebergTableName = f"iceberg_{tableSuffix}"
icebergS3Location = f"s3://{cleanZoneBucketName}/{icebergTableName}/"

# Initialize Spark Session with Iceberg Catalog configuration
spark = SparkSession.builder \
    .config(f"spark.sql.catalog.{catalog_name}", "org.apache.iceberg.spark.SparkCatalog") \
    .config(f"spark.sql.catalog.{catalog_name}.warehouse", icebergS3Location) \
    .config(f"spark.sql.catalog.{catalog_name}.catalog-impl", "org.apache.iceberg.aws.glue.GlueCatalog") \
    .config(f"spark.sql.catalog.{catalog_name}.io-impl", "org.apache.iceberg.aws.s3.S3FileIO") \
    .config(f"spark.sql.extensions", "org.apache.iceberg.spark.extensions.IcebergSparkSessionExtensions") \
    .getOrCreate()

# Initialize Spark & Glue Context
sc = spark.sparkContext
glueContext = GlueContext(sc)
job = Job(glueContext)
job.init(args['JOB_NAME'], args)

# Read Source Table from Glue Data Catalog
InputDynamicFrameTable = glueContext.create_dynamic_frame.from_catalog(
    database=glueDatabaseName,
    table_name=glueDataCatalogTableName,
    transformation_ctx="InputDynamicFrameTable"
)

# Convert DynamicFrame to DataFrame
InputDynamicFrameTable_DF = InputDynamicFrameTable.toDF()

# Get Schema & Drop 'op' Column if Exists
schema = InputDynamicFrameTable_DF.schema
columns_to_keep = [field.name for field in schema if field.name != "op"]
final_DF = InputDynamicFrameTable_DF.select([col(c) for c in columns_to_keep])

# Convert `last_update_time` to Timestamp (If Exists)
if "last_update_time" in final_DF.columns:
    final_DF = final_DF.withColumn("last_update_time", col("last_update_time").cast("timestamp"))

# Register the DataFrame as a TempView
final_DF.createOrReplaceTempView("OutputDataFrameTable")

# Write the filtered data to an Iceberg table
create_table_query = f"""
    CREATE OR REPLACE TABLE {catalog_name}.`{glueDatabaseName}`.{icebergTableName}
    USING iceberg
    TBLPROPERTIES ("format-version"="2")
    AS SELECT * FROM OutputDataFrameTable;
    """

# Run the Spark SQL query
spark.sql(create_table_query)

#Update Table property to accept Schema Changes
spark.sql(f"""ALTER TABLE {catalog_name}.`{glueDatabaseName}`.{icebergTableName} SET TBLPROPERTIES (
                'write.spark.accept-any-schema'='true'
            )""")

job.commit()
Extracting Parameters
The script begins by retrieving runtime parameters passed when the AWS Glue job is triggered. These include:
- S3 Bucket Names (raw_zone_bucket_name, clean_zone_bucket_name) – Locations for raw and transformed data.
- Source Database & Table (source_database_name, source_table_name) – The original data source being processed.
- File Information (object_key, source_file_name) – Identifiers for the input data file.
- Glue Catalog Name (glue_database_name, catalog_name) – Used for managing metadata and table definitions.
This allows the script to dynamically process different datasets without hardcoded values.
Defining Iceberg Table Metadata
- The Iceberg table name and S3 storage location are dynamically generated based on the source database and table names.
- The script ensures the table follows Apache Iceberg’s transaction-based format for efficient query performance and schema evolution.
tableSuffix = f"{sourceDatabaseName}_{sourceTableName}"
glueDataCatalogTableName = tableSuffix.lower()
icebergTableName = f"iceberg_{tableSuffix}"
icebergS3Location = f"s3://{cleanZoneBucketName}/{icebergTableName}/"
Initializing Spark
The script sets up a Spark Session with Iceberg-specific configurations:
- Registers AWS Glue as the Iceberg Catalog, ensuring metadata is managed centrally.
- Enables S3-based storage for Iceberg tables to ensure efficient data retrieval.
- Loads Iceberg extensions to support advanced features like schema evolution and time travel.
spark = SparkSession.builder \
    .config(f"spark.sql.catalog.{catalog_name}", "org.apache.iceberg.spark.SparkCatalog") \
    .config(f"spark.sql.catalog.{catalog_name}.warehouse", icebergS3Location) \
    .config(f"spark.sql.catalog.{catalog_name}.catalog-impl", "org.apache.iceberg.aws.glue.GlueCatalog") \
    .config(f"spark.sql.catalog.{catalog_name}.io-impl", "org.apache.iceberg.aws.s3.S3FileIO") \
    .config(f"spark.sql.extensions", "org.apache.iceberg.spark.extensions.IcebergSparkSessionExtensions") \
    .getOrCreate()
Loading Raw Data from AWS Glue Catalog
The script retrieves the source data from AWS Glue Data Catalog, which was populated by AWS Glue Crawlers.
- DynamicFrame to DataFrame Conversion: AWS Glue’s DynamicFrame is converted into a Spark DataFrame for transformation.
InputDynamicFrameTable = glueContext.create_dynamic_frame.from_catalog(
    database=glueDatabaseName,
    table_name=glueDataCatalogTableName,
    transformation_ctx="InputDynamicFrameTable"
)

InputDynamicFrameTable_DF = InputDynamicFrameTable.toDF()
Data Transformation & Schema Adjustments
- Dropping Unnecessary Columns: The script removes the op column (if present), which typically tracks change data capture (CDC) operations (INSERT, UPDATE, DELETE).
schema = InputDynamicFrameTable_DF.schema
columns_to_keep = [field.name for field in schema if field.name != "op"]
final_DF = InputDynamicFrameTable_DF.select([col(c) for c in columns_to_keep])
- Casting Timestamp Columns: If the last_update_time column exists, it is explicitly converted to a timestamp format for consistency.
if "last_update_time" in final_DF.columns:
    final_DF = final_DF.withColumn("last_update_time", col("last_update_time").cast("timestamp"))
Writing Data to Apache Iceberg Table
The transformed data is written into an Iceberg table using Spark SQL.
- Creating a Temporary Table: The transformed DataFrame is registered as a temporary SQL table for easier manipulation.
- Creates or updates the Iceberg table in AWS Glue Data Catalog.
- Ensures ACID compliance and transactional consistency.
- Schema evolution is enabled by setting “format-version”=“2”, allowing updates without full table reprocessing.
final_DF.createOrReplaceTempView("OutputDataFrameTable")

create_table_query = f"""
    CREATE OR REPLACE TABLE {catalog_name}.`{glueDatabaseName}`.{icebergTableName}
    USING iceberg
    TBLPROPERTIES ("format-version"="2")
    AS SELECT * FROM OutputDataFrameTable;
"""
spark.sql(create_table_query)
Enabling Schema Evolution for Future Updates
Since Iceberg supports schema evolution, the script explicitly configures the table to accept schema changes dynamically. This prevents failures when new columns are added.
spark.sql(f"""ALTER TABLE {catalog_name}.`{glueDatabaseName}`.{icebergTableName} SET TBLPROPERTIES (
                'write.spark.accept-any-schema'='true'
            )""")
After the initial load and creation of Apache Iceberg tables, our inserts, updates, and schema changes should have triggered the glue-incremental job.
To verify this, go to the AWS Glue console and locate the glue-incremental job. You should see that it was triggered twice—once for the insert and update operations, and again for the schema alteration followed by the subsequent insert.
Now, let’s dive into the code to better understand how the glue-incremental job functions.
import sys
import boto3
from awsglue.utils import getResolvedOptions
from pyspark.sql import SparkSession
from pyspark.sql.functions import col
from awsglue.context import GlueContext
from awsglue.job import Job

# Parse input arguments from AWS Glue job
args = getResolvedOptions(sys.argv, [
    'JOB_NAME', 'raw_zone_bucket_name', 'object_key', 'source_database_name',
    'source_table_name', 'source_file_name', 'glue_database_name', 'clean_zone_bucket_name', 'catalog_name'
])

# Assign arguments to variables
rawZoneBucketName = args['raw_zone_bucket_name']
objectKey = args['object_key']
sourceDatabaseName = args['source_database_name']
sourceTableName = args['source_table_name']
sourceFileName = args['source_file_name']
glueDatabaseName = args['glue_database_name']
cleanZoneBucketName = args['clean_zone_bucket_name']
catalog_name = args['catalog_name']

# Define Iceberg table name and storage location
tableSuffix = f"{sourceDatabaseName}_{sourceTableName}"
icebergTableName = f"iceberg_{tableSuffix}"
icebergS3Location = f"s3://{cleanZoneBucketName}/{icebergTableName}/"

# Initialize Spark Session with Iceberg configurations

spark = SparkSession.builder \
    .config(f"spark.sql.catalog.{catalog_name}", "org.apache.iceberg.spark.SparkCatalog") \
    .config(f"spark.sql.catalog.{catalog_name}.warehouse", icebergS3Location) \
    .config(f"spark.sql.catalog.{catalog_name}.catalog-impl", "org.apache.iceberg.aws.glue.GlueCatalog") \
    .config(f"spark.sql.catalog.{catalog_name}.io-impl", "org.apache.iceberg.aws.s3.S3FileIO") \
    .config(f"spark.sql.extensions", "org.apache.iceberg.spark.extensions.IcebergSparkSessionExtensions") \
    .getOrCreate()

# Initialize Spark & Glue Context
sc = spark.sparkContext
glueContext = GlueContext(sc)
job = Job(glueContext)
job.init(args['JOB_NAME'], args)

# Read CSV file from S3 into a Spark DataFrame
csv_path = f"s3://{rawZoneBucketName}/{objectKey}"
input_df = spark.read.option("header", True).option("inferSchema", True).csv(csv_path)

# Ensure 'Op' column exists
if "Op" not in input_df.columns:
    raise ValueError("ERROR: The 'Op' column is missing. It is required for processing.")

# Extract primary key (assumed to be the first column after 'Op')
primary_key_column = input_df.columns[1]

# Retrieve the existing schema from Iceberg
existing_schema_df = spark.sql(f"DESCRIBE {catalog_name}.{glueDatabaseName}.{icebergTableName}")

# Filter out invalid rows (empty or comments)
existing_schema_df_clean = existing_schema_df.filter(
    (existing_schema_df["col_name"] != "") &
    (~existing_schema_df["col_name"].startswith("#")) &
    (existing_schema_df["data_type"] != "")
)

# Get valid column names and types
existing_columns = set(existing_schema_df_clean.select("col_name").rdd.flatMap(lambda x: x).collect())
existing_schema_dict = dict(existing_schema_df_clean.select("col_name", "data_type").rdd.map(lambda row: (row[0], row[1])).collect())

# Identify new columns that are in CSV but not in Iceberg
csv_schema = dict(input_df.dtypes)  # {col_name: data_type}
new_columns = {col: csv_schema[col] for col in csv_schema if col not in existing_columns and col != "Op"}

# Initialize merged schema dictionary
merged_schema_dict = existing_schema_dict.copy()
merged_columns = list(existing_columns)

# Dynamically add new columns to Iceberg if necessary
for new_col, data_type in new_columns.items():
    spark.sql(f"ALTER TABLE {catalog_name}.{glueDatabaseName}.{icebergTableName} ADD COLUMN {new_col} {data_type.upper()}")

    # Update the schema dictionary
    merged_schema_dict[new_col] = data_type.upper()
    merged_columns.append(new_col)

# Process each row sequentially
for row in input_df.collect():

    op_value = row['Op']
    # Remove the 'Op' field from the row (since it's no longer needed for SQL queries)
    row_data = {col: row[col] for col in row.asDict() if col != 'Op'}

    # Convert row dictionary to a single-row Spark DataFrame
    row_df = spark.createDataFrame([row_data])

    # Cast columns to match Iceberg schema
    for column_name, data_type in merged_schema_dict.items():
        if column_name in row_df.columns:
            row_df = row_df.withColumn(column_name, col(column_name).cast(data_type))

    # Create temporary table for this row
    row_df.createOrReplaceTempView("single_row_table")

    # Dynamically generate INSERT column lists
    insert_columns = merged_columns

    insert_column_values = ""
    update_table_column_list = ""
    for column in insert_columns:

        if column in row_df.columns:
            update_table_column_list+="""target.{0}=source.{0},""".format(column)

        insert_column_values += """source.{0},""".format(column) if column in row_df.columns else "NULL,"

    merge_query = ""

    if op_value == 'D':
        merge_query = """
            MERGE INTO glue_catalog.{0}.{1} target
            USING single_row_table source
            ON {2}
            WHEN MATCHED
            THEN DELETE""".format(
                glueDatabaseName.lower(),  # Database name in lowercase
                icebergTableName.lower(),  # Iceberg table name in lowercase
                primary_key_column,  # Condition for matching
                update_table_column_list.rstrip(","),  # Update columns
                ",".join(insert_columns),  # Insert column names
                insert_column_values.rstrip(",")  # Insert column values
            )

    elif op_value in ['I', 'U']:
        merge_query = """
            MERGE INTO glue_catalog.{0}.{1} target
            USING single_row_table source
            ON target.{2} = source.{2}
            WHEN MATCHED
            THEN UPDATE SET {3}
            WHEN NOT MATCHED THEN INSERT ({4}) VALUES ({5})""".format(
            glueDatabaseName.lower(),  # Database name in lowercase
            icebergTableName.lower(),  # Iceberg table name in lowercase
            primary_key_column,  # Condition for matching
            update_table_column_list.rstrip(","),  # Update columns
            ",".join(insert_columns),  # Insert column names
            insert_column_values.rstrip(",")  # Insert column values
        )

    spark.sql(merge_query)
    job.commit()
Extracting Parameters
At the start, the script retrieves runtime parameters, allowing for dynamic execution. These parameters define:
- S3 locations (raw_zone_bucket_name, clean_zone_bucket_name) – Where raw and transformed data reside.
- Database & Table Names (source_database_name, source_table_name, glue_database_name) – Used to locate and manage data.
- Object Identifiers (object_key, source_file_name) – Identifies the source CSV file.
Defining Iceberg Table Metadata
- Table name is dynamically generated based on source database and table names.
- Storage location is set to an S3 bucket within the Clean Zone for structured storage.
tableSuffix = f"{sourceDatabaseName}_{sourceTableName}"
icebergTableName = f"iceberg_{tableSuffix}"
icebergS3Location = f"s3://{cleanZoneBucketName}/{icebergTableName}/"
Initializing Spark
Sets up Iceberg as the table format in AWS Glue, enabling:
- S3-backed Iceberg tables for optimized query performance.
- Schema evolution (auto-adding new columns dynamically).
- ACID compliance & time-travel queries using Iceberg’s catalog features.
spark = SparkSession.builder \
    .config(f"spark.sql.catalog.{catalog_name}", "org.apache.iceberg.spark.SparkCatalog") \
    .config(f"spark.sql.catalog.{catalog_name}.warehouse", icebergS3Location) \
    .config(f"spark.sql.catalog.{catalog_name}.catalog-impl", "org.apache.iceberg.aws.glue.GlueCatalog") \
    .config(f"spark.sql.catalog.{catalog_name}.io-impl", "org.apache.iceberg.aws.s3.S3FileIO") \
    .config(f"spark.sql.extensions", "org.apache.iceberg.spark.extensions.IcebergSparkSessionExtensions") \
    .getOrCreate()
Reading Raw Data from S3 (CSV Format)
- Reads a CSV file into a Spark DataFrame with inferred schema.
- Ensures the required Op column (tracking CDC operations) exists.
csv_path = f"s3://{rawZoneBucketName}/{objectKey}"
input_df = spark.read.option("header", True).option("inferSchema", True).csv(csv_path)

if "Op" not in input_df.columns:
    raise ValueError("ERROR: The 'Op' column is missing. It is required for processing.")
Retrieving Existing Schema from Iceberg Table
- Runs an Iceberg SQL query to fetch the existing table schema.
- Filters out invalid rows (empty or commented metadata).
- Extracts column names into existing_columns.
- Stores column data types in existing_schema_dict for validation.
- The first column after Op is assumed to be the primary key for matching records.
primary_key_column = input_df.columns[1]

existing_schema_df = spark.sql(f"DESCRIBE {catalog_name}.{glueDatabaseName}.{icebergTableName}")

existing_schema_df_clean = existing_schema_df.filter(
    (existing_schema_df["col_name"] != "") &
    (~existing_schema_df["col_name"].startswith("#")) &
    (existing_schema_df["data_type"] != "")
)

existing_columns = set(existing_schema_df_clean.select("col_name").rdd.flatMap(lambda x: x).collect())
existing_schema_dict = dict(existing_schema_df_clean.select("col_name", "data_type").rdd.map(lambda row: (row[0], row[1])).collect())
Handling Schema Evolution
- Compares CSV schema with Iceberg schema.
- Identifies new columns that need to be added.
- Dynamically adds missing columns without breaking queries.
csv_schema = dict(input_df.dtypes)
new_columns = {col: csv_schema[col] for col in csv_schema if col not in existing_columns and col != "Op"}

for new_col, data_type in new_columns.items():
    spark.sql(f"ALTER TABLE {catalog_name}.{glueDatabaseName}.{icebergTableName} ADD COLUMN {new_col} {data_type.upper()}")
Processing Each Row & Applying CDC Logic
- Iterates row-by-row to handle CDC operations.
- Converts each row into a temporary Spark DataFrame.
- Creates a temporary table for the current row.
- Generates dynamic SQL for merging the row into the Iceberg table.
# Process each row sequentially
for row in input_df.collect():

    op_value = row['Op']
    row_data = {col: row[col] for col in row.asDict() if col != 'Op'}

    row_df = spark.createDataFrame([row_data])

    for column_name, data_type in merged_schema_dict.items():
        if column_name in row_df.columns:
            row_df = row_df.withColumn(column_name, col(column_name).cast(data_type))

    row_df.createOrReplaceTempView("single_row_table")

    insert_columns = merged_columns

    insert_column_values = ""
    update_table_column_list = ""
    for column in insert_columns:

        if column in row_df.columns:
            update_table_column_list+="""target.{0}=source.{0},""".format(column)

        insert_column_values += """source.{0},""".format(column) if column in row_df.columns else "NULL,"
Generating Merge Query for CDC
- DELETE Operation: Removes the record if a match is found on the primary key.
- INSERT or UPDATE Operation: If a match is found, updates the row. If no match is found, inserts a new row.
merge_query = ""

if op_value == 'D':
        merge_query = """
            MERGE INTO glue_catalog.{0}.{1} target
            USING single_row_table source
            ON {2}
            WHEN MATCHED
            THEN DELETE""".format(
                glueDatabaseName.lower(),  # Database name in lowercase
                icebergTableName.lower(),  # Iceberg table name in lowercase
                primary_key_column,  # Condition for matching
                update_table_column_list.rstrip(","),  # Update columns
                ",".join(insert_columns),  # Insert column names
                insert_column_values.rstrip(",")  # Insert column values
            )

    elif op_value in ['I', 'U']:
        merge_query = """
            MERGE INTO glue_catalog.{0}.{1} target
            USING single_row_table source
            ON target.{2} = source.{2}
            WHEN MATCHED
            THEN UPDATE SET {3}
            WHEN NOT MATCHED THEN INSERT ({4}) VALUES ({5})""".format(
            glueDatabaseName.lower(),  # Database name in lowercase
            icebergTableName.lower(),  # Iceberg table name in lowercase
            primary_key_column,  # Condition for matching
            update_table_column_list.rstrip(","),  # Update columns
            ",".join(insert_columns),  # Insert column names
            insert_column_values.rstrip(",")  # Insert column values
        )

spark.sql(merge_query)
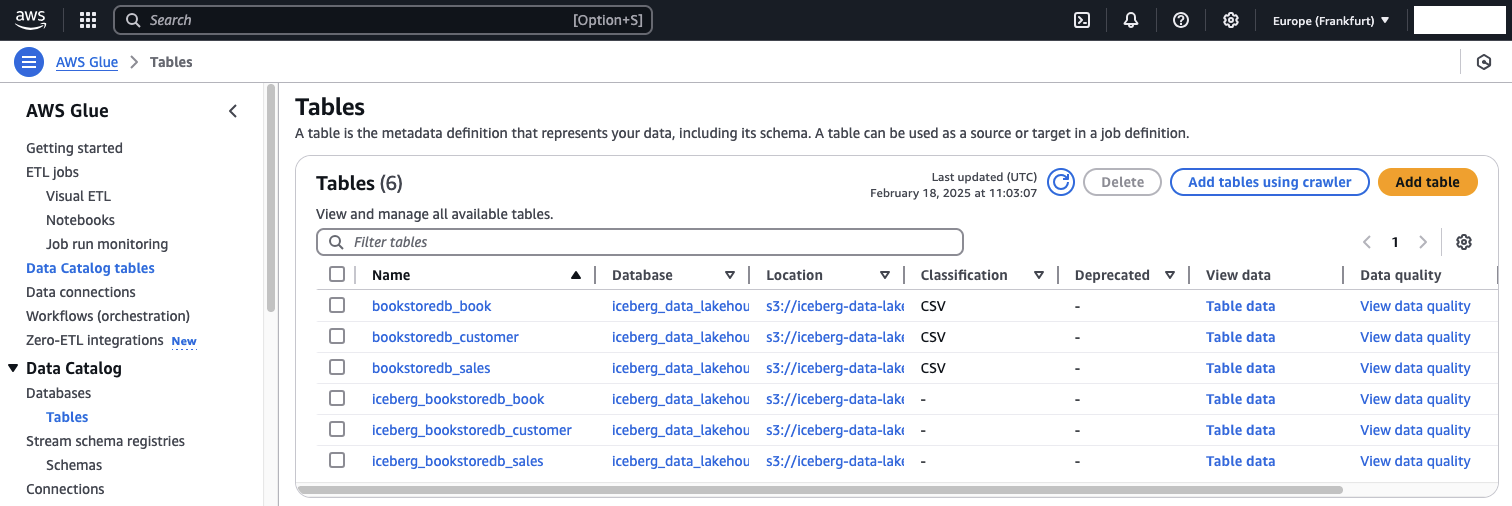
Now that both the glue-init and the glue-incremental job have run successfully, we will hcek the AWS Glue Data Catalog to see whether all tables have been successfully added. Navigate to the AWS Glue consolse and select Data catalgo tables. You should see that six tables have been created. Three tables for the raw data in the raw zone and three tables for each Apache Iceberg table.
Verify Data
As we conclude Part 2 of this series, we will perform a few data validation checks on the Apache Iceberg table created from the book table data. Specifically, we will verify that all records are present and explore Iceberg’s time travel functionality. AWS Athena will be used to run ad-hoc queries on our Glue Data Catalog.
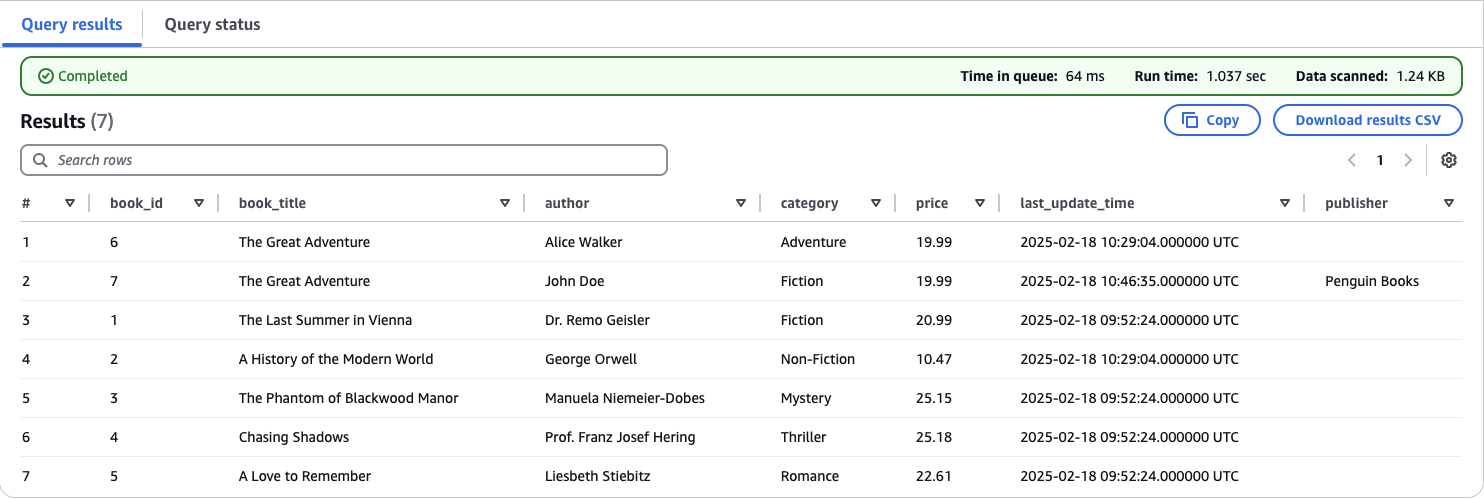
Navigate to the AWS Athena console. On the left-hand side, you should see all six tables currently in the Data Catalog. Select iceberg_bookstoredb_book and click Preview Table. Athena will generate a query and display the first 10 entries from the table. Since our table contains only seven records at this point, Athena should display all of them.
Compare the Athena output with your MySQL database —you should see that all records are correctly replicated. Notably, the last entry, where book_id = 7, includes a publisher.
Note
While the schema change has been successfully applied, existing records do not have the default value Unknown Publisher that was added in the MySQL database. This limitation occurs when using S3 as the target for AWS Database Migration Service (DMS).
Next, we will use Iceberg’s time travel functionality to view a previous version of the table—before updates, inserts, and schema changes were applied.
Replace the existing SQL query in Athena with the following:
SELECT * FROM "iceberg_data_lakehouse"."iceberg_bookstoredb_customer" FOR TIMESTAMP AS OF (current_timestamp - interval 'X' minute);
Replace X with the number of minutes you want to go back in time. This value depends on when you completed Part 1 of this series.
If chosen correctly, Athena will display the original Iceberg table. You will notice that the publisher column is missing, and no inserts or updates have been applied to the book table yet.

Feel free to repeat the steps for the customer and ales tables to complete the verification process. This ensures that all data is correctly ingested, transformed, and stored in the Iceberg tables, maintaining consistency across the dataset.
Summary
Congratulations on completing Part 2 of this three-part series! You’ve successfully set up the core components of the data lake, including Glue ETL jobs. You also validated that the Iceberg tables function as expected and explored the time travel feature to view different versions of the book table over time.
In Part 3, we’ll bring everything together by integrating a Business Intelligence (BI) workload. This will involve consolidating data stored in Iceberg tables and using it as the foundation for a QuickSight dashboard to gain visual insights.
I hope you enjoyed this example and learned something new. I look forward to your feedback and questions. For the complete example code, please visit my Github.
— Hendrik
Title Photo by Sophie Turner on Unsplash