
Building a transactional data lake using Lake Formation and Apache Iceberg Part 1
- Hendrik Hagen
- Aws
- February 15, 2025
Table of Contents
Introduction
In today’s data-driven world, effective data management is essential for organizations aim to make well-informed, strategic decisions. As the volume and complexity of data continue to grow, so does the need for robust data management practices. This involves ingesting, storing, organizing, and maintaining vast amounts of structured and unstructured data efficiently.
One approach that has emerged as the industry standard for scalable data storage, processing, and management is the Data Lake. But what exactly is a Data Lake? Simply put, a Data Lake is a centralized repository that allows organizations to store all their data—regardless of format or scale—without needing to structure it upfront. From business intelligence and analytics to IoT, machine learning, and AI workloads, Data Lakes provide the foundation for managing and analyzing data efficiently.
However, traditional Data Lakes come with significant challenges. They typically store data as files in distributed storage systems (e.g., Parquet, ORC, Avro on S3, HDFS, or ADLS), which lack built-in mechanisms for consistency when multiple processes read and write simultaneously. This can lead to data corruption, partial writes, and dirty reads, particularly in high-concurrency environments. Schema evolution is also a challenge—modifying a schema often requires reprocessing entire datasets, and engines relying on column positions rather than names can produce incorrect results. Additionally, data lakes struggle with transactional integrity, making rollbacks, versioning, and row-level updates difficult, expensive, or outright impractical.
To overcome these limitations, Apache Iceberg introduces a modern table format designed to bring ACID transactions, schema evolution, and time-travel capabilities to Data Lakes. With Iceberg, data management becomes more reliable, scalable, and efficient. It ensures atomic writes, concurrent updates without conflicts, and allows querying historical states without complex file operations. Furthermore, it enables efficient row-level updates and deletions—crucial for regulatory compliance, such as GDPR’s “right to be forgotten.”
In this blog, I’ll walk you through how to leverage AWS LakeFormation and Apache Iceberg to build a transactional Data Lake on S3. This solution enhances your Data Lake with features like ACID transactions, schema enforcement, and time travel—allowing you to run high-performance analytics queries that deliver consistent, up-to-date results.
This blog post is the first in a three-part series on building a transactional Data Lake using AWS LakeFormation and Apache Iceberg.
Part 1 (This Post): We’ll lay the foundation by setting up the Data Lake using AWS LakeFormation and ingesting data from a sample source database with AWS Database Migration Service (DMS).
Part 2: “Building a transactional data lake using Lake Formation and Apache Iceberg Part 2” – We’ll expand the Data Lake by setting up ELT pipelines with AWS Glue. These jobs will clean and transform the raw ingested data into Iceberg tables, making it ready for downstream analytics.
Part 3: “Building a transactional data lake using Lake Formation and Apache Iceberg Part 3” – We’ll complete the series by integrating a Business Intelligence (BI) workload. This includes consolidating data stored in Iceberg tables and using it as the foundation for a QuickSight dashboard for visualization and insights.
Overall Architecture
To begin, let’s explore the architecture we’ll deploy in this example. Our goal is to build a fully functional transactional Data Lake using AWS LakeFormation and Apache Iceberg.
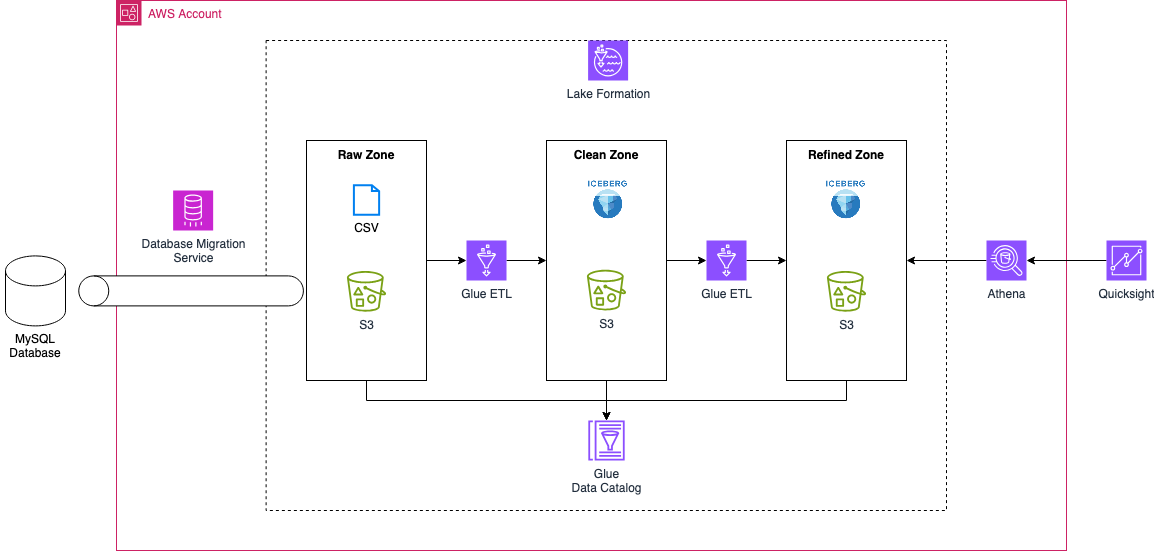
The overall architecture consists of three key components: ingestion, storage & processing, and consumption.
Data Ingestion
In this example, AWS Database Migration Service (DMS) handles data ingestion. DMS allows both homogeneous and heterogeneous database migrations and supports change data capture (CDC) to track ongoing changes after the initial migration. This enables continuous data replication from the source database to the Data Lake. We’ll use these capabilities to ingest data from a MySQL database into our Data Lake.
Storage & Processing
This is the core of our Data Lake architecture, which is divided into three storage tiers (zones):
Raw Zone – Stores unprocessed structured, semi-structured, and unstructured data.
Clean Zone – Holds processed and cleaned data in the Apache Iceberg format.
Refined Zone – Contains consolidated data from the Clean Zone, optimized for downstream workloads like Business Intelligence (BI) and analytics.
AWS Glue ETL jobs handle the movement and transformation of data across these zones, ensuring the data is properly cleaned and structured. AWS LakeFormation provides centralized governance, making it easier to manage access control and data sharing across the organization. Additionally, the AWS Glue Data Catalog functions as the metastore, maintaining metadata about our datasets and tables.
Data Consumption
The consumption layer in our architecture is designed for Business Intelligence (BI) workloads. We’ll use AWS QuickSight, in combination with AWS Athena, to build a BI dashboard that visualizes our ingested and processed data, enabling us to extract meaningful insights.
By structuring our architecture in this way, we create a scalable, governed, and high-performance transactional Data Lake that supports real-time analytics, machine learning, and BI use cases.
Ingestion Architecture
As outlined above, this blog post focuses on implementing the ingestion layer of our Data Lake. Our goal is to set up a fully functional AWS DMS pipeline that ingests data from a MySQL database into the Raw Zone of our Data Lake using either full load or change data capture (CDC).
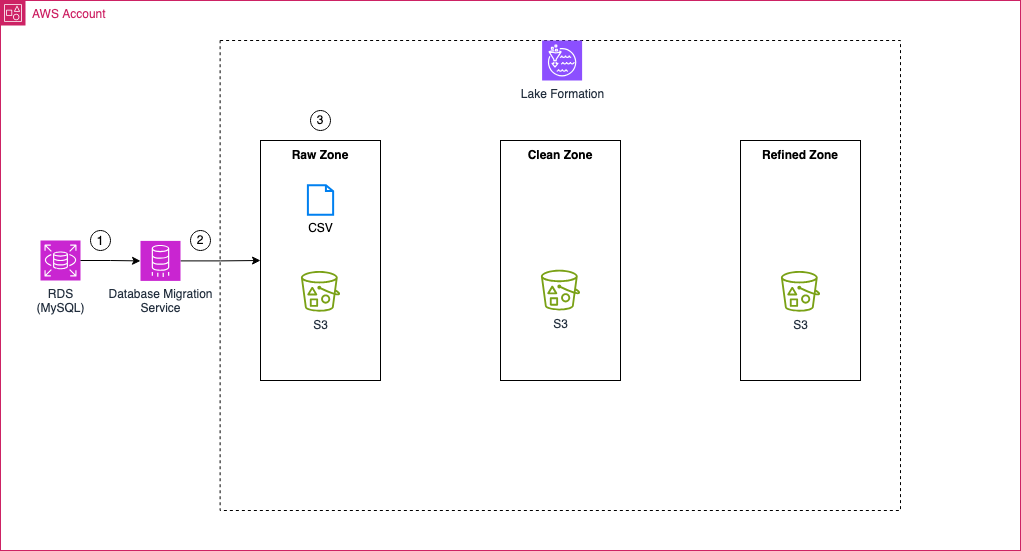
To achieve this, we will first create an RDS MySQL database that serves as our data source. We will set up multiple tables in this database and populate them with sample data. Once the source database is ready, we will configure a serverless AWS DMS job to migrate data from MySQL to an S3 bucket dedicated to the Raw Zone. The DMS pipeline will begin with a full load of all existing data and then enable Change Data Capture (CDC) to continuously replicate changes from the source database to S3. The output format for all data ingested via DMS will be CSV.
Once ingested, the raw data will reside in the Raw Zone S3 bucket, containing both the initial full load and all subsequent changes captured through CDC. This raw data will serve as the foundation for the next phase, where AWS Glue ETL jobs will transform the CSV files into Apache Iceberg tables, making them ready for further processing and analytics.
By the end of this post, we will have a fully operational data ingestion pipeline that continuously replicates changes from MySQL into our Data Lake, setting the stage for data transformation and analytics in the next part of this series.
Warning
For ease of use, the RDS database in this example is configured to be publicly accessible. However, this poses a significant security risk and should never be done in a real-world production environment. Always follow best practices by restricting access using VPC security groups, private subnets, and IAM roles to ensure the security of your database.
Bootstrap Environment
The code associated with this blog post is hosted on Github. Feel free to clone the repository or manually copy the code to your local machine. Within the provided directory, you’ll find the Terraform code to deploy the complete architecture detailed above.
Note
The Terraform code in this example is not divided into multiple parts. Instead, deploying the Terraform configuration will provision all components required for Part 1, Part 2, and Part 3 of this blog series.
To avoid unnecessary costs, please ensure that you destroy the infrastructure once you have completed the deployment and testing.
Before deploying the pipeline, you need to update a Terraform variable. Open the terraform.tfvars file, where you’ll find the following variables:
  application_name      = "iceberg-data-lakehouse"
  password_database     = "supersecretpassword"
  username_database     = "admin"
  initial_database_name = "bookstoredb"
  database_replication_structure = {
    bookstoredb = ["customer", "book", "sales"]
  }
  public_ip = "xxxxxxxxxxx/32"
The only variable that needs to be changed is public_ip. Replace xxxxxxxxxxx/32 with your public IP in CIDR notation**. This is necessary to allow access from your machine to the RDS database over the internet. We will use this access method later to create tables and insert sample data into the database.
Warning
You can modify password_database and username_database, but DO NOT change the other variables. Altering them will cause the example to no longer function correctly.
Once you’ve updated the variables, run terraform init to initialize the required Terraform providers, followed by terraform apply to deploy the infrastructure. This will set up the complete environment needed for the data lake, including AWS DMS, AWS LakeFormation, and Apache Iceberg integration.
Setup MySQL Database
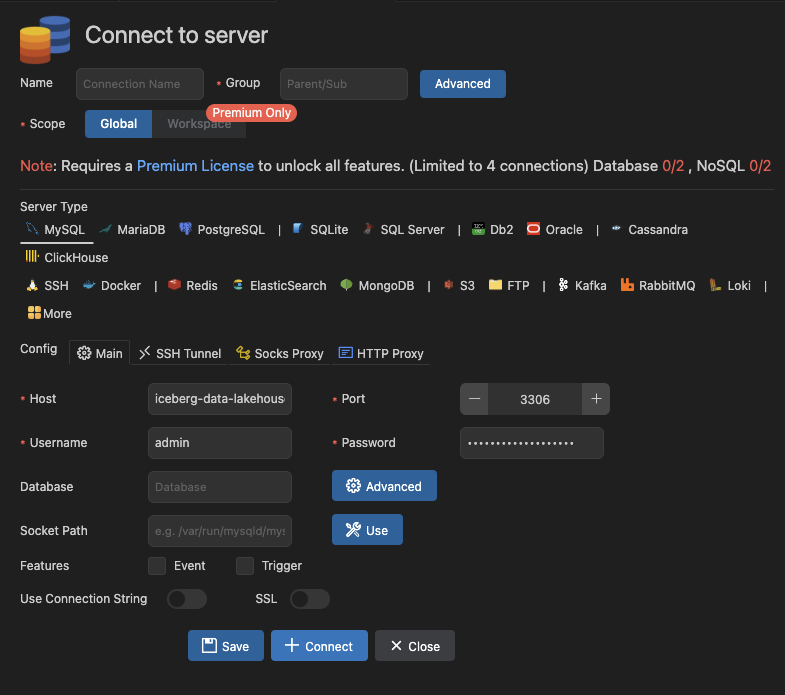
Before moving to the AWS Console to start the DMS task and perform the database migration, we first need to populate our database. For this example, we used the MySQL extension in VSCode, but feel free to use any tool of your choice. Click on Add Connection and enter the following values:
- Host: The endpoint of the RDS database, which can be found in the Terraform output under rds_endpoint
- Port: 3306
- Username: admin
- Password: supersecretpassword
Click + Connect to establish a connection to the RDS database.
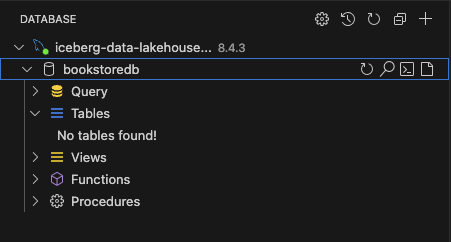
Once connected, you should see the bookstoredb database that has already been created.
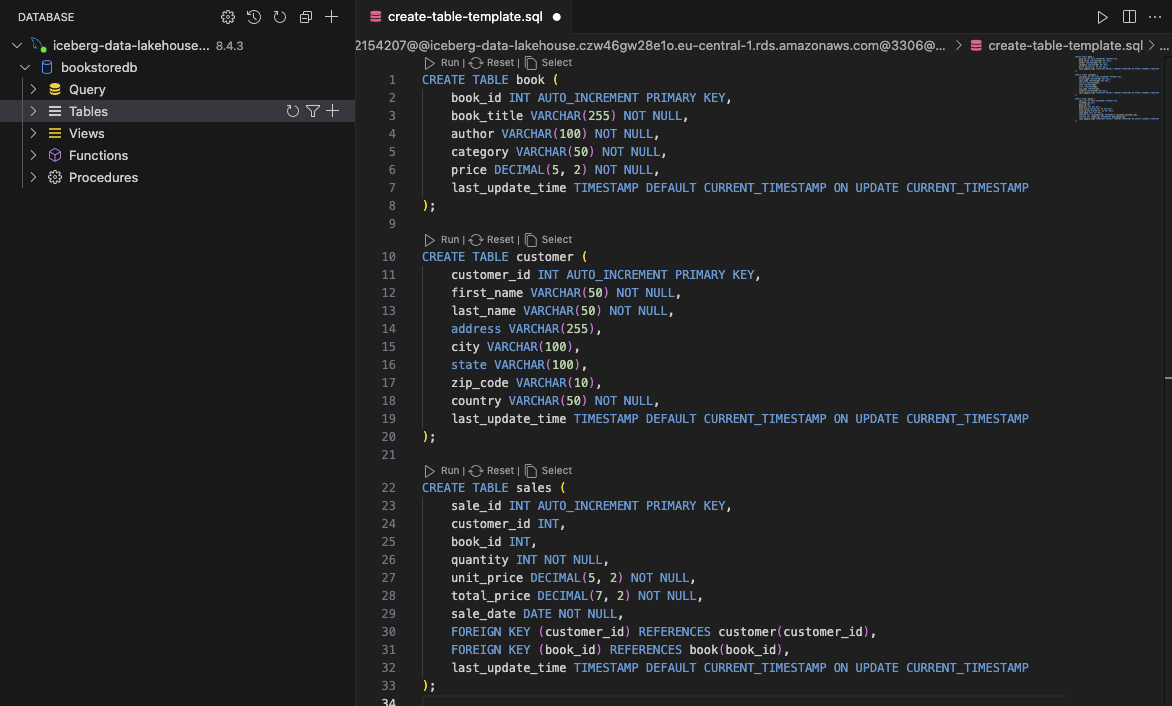
Next, we will create tables to simulate a bookstore. We need three tables: sales, book, and customer. Click on New Table next to Tables, then run the following SQL statements to create them:
CREATE TABLE book (
    book_id INT AUTO_INCREMENT PRIMARY KEY,
    book_title VARCHAR(255) NOT NULL,
    author VARCHAR(100) NOT NULL,
    category VARCHAR(50) NOT NULL,
    price DECIMAL(5, 2) NOT NULL,
    last_update_time TIMESTAMP DEFAULT CURRENT_TIMESTAMP ON UPDATE CURRENT_TIMESTAMP
);

CREATE TABLE customer (
    customer_id INT AUTO_INCREMENT PRIMARY KEY,
    first_name VARCHAR(50) NOT NULL,
    last_name VARCHAR(50) NOT NULL,
    address VARCHAR(255),
    city VARCHAR(100),
    state VARCHAR(100),
    zip_code VARCHAR(10),
    country VARCHAR(50) NOT NULL,
    last_update_time TIMESTAMP DEFAULT CURRENT_TIMESTAMP ON UPDATE CURRENT_TIMESTAMP
);

CREATE TABLE sales (
    sale_id INT AUTO_INCREMENT PRIMARY KEY,
    customer_id INT,
    book_id INT,
    quantity INT NOT NULL,
    unit_price DECIMAL(5, 2) NOT NULL,
    total_price DECIMAL(7, 2) NOT NULL,
    sale_date DATE NOT NULL,
    FOREIGN KEY (customer_id) REFERENCES customer(customer_id),
    FOREIGN KEY (book_id) REFERENCES book(book_id),
    last_update_time TIMESTAMP DEFAULT CURRENT_TIMESTAMP ON UPDATE CURRENT_TIMESTAMP
);
Note
All SQL statements are available in the src/sql folder.
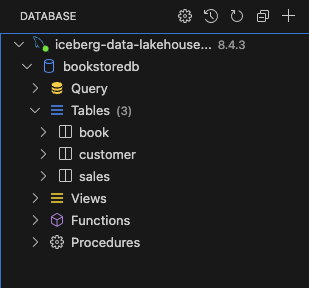
After executing these SQL statements, you should see the three newly created tables.
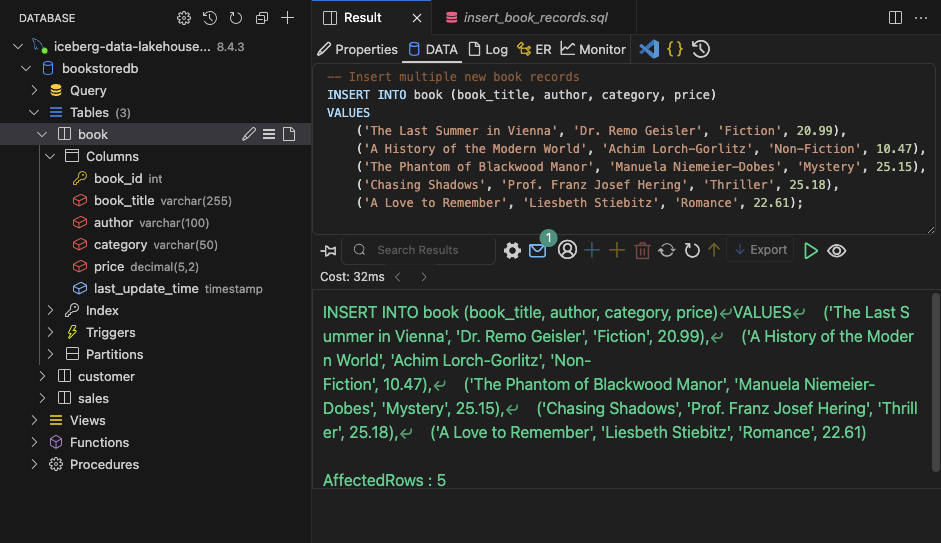
Next, we will populate the tables with sample data to simulate our data source and prepare for the first full load using AWS DMS. Run the following SQL statements to insert records into the sales, book, and customer tables:
-- Insert multiple new book records
INSERT INTO book (book_title, author, category, price)
VALUES
    ('The Last Summer in Vienna', 'Dr. Remo Geisler', 'Fiction', 20.99),
    ('A History of the Modern World', 'Achim Lorch-Gorlitz', 'Non-Fiction', 10.47),
    ('The Phantom of Blackwood Manor', 'Manuela Niemeier-Dobes', 'Mystery', 25.15),
    ('Chasing Shadows', 'Prof. Franz Josef Hering', 'Thriller', 25.18),
    ('A Love to Remember', 'Liesbeth Stiebitz', 'Romance', 22.61);


INSERT INTO customer (first_name, last_name, address, city, state, zip_code, country)
VALUES
('Christiane', 'Paffrath', 'Oskar-Freudenberger-Straße 879', 'Ahaus', 'Sachsen-Anhalt', '66145', 'Germany'),
('Arnold', 'Reuter', 'Monika-Neuschäfer-Weg 34', 'Celle', 'Bremen', '07985', 'Germany'),
('Louise', 'Beckmann', 'Zeki-Rörricht-Weg 1', 'Hersbruck', 'Sachsen', '52035', 'Germany'),
('Imke', 'Zimmer', 'Alexandre-Gertz-Ring 65', 'Merseburg', 'Saarland', '86968', 'Germany'),
('Anna-Luise', 'Gerlach', 'Ralf-Sölzer-Weg 0', 'Pritzwalk', 'Brandenburg', '18947', 'Germany');

-- Insert sales records without specifying sale_id (auto-incremented)
INSERT INTO sales (customer_id, book_id, quantity, unit_price, total_price, sale_date)
VALUES
    (1, 1, 2, 20.99, 41.98, '2024-08-11'),  -- Christiane Paffrath buys 2 copies of 'The Last Summer in Vienna'
    (2, 3, 1, 25.15, 25.15, '2024-11-06'),  -- Arnold Reuter buys 1 copy of 'The Phantom of Blackwood Manor'
    (3, 4, 3, 25.18, 75.54, '2024-09-01'),  -- Louise Beckmann buys 3 copies of 'Chasing Shadows'
    (4, 5, 1, 22.61, 22.61, '2024-08-15'),  -- Imke Zimmer buys 1 copy of 'A Love to Remember'
    (5, 2, 2, 10.47, 20.94, '2024-10-22'),  -- Anna-Luise Gerlach buys 2 copies of 'A History of the Modern World'
    (1, 4, 4, 25.18, 100.72, '2024-10-22'),  -- Christiane Paffrath buys 4 copies of 'Chasing Shadows'
    (2, 5, 3, 22.61, 67.83, '2024-08-10'),  -- Arnold Reuter buys 3 copies of 'A Love to Remember'
    (3, 1, 1, 20.99, 20.99, '2024-07-22'),  -- Louise Beckmann buys 1 copy of 'The Last Summer in Vienna'
    (4, 2, 2, 10.47, 20.94, '2024-09-10'),  -- Imke Zimmer buys 2 copies of 'A History of the Modern World'
    (5, 3, 1, 25.15, 25.15, '2024-08-30');  -- Anna-Luise Gerlach buys 1 copy of 'The Phantom of Blackwood Manor'
Note
For brevity, the following screenshots only show the process for the book table. Ensure you repeat these steps for all three tables.
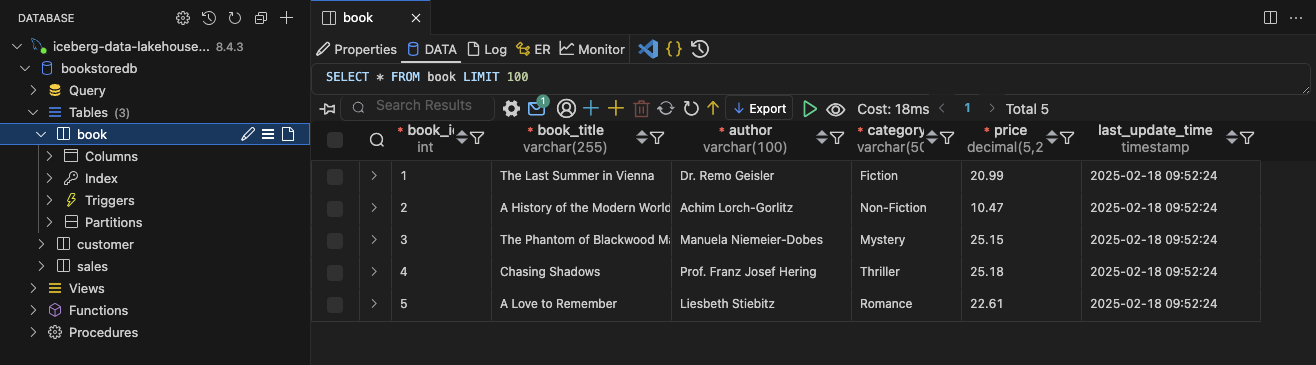
Once the data is inserted, you should have enough sample records to continue with the data lake demonstration.
Start Database Migration
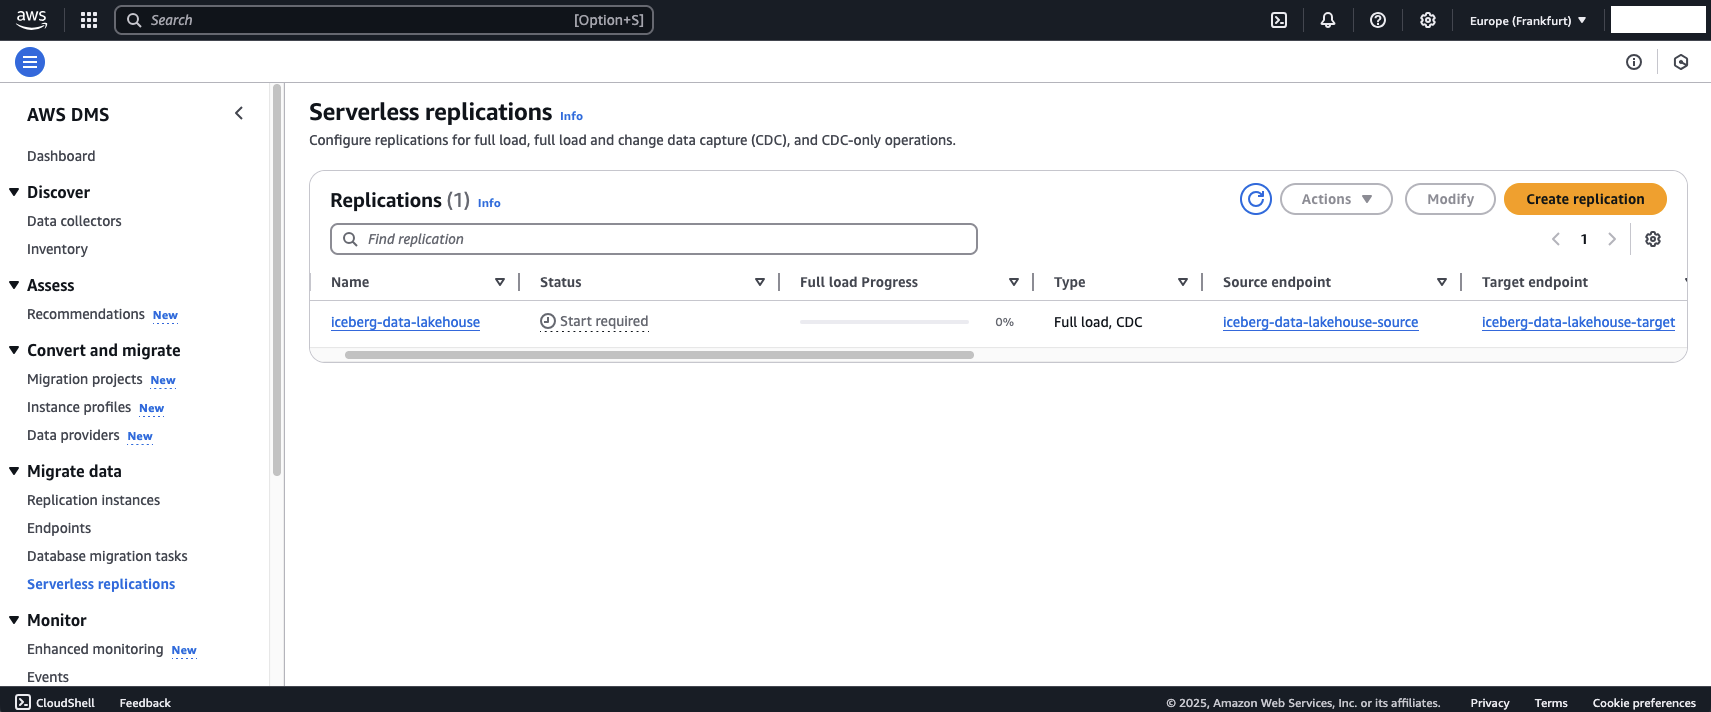
After having populated the RDS database for our example, login to the AWS console to perform the subsequent steps. Once in the AWS Console, navigate to the AWS DMS console. On the left menu select Serverless replications under Migrate data. Here you should find the AWS DMS Serverless Configuration deployed using Terraform. It is currently in a stopped state.
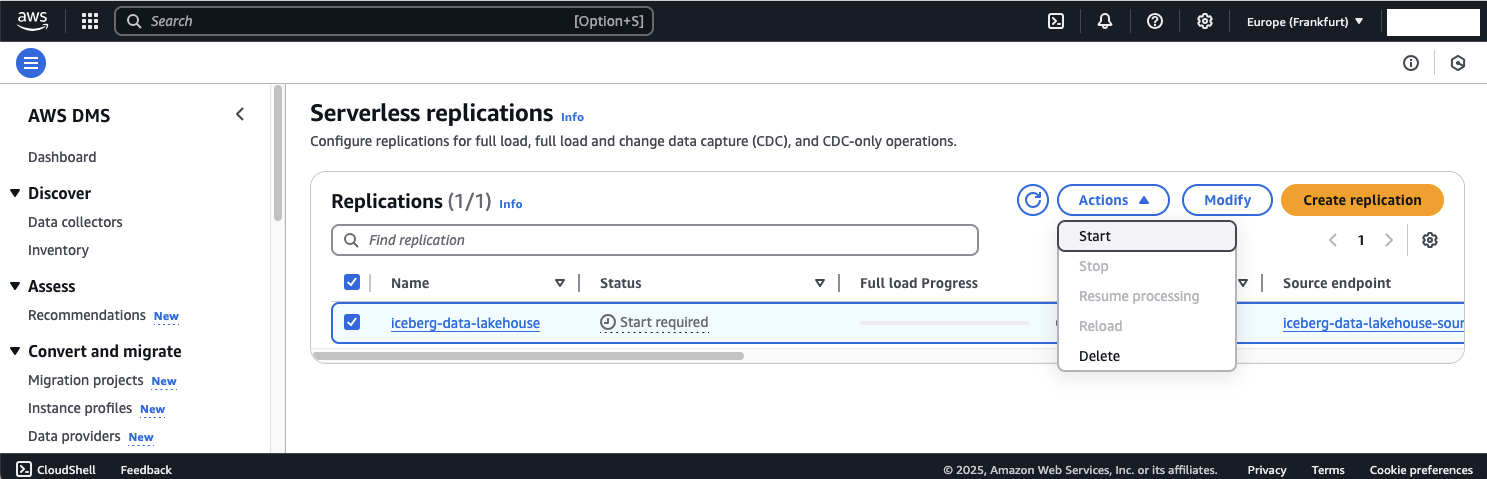
To start AWS DMS, select the configuration, click on Actions and select Start. Make sure to select Don’t stop CDC on the next window and click Start replication. DMS should launch.
Note
It can take up to 20min for DMS to start, connect to the endpoint, provision capacity, and perform the full load.
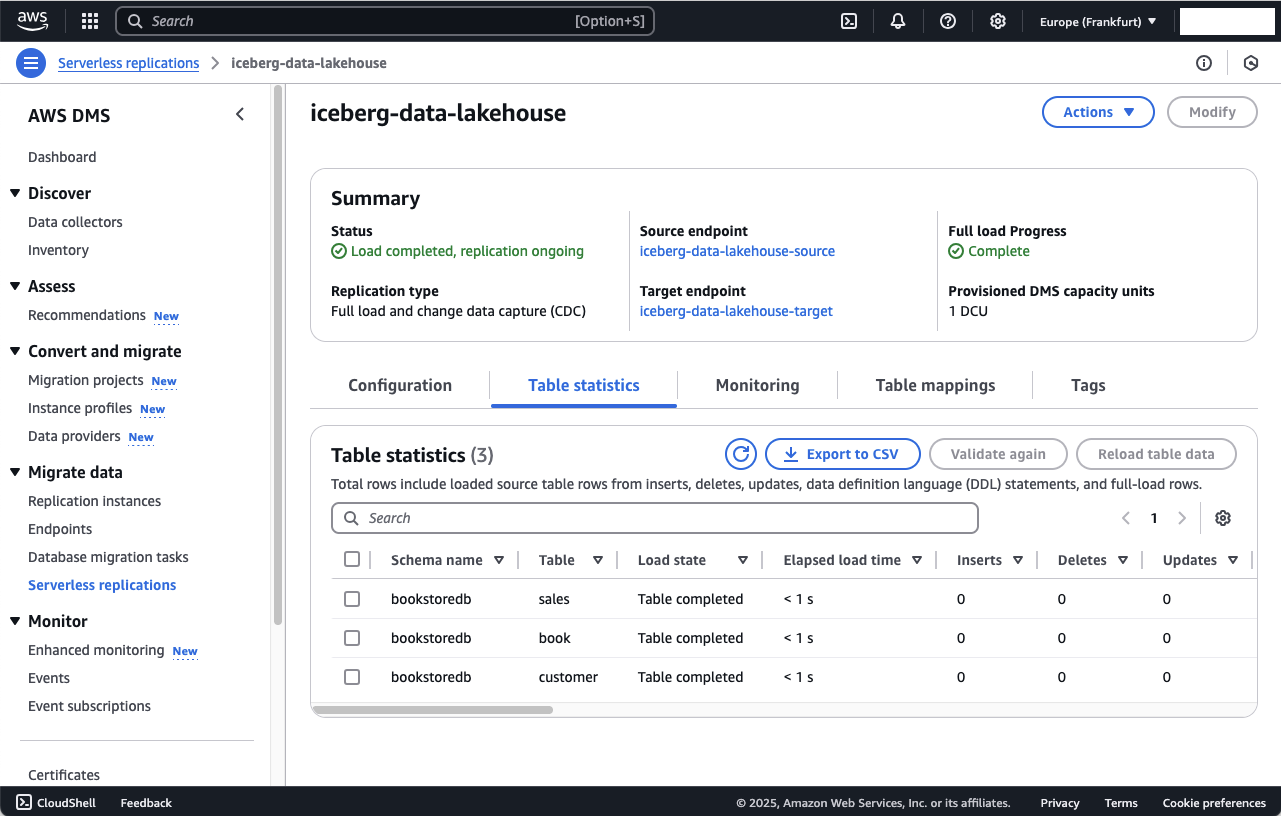
After DMS have completed the launch and performed the first full load, you can check the table settings in the configuration overview. You will see that all three tables have been recognized by DMS and been copied over to the Raw Zone S3 Bucket.
To double check, navigate to the S3 console and open the S3 Raw Zone Bucket. DMS will have added a prefix for the database - bookstoredb - as well as a prefix for the database table name. Inside these folders you will find a file called LOAD00000001.csv.
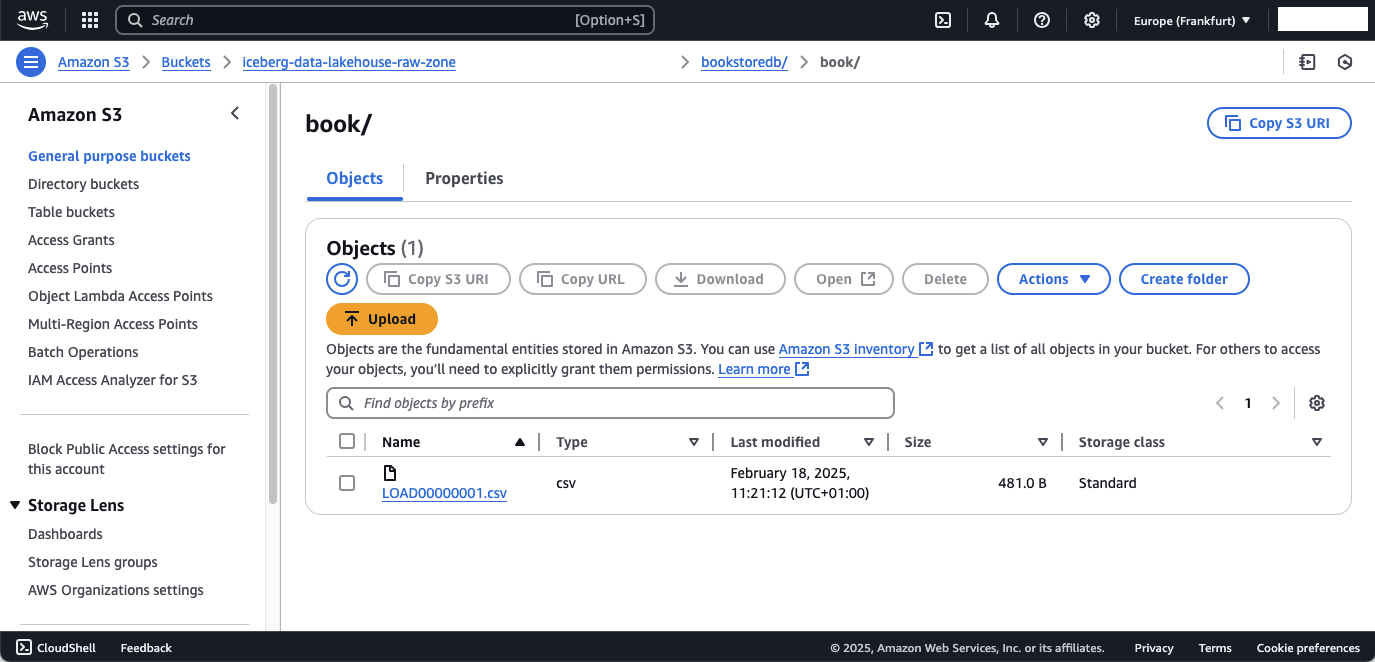
This csv file contains the records of the database tables. Feel free to download and open the file to evaluate the content. The csv content of the book table should look like this.
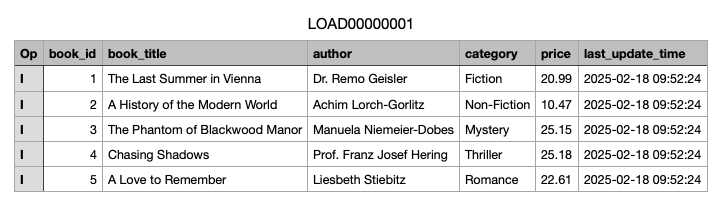
The extra column op is a column added by AWS DMS and describes the action that was performed on the data. We will use these values in part 2 of this blog series to update our Iceberg tables.
- I: Insert
- U: Update
- D: Delete
Exploring CDC
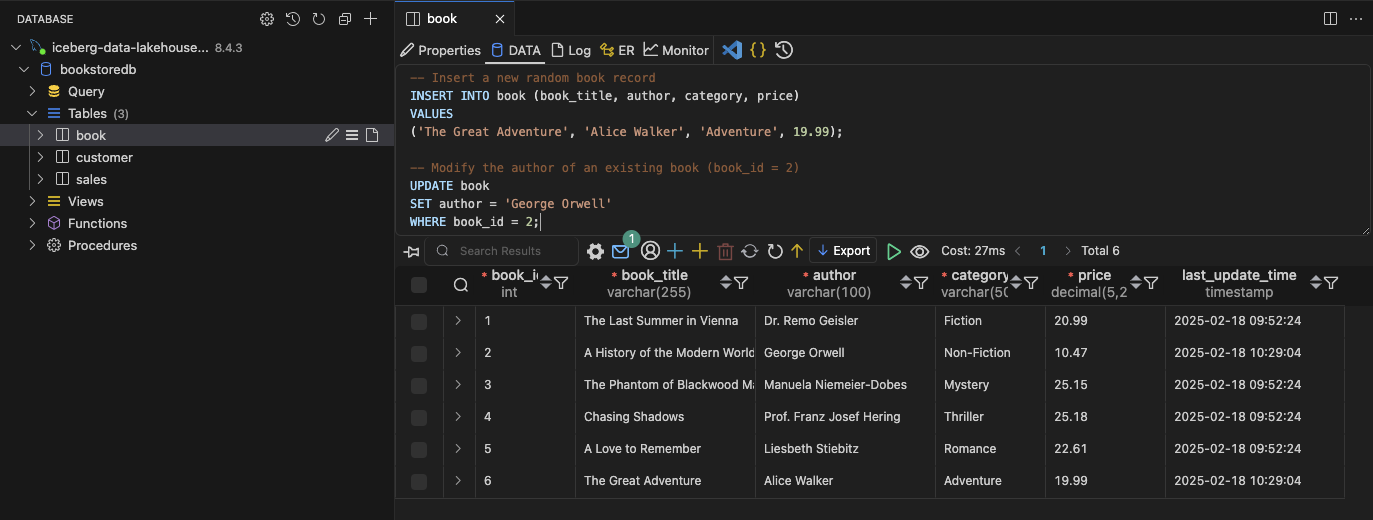
After confirming the successful completion of the full loads in our tables, it’s time to delve into the change data capture (CDC) aspect of our solution. CDC allows us to detect changes in our tables and replicate them to S3, ensuring that updates in the source database are reflected in the data lake in near real-time. Let’s return to our MySQL database and demonstrate the effects of inserting and updating records in the book table. Feel free to experiment with additional changes. Below are the SQL statements to insert a new record and update an existing one:
-- Insert a new random book record
INSERT INTO book (book_title, author, category, price)
VALUES
('The Great Adventure', 'Alice Walker', 'Adventure', 19.99);

-- Modify the author of an existing book (book_id = 2)
UPDATE book
SET author = 'George Orwell'
WHERE book_id = 2;
After executing these queries, you should see a new entry and an updated record.
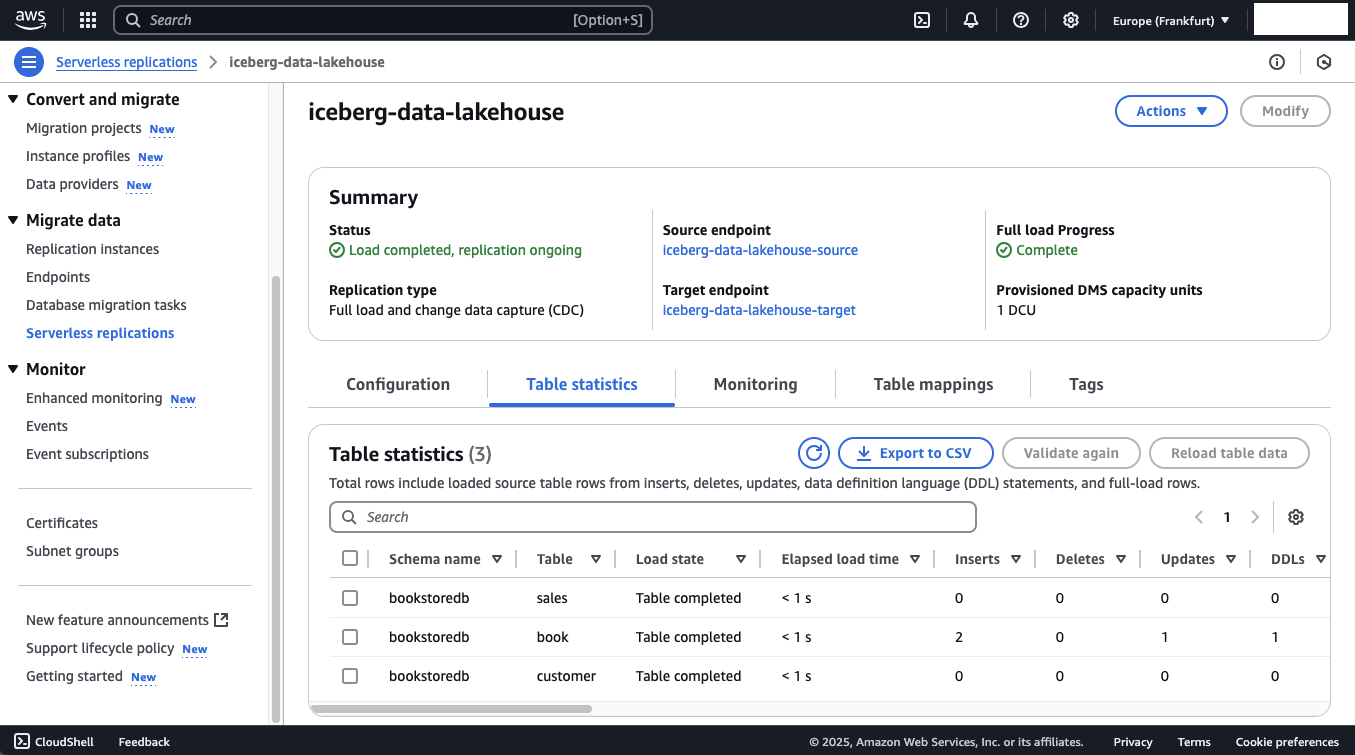
Now, head back to the AWS DMS console and open the Table statistics of the Serverless DMS configuration. You should see that DMS has detected both the insert and the update in the book table.
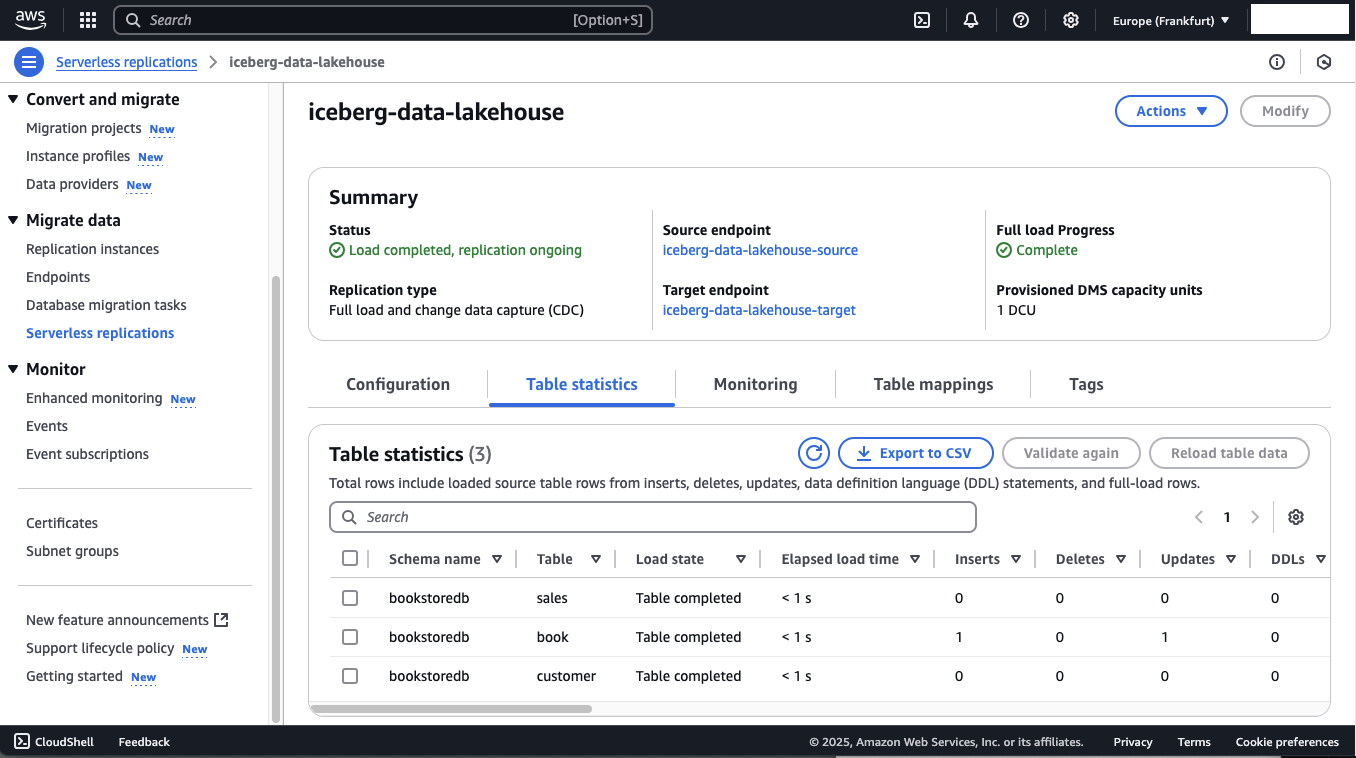
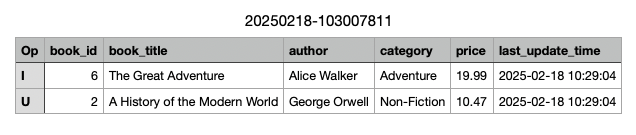
In the raw zone of your S3 Bucket, a change file should have been created. Unlike the full load file LOAD00000001.csv, CDC files are named using the date and timestamp of their creation, providing better traceability for changes.
The CSV file will include the changes made to the book table.
Schema Changes
In addition to inserting, updating, or deleting entries, you may also want to replicate schema changes, such as adding or removing columns in your database tables. Returning to the MySQL database, let’s use the book table as an example again. Feel free to modify the table further. To add a new column, publisher, run the following script:
ALTER TABLE book
ADD COLUMN publisher VARCHAR(150) NOT NULL DEFAULT 'Unknown Publisher';

INSERT INTO book (book_title, author, category, price, publisher)
VALUES ('The Great Adventure', 'John Doe', 'Fiction', 19.99, 'Penguin Books');
Note
When using S3 as a target in DMS, DDL statements (like ALTER) are detected, but not immediately replicated. To demonstrate the effect of the new column, we need to insert a record. Note that default values for existing entries are not replicated—this is a current limitation when using DMS with S3.
After running the query, you should see seven entries in your book table, along with the new publisher column.
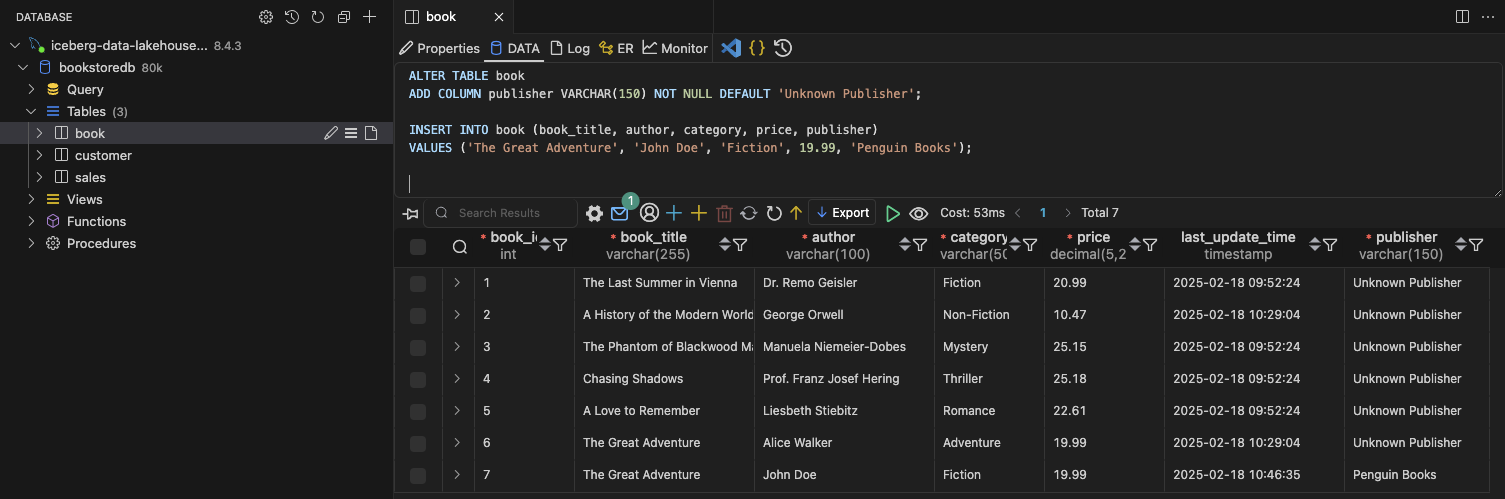
In DMS, schema changes like this are marked as DDL statements, while the new insert is categorized under Inserts.
A new CSV file should appear in the raw zone S3 Bucket, containing the data from the schema change.

Summary
Congratulations on completing Part 1 of this three-part series! You’ve successfully set up the AWS DMS ingestion pipeline, configured your MySQL database, and added sample data. You also inserted new records and enhanced the schema of your book table.
In Part 2, we will focus on the data storage and processing layer of the data lake. We’ll dive deeper into AWS Glue and explore how Apache Iceberg can improve your data lake management.
I hope you enjoyed this example and learned something new. I look forward to your feedback and questions. For the complete example code, please visit my Github.
— Hendrik
Title Photo by Sophie Turner on Unsplash