Serverless Jenkins on ECS Fargate: Part 2
- Hendrik Hagen
- Aws
- May 8, 2023
Table of Contents
Introduction
This is the second post of a three-post series.
In the first post Serverless Jenkins on ECS Part 1, we set up a Jenkins Controller with Terraform on AWS Fargate.
In the second post, we will expand the setup by adding a Jenkins Agent.
We will finish part three Serverless Jenkins on ECS Part 3 by customizing our Controller and Agent docker images and setup a deployment pipeline for Terraform using Jenkins Configuration as Code.
Note
Please be aware that this blog post won’t go into much detail regarding Jenkins itself. We will set up a Jenkins job to deploy Terraform configuration in part three of this series, but won’t do a deep dive into topics like plugin management, task configuration, and user management. For more information, please visit the official Jenkins website [https://www.jenkins.io/].
Architecture Review
Before we start the second part of this series, I would like to revisit part one and take a look at what we already build. The diagram below shows the components that were already deployed in part one as well as the infrastructure we will create in part two.
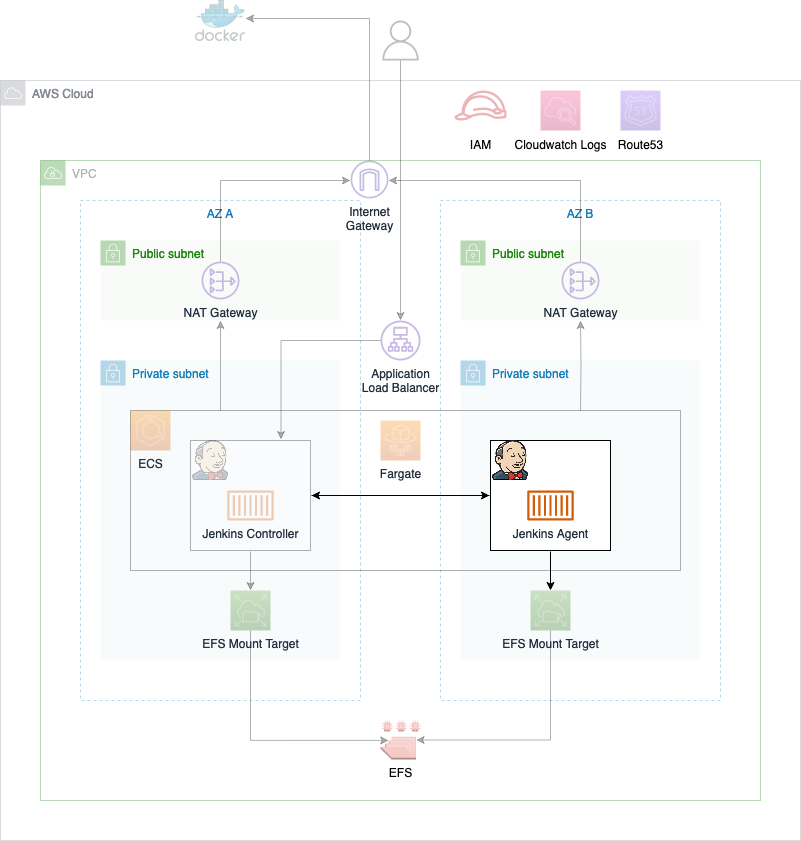
As you can see, most of the infrastructure has already been deployed. The only thing we will add in part two is the Jenkins Agent which runs on ECS.
Configure Jenkins Agent
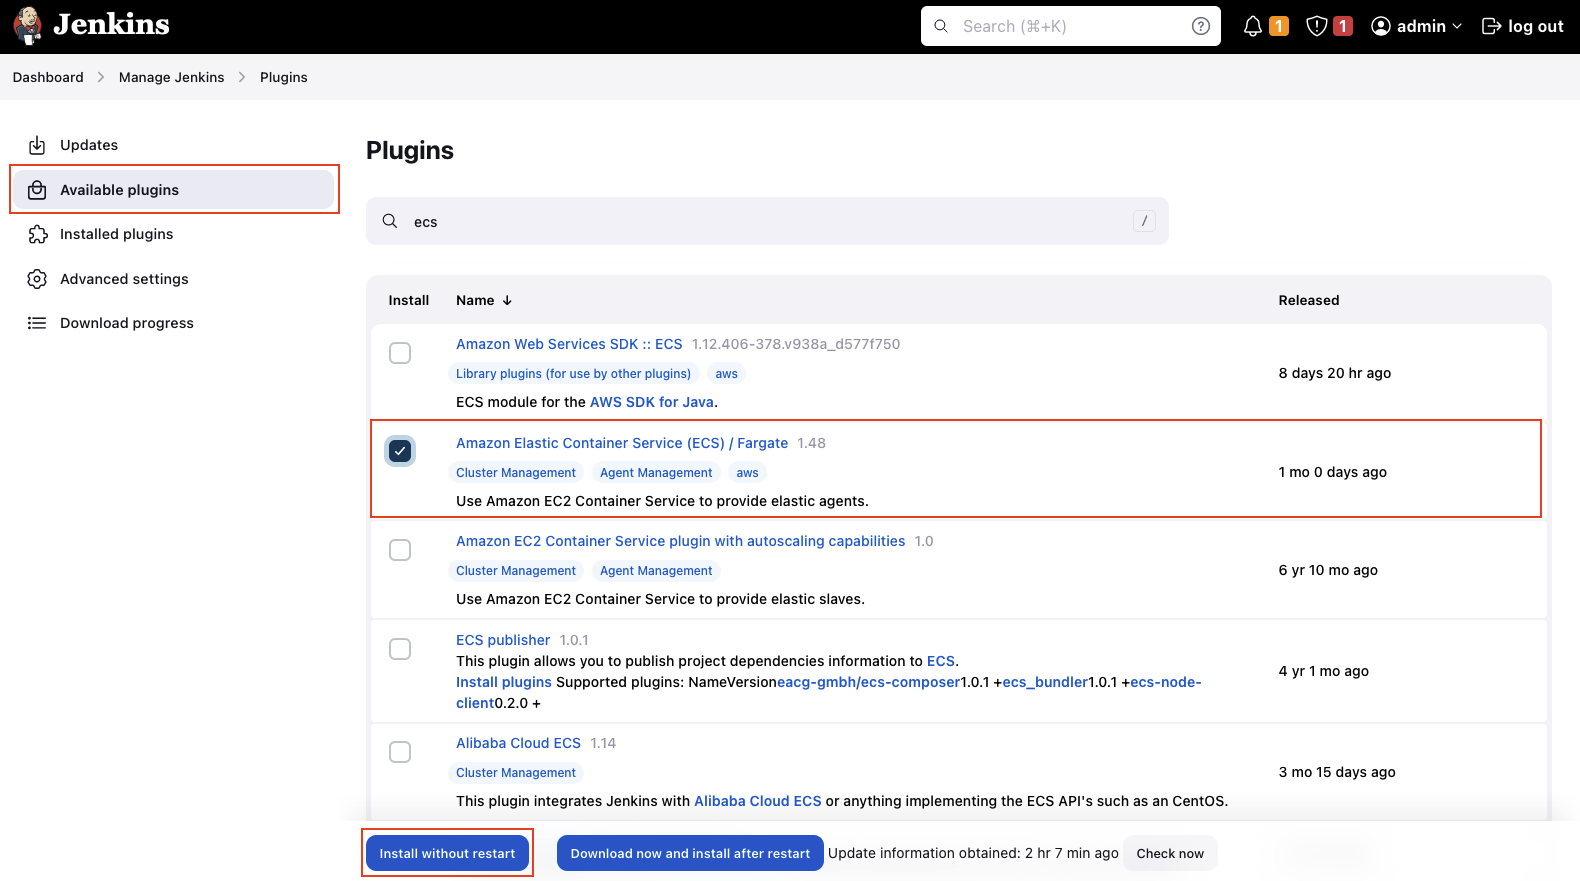
In the first part of this series, we set up the Jenkins Controller. We will continue by setting up the Jenkins Agent. Before we can configure a Jenkins Agent, we need to download a plugin to enable support for AWS ECS Fargate. The plugin will allow us to launch Agents into our ECS Cluster from our Controller node. Click on Dashboard -> Manage Jenkins -> Plugins.

Under Available plugins search for ecs and select the plugin Amazon Elastic Container Service (ECS) / Fargate. Click install without restart to install the plugin.
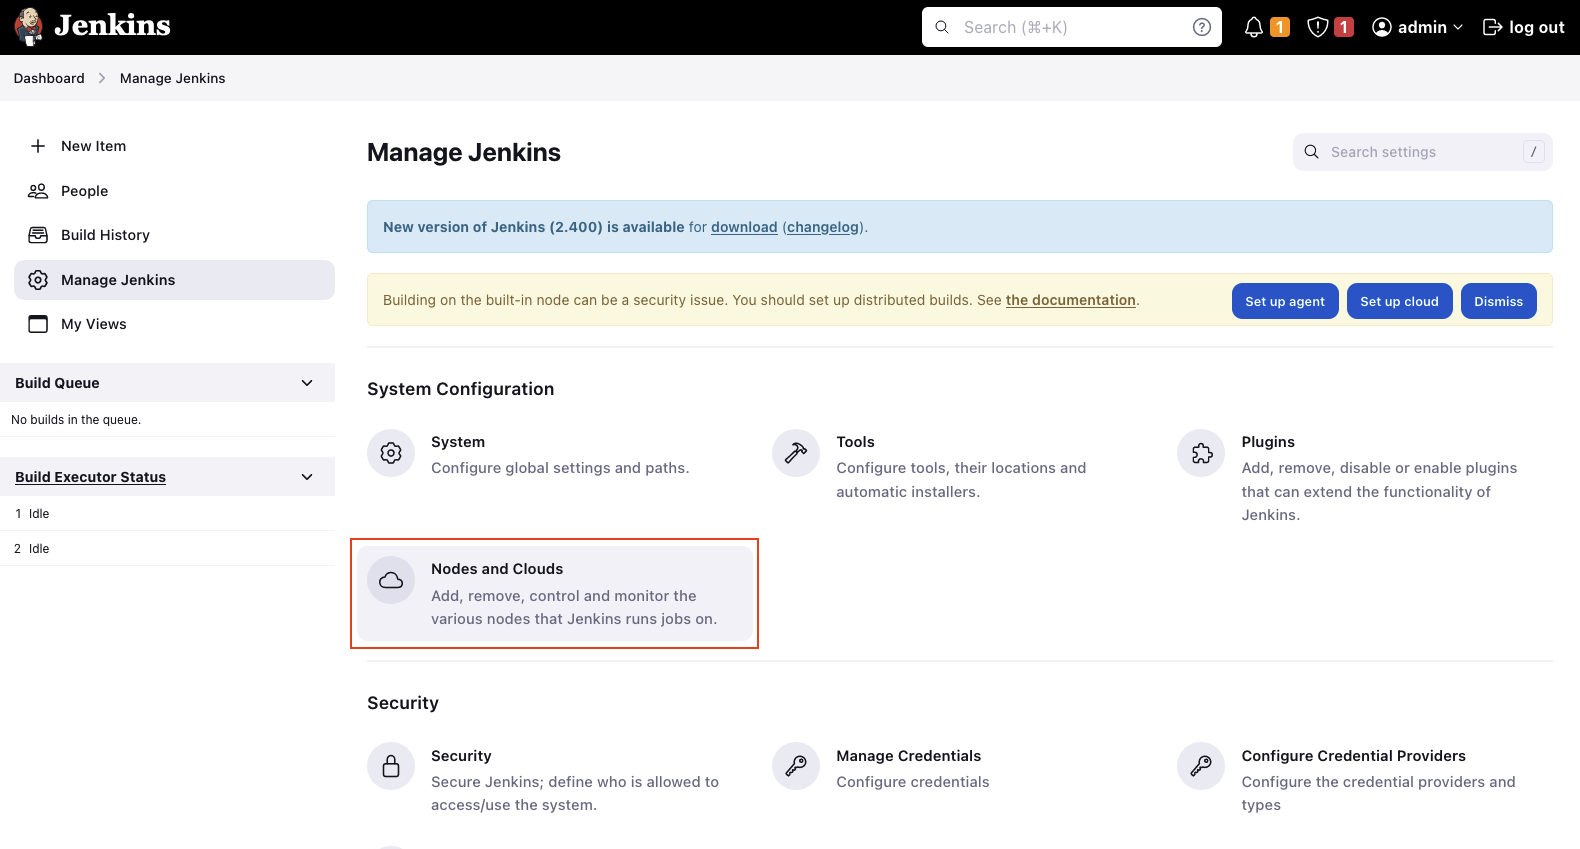
Once the ECS plugin has been installed, we will configure our Jenkins Agent. Click on Dashboard -> Manage Jenkins -> Nodes and Clouds to set up a new Jenkins node.
Select Clouds in the right menu and add a new Amazon EC2 Container Service Cloud node via the drop-down menu. Enter a valid Name and click on Show More. Select the AWS Region where the ECS Cluster has been deployed under Amazon ECS Region Name. The field ECS Cluster should be filled automatically.
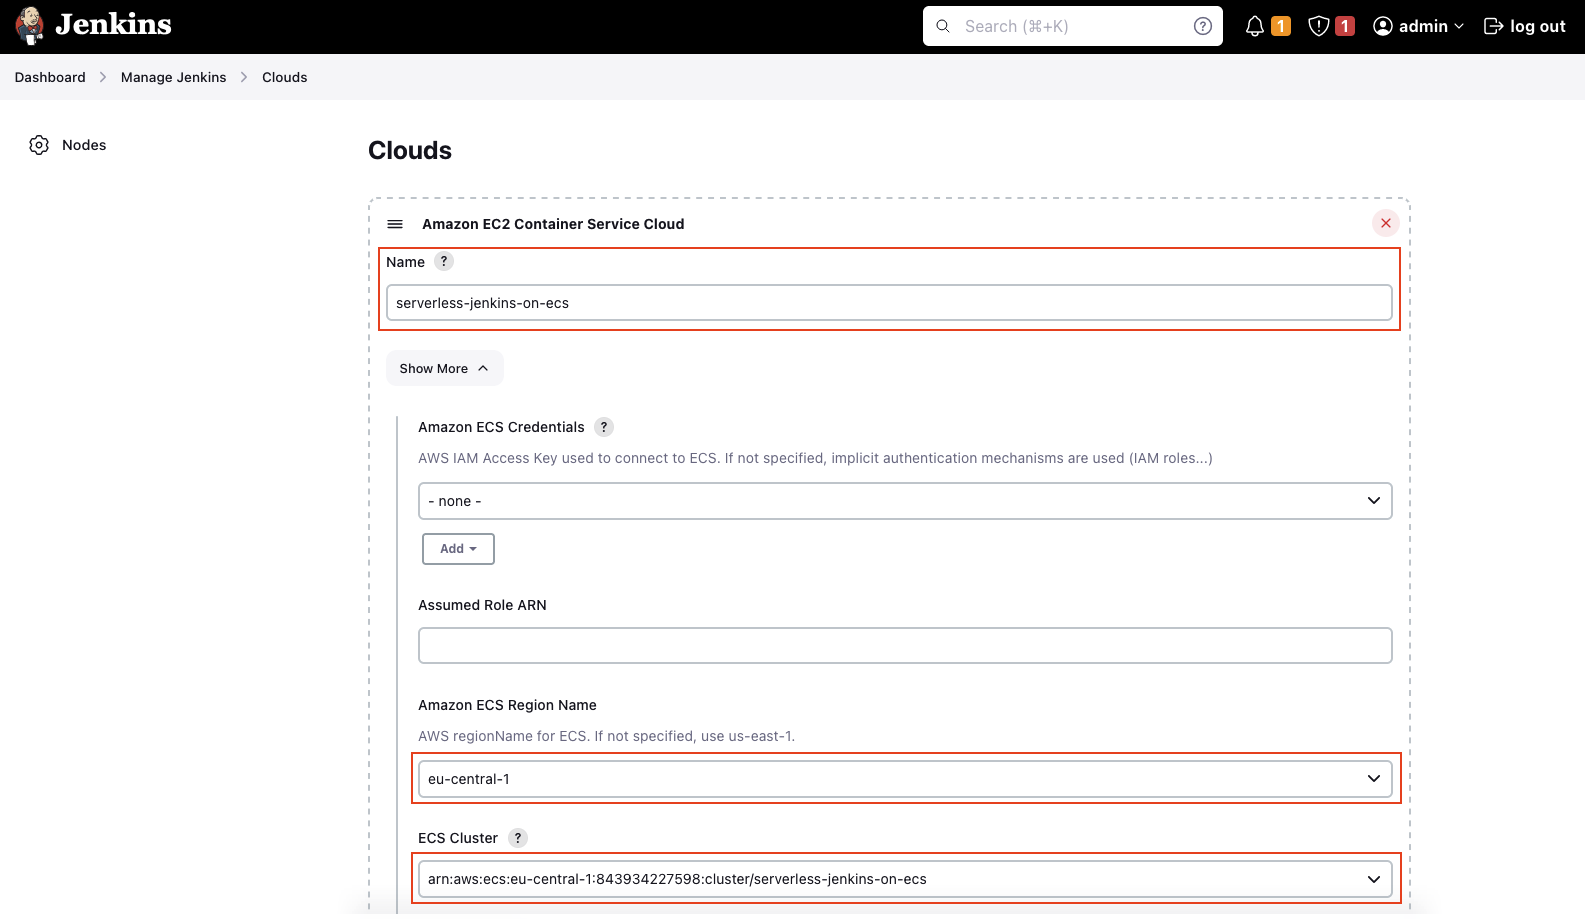
Open the Advanced tab. Even though there are a lot of configuration options available, we will only set the Tunnel connection through. The string can be extracted via the Terraform output jenkins_controller_agent_tunnel_connection. In our case, enter jenkins-controller.serverless-jenkins-on-ecs:50000. Jenkins provides an internal, private ClusterIP service on port 50000 that allows Jenkins Agents to communicate with the Jenkins Controller from inside the cluster.
After having set Tunnel connection through, we will add an ECS agent template. Scroll down and add a new template. There are a few fields we have to fill. Please refer to the table below to get an overview of the fields and values you have to enter to configure the agent template.
Note
Please DO NOT include the " when using Terraform outputs. Just paste in the raw value without surrounding ".
| Field name | Value |
|---|---|
| Label | agent |
| Template Name | agent |
| Docker Image | jenkins/inbound-agent |
| Launch type | FARGATE |
| Operating System Family | LINUX |
| Network mode | awsvpc |
| Soft Memory Reservation | 2048 |
| CPU units | 1024 |
| Subnets | Terraform output => private_subnet_ids |
| Security Groups | Terraform output => ecs_jenkins_agent_security_group_id |
Open the Advanced tab of the agent template. The Advanced tab allows us to configure the IAM and logging settings. Fill out the following two fields.
| Field name | Value |
|---|---|
| Task Role ARN | Terraform output => ecs_agent_role_arn |
| Task Execution Role ARN | Terraform output => ecs_execution_role_arn |
| Logging Driver | awslogs |
Once you have set the Logging Driver, add three Logging Configuration blocks and add the following values.
| Name | Value |
|---|---|
| awslogs-group | Terraform output => ecs_cloudwatch_log_group_name |
| awslogs-region | YOUR AWS REGION |
| awslogs-stream-prefix | jenkins-agent |
After the values have been entered, click Save to save the configuration.
Create Jenkins Pipeline
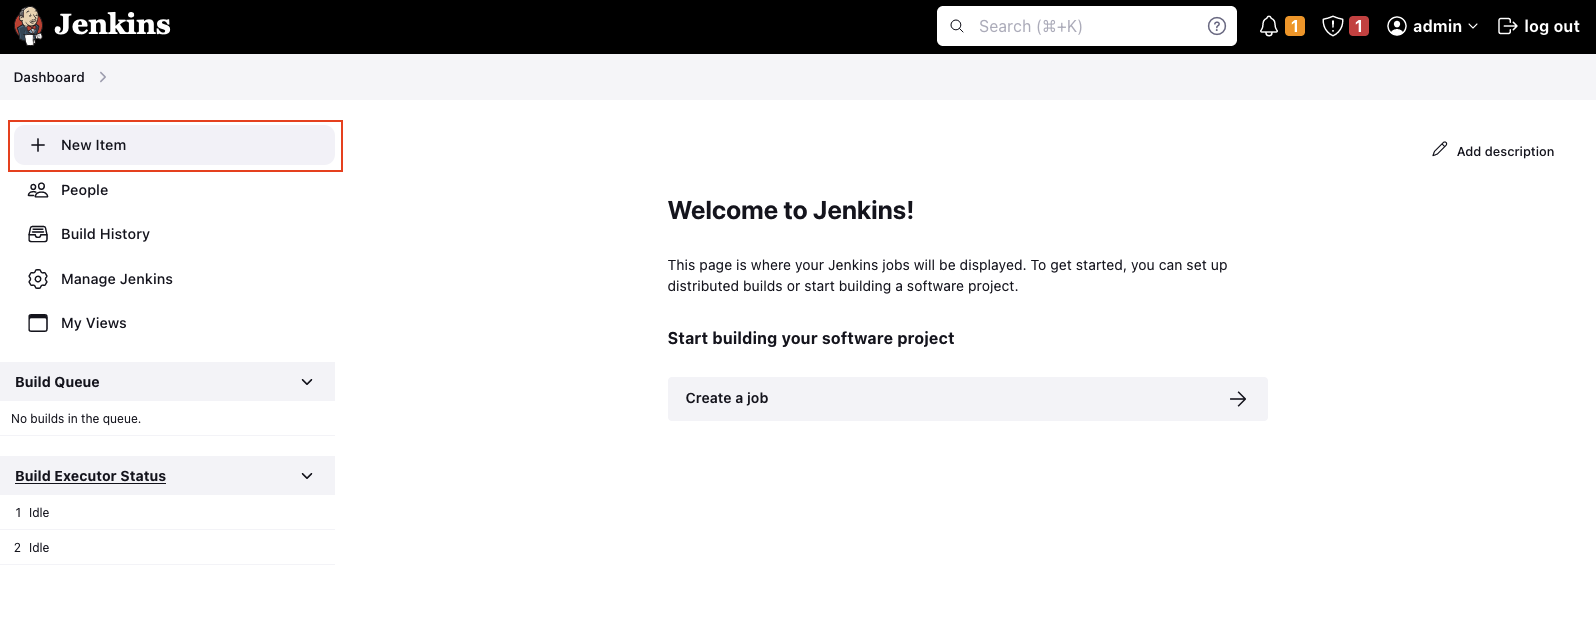
Now that we have the Jenkins Agent configured, it’s time to set up our first Jenkins pipeline. Open the dashboard and create a new item via + New Item in the right menu.
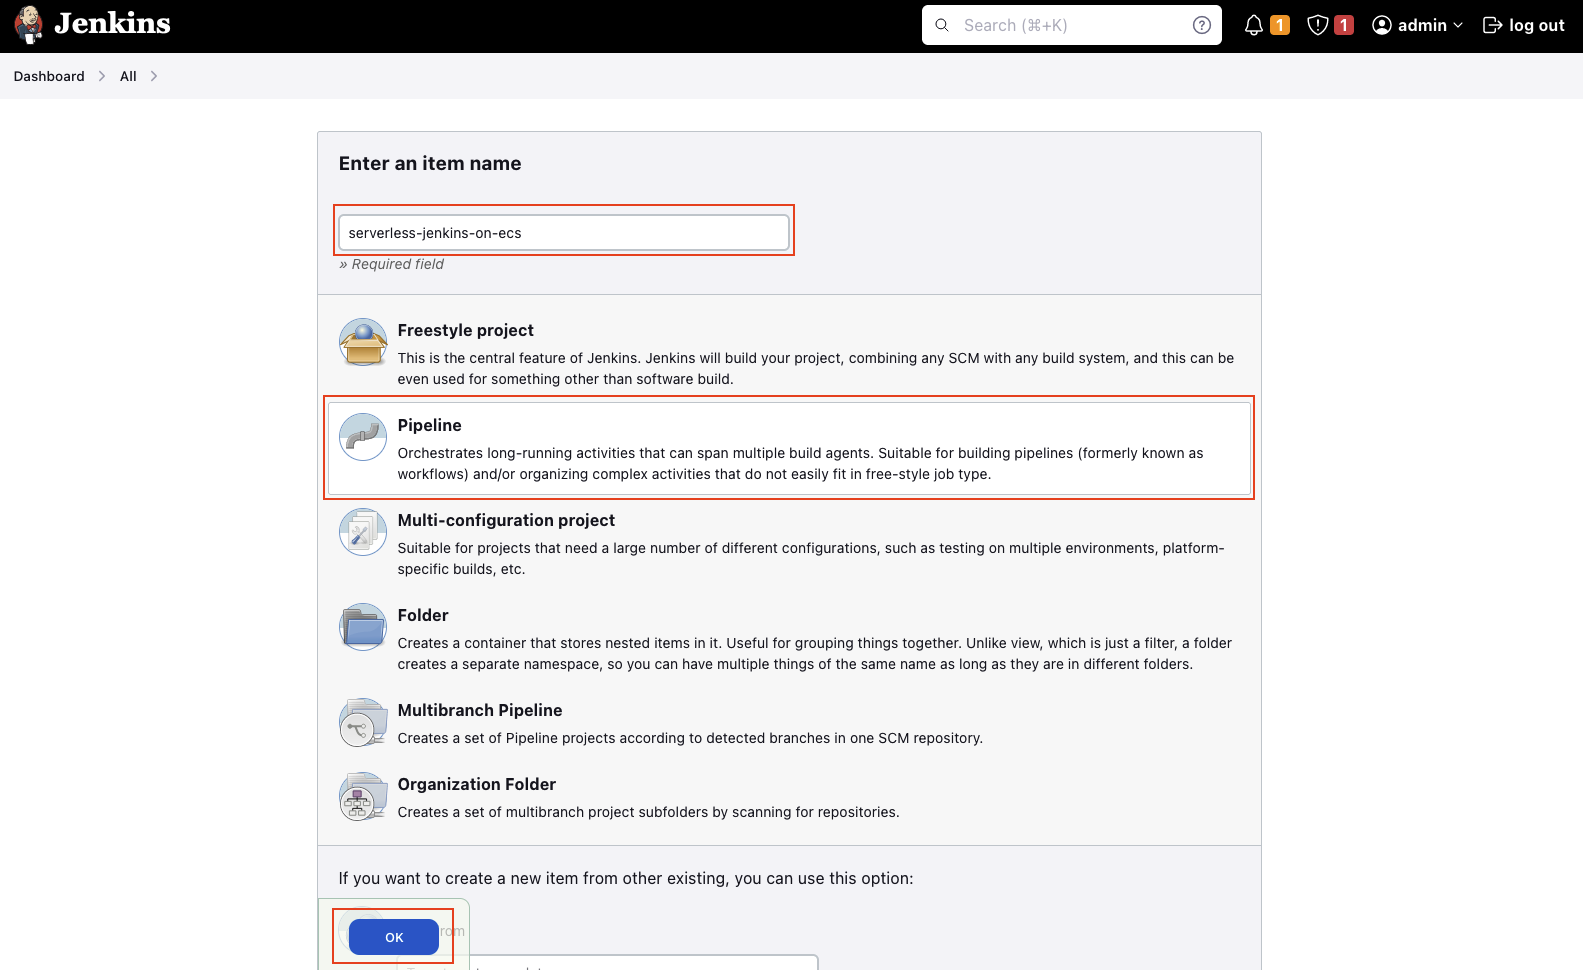
Select a Pipeline project and enter a suitable Name. Click on OK to create a project.
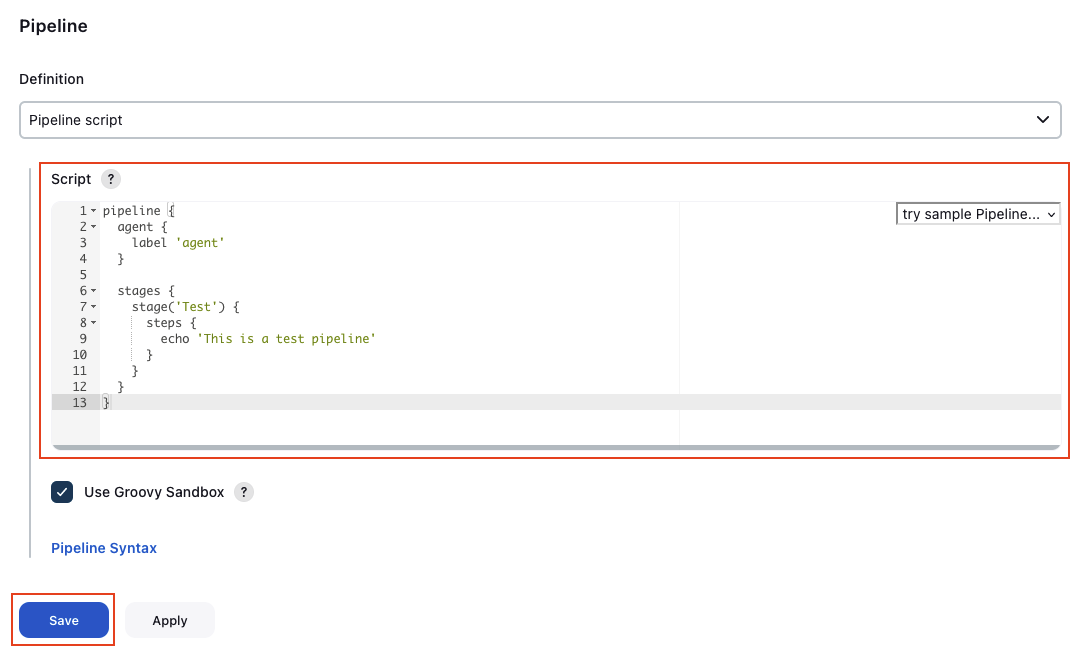
Scroll all the way down and add the following script as the Pipeline Definition. The pipeline will start an agent called agent and will execute a single stage Test. The Test stage will simply print a message to the console. Click Save to confirm your configuration.
Note
The label used for the agent needs to be the same name that was defined in the Label field when configuring the ECS agent template.
pipeline {
  agent {
    label 'agent'
  }

  stages {
    stage('Test') {
      steps {
        echo 'This is a test pipeline'
      }
    }
  }
}
Start First Build
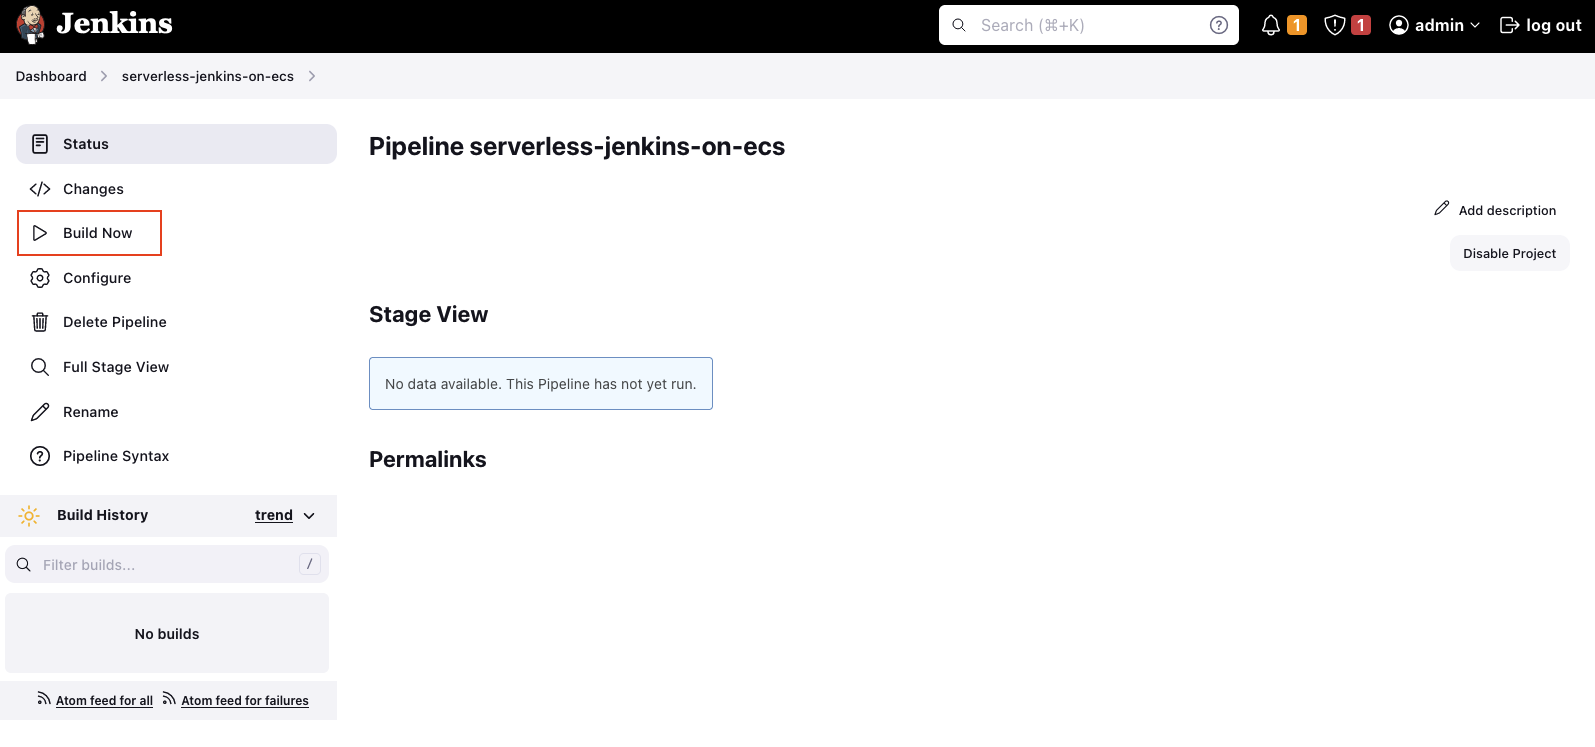
Now that the Agent has been configured, it is time to start our first build. To start a build, click on Build Now.
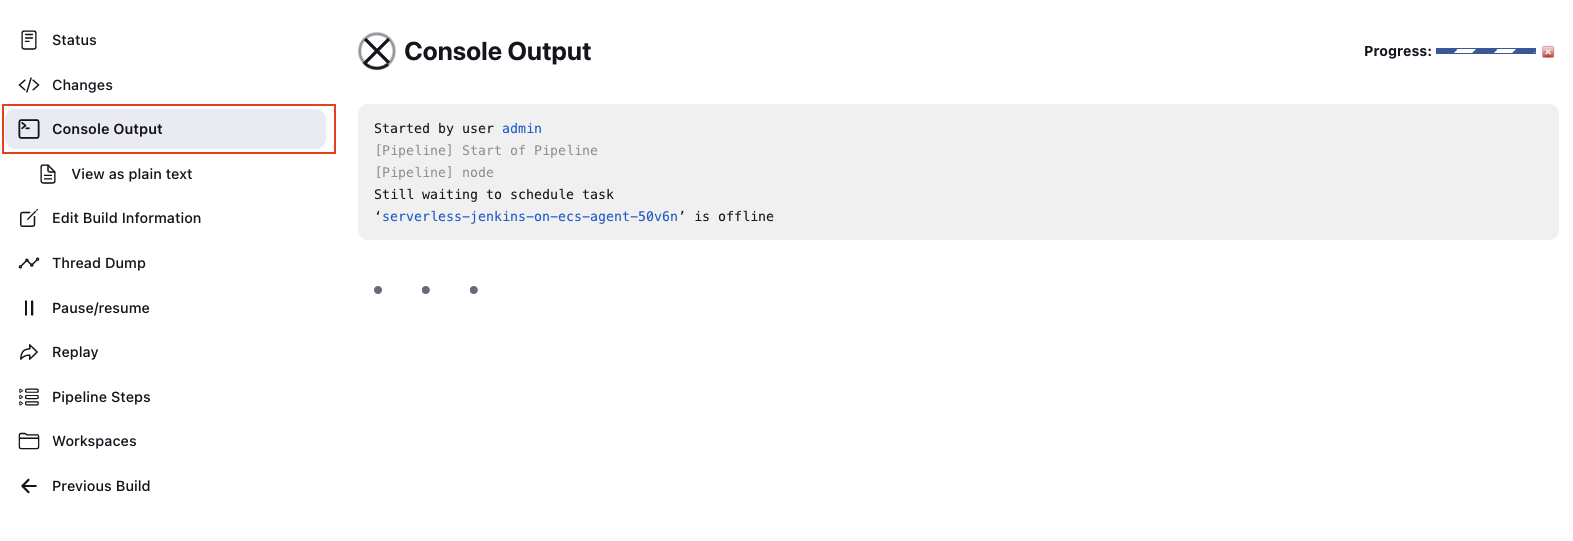
Select the build and open the Console Output. After a few seconds, you should see the following message. This means that Jenkins is currently in the process of starting a Jenkins Agent.
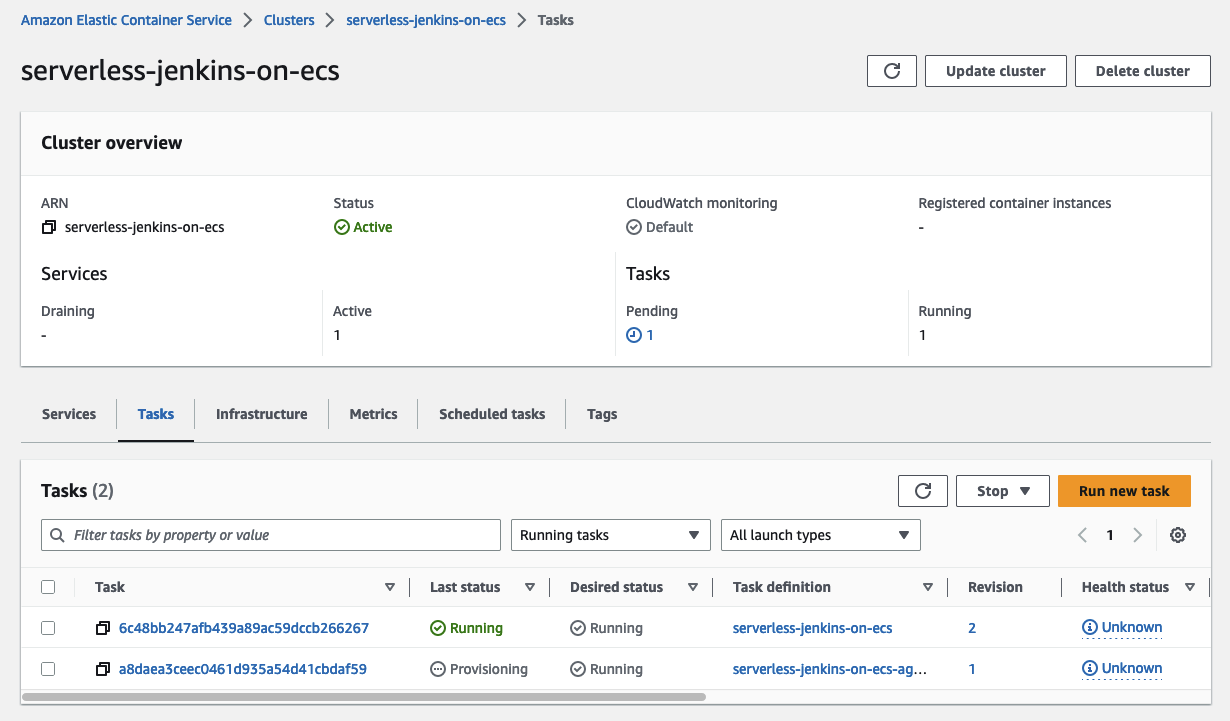
To confirm, open the ECS console. You will see that a second task has been started. This is the Jenkins Agent that will perform the pending task.
Once the Agent has been started and the task has been finished successfully, the following message will be displayed in the Jenkins console.
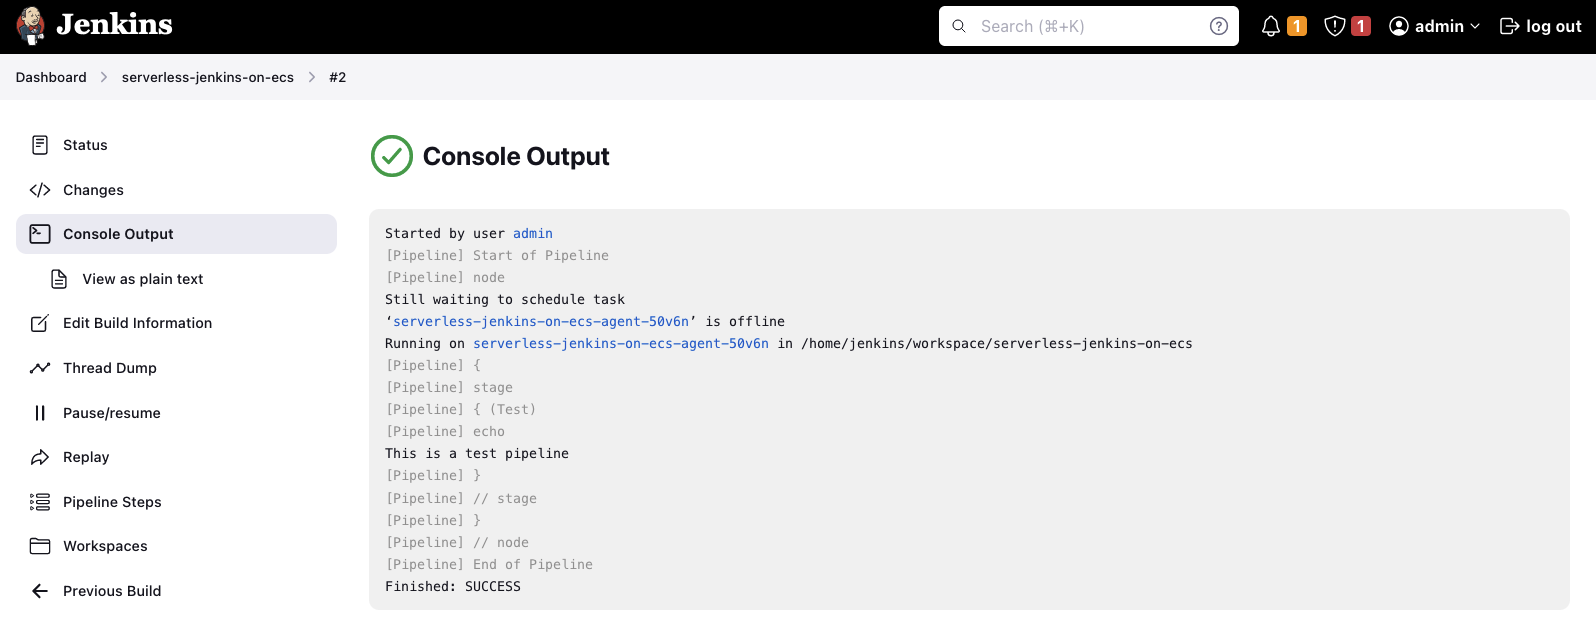
Congratulations! You just set up a fully functional Jenkins Controller/Agent environment in AWS using Terraform.
Summary
This was a relatively short blog post. We only added a Jenkins Agent to our setup and were able to execute a simple pipeline. This might seem like a trivial step, but we made our CI/CD pipeline a lot more scalable and reliable. In the next post of this series, we will customize our Controller and Agent images and introduce Jenkins Configuration as Code. Stay tuned!
I hope you had fun and learned something new while working through this short example. I am looking forward to your feedback and questions. If you want to take a look at the complete example code please visit my Github.
— Hendrik