
Secretless Terraform Deployments
- Hendrik Hagen
- Aws
- March 21, 2023
Table of Contents
Introduction
According to OWASP, the second biggest of the top 10 web application security risks in 2021 were sensitive data exposures (including credential leaks). A Data Breach Investigation Report done by Verizon in 2022 found that 61% of data breaches were due to leaked credentials. Even though the risk of using long-term credentials is generally known, they are still widely used throughout pipelines, servers, laptops, desktops, and many more locations.
In the case of a leak, the impact on business operations, the financial and reputational damages, and the following legal actions could be catastrophic. Take the example of Code Spaces, a company that was forced to shut down after an attacker got hold of leaked credentials and deleted their entire AWS infrastructure including backups.
In order to not become the next Code Spaces or wake up to a hefty bill due to Crypto Mining Hackers, it is important to take credential management seriously, especially in the age of Infrastructure as Code and hyper scalers like AWS. Everyone who has deployed infrastructure to AWS using Terraform knows how easy it is to deploy resources once you have the proper permissions.
One solution to get rid of long-term credentials is to use AWS IAM OIDC identity providers to establish a trust relationship with OIDC-compatible IdPs. Instead of creating AWS IAM users with long-term credentials in your account to access AWS resources, identities can be managed outside AWS by external IdPs. Users managed by these IdPs can then use JWTs to assume IAM roles and retrieve temporary credentials from AWS.
In this post, I would like to show you how you can leverage IAM OIDC identity providers in combination with GitHub as an IdP to build a secretless deployment pipeline for Terraform…with Terraform.
OIDC Workflow
Before jumping into the implementation, I would like to discuss the general workflow when using AWS IAM OIDC identity providers and GitHub Actions and how a secretless connection works. The workflow can be divided into five steps which are shown in the figure below.
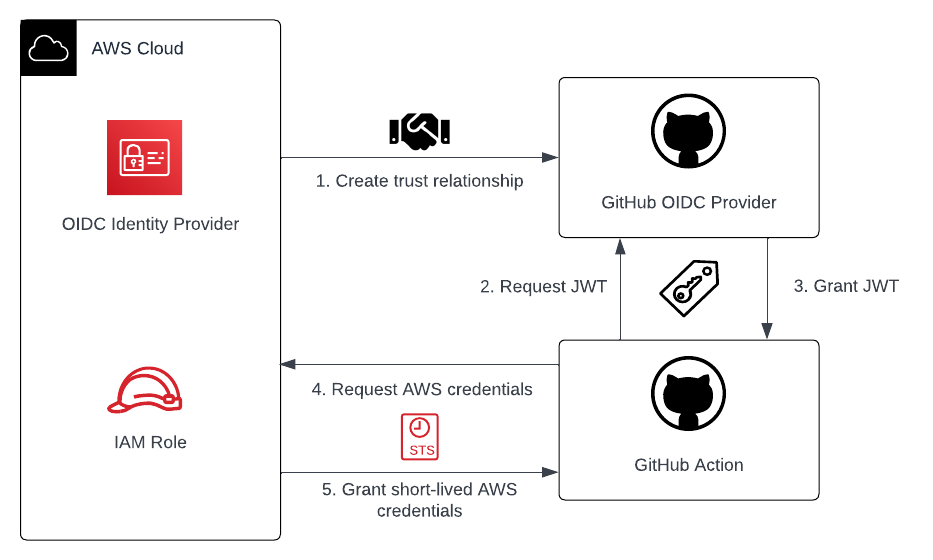
- Register GitHub as IAM OIDC Identity Provider in AWS and create an IAM role IdP identities are allowed to assume.
- GitHub Action requests a signed JWT during the job run from the GitHub OIDC provider.
- GitHub OIDC provider issues signed JWT to GitHub Action.
- GitHub Action sends JWT and ARN of the IAM role which should be assumed to AWS.
- AWS validates JWT and grants short-lived credentials to GitHub Action.
Once the credentials have been granted by AWS, the GitHub Action can use the permissions to access AWS resources. In the case of our example, we will use these credentials to deploy our Terraform configuration.
Project Structure
Before we start setting up our GitHub Action and our Terraform configuration, I would like you to create the project structure. Please create the following files and folders.
├── github-content/
│   └── deployment.yml
│   └── main.tf
├── github.tf
├── aws.tf
├── provider.tf
├── variables.tf
As mentioned above, we will build a Terraform deployment pipeline using Terraform. This might be a bit counter intuitive, but we will be using Terraform to bootstrap our whole infrastructure. To get a bit more practice when working with Terraform and to make this example a bit more challenging, we will not only set up the AWS IAM OIDC identity provider, but also our complete GitHub environment including repository, branches, actions, and secrets using Terraform.
The folder github-content contains the content that we will push to our GitHub repository once it has been created via Terraform. github.tf will contain our Terraform configuration for the GitHub infrastructure while aws.tf will contain our AWS configuration for the OIDC identity provider. provider.tf and variables.tf will contain our Terraform provider configuration and our variables.
Prerequisites
- GitHub Access Token
- AWS Access Credentials
Implement AWS IAM OIDC Identity Provider
As already described above, the OIDC workflow starts with registering GitHub as a valid OIDC identity provider in AWS. By registering GitHub as a trusted IdP, we allow GitHub identities to request temporary credentials and assume IAM roles from our AWS account. Please copy the following code into your aws.tf.
################################################################################
# Get GitHub TLS cert
################################################################################

data "tls_certificate" "github" {
  url = "https://token.actions.githubusercontent.com/.well-known/openid-configuration"
}


################################################################################
# IAM OpenID Connect for GitHub
################################################################################

resource "aws_iam_openid_connect_provider" "this" {
  url = "https://token.actions.githubusercontent.com"

  client_id_list  = ["sts.amazonaws.com"]
  thumbprint_list = [data.tls_certificate.github.certificates[0].sha1_fingerprint]
}
The code snippet above will create a GitHub identity provider in AWS. As we will be working with two Terraform providers - aws and github - we will set up a provider configuration to make sure that the correct providers and versions are downloaded by Terraform. Copy the following code into your provider.tf.
terraform {
  required_providers {
    aws = {
      source  = "hashicorp/aws"
      version = ">=4.40.0"
    }
    github = {
      source  = "integrations/github"
      version = ">=5.0"
    }
  }
}

provider "github" {}

provider "aws" {}
Before running a Terraform command, you need to set up the credentials for AWS and GitHub provider. For all possible configuration options please visit the official Terraform documentation regarding the AWS Provider and the GitHub Provider. In the case of GitHub we will use an API key that we will export as an environment variable.
export GITHUB_TOKEN=xxxxx
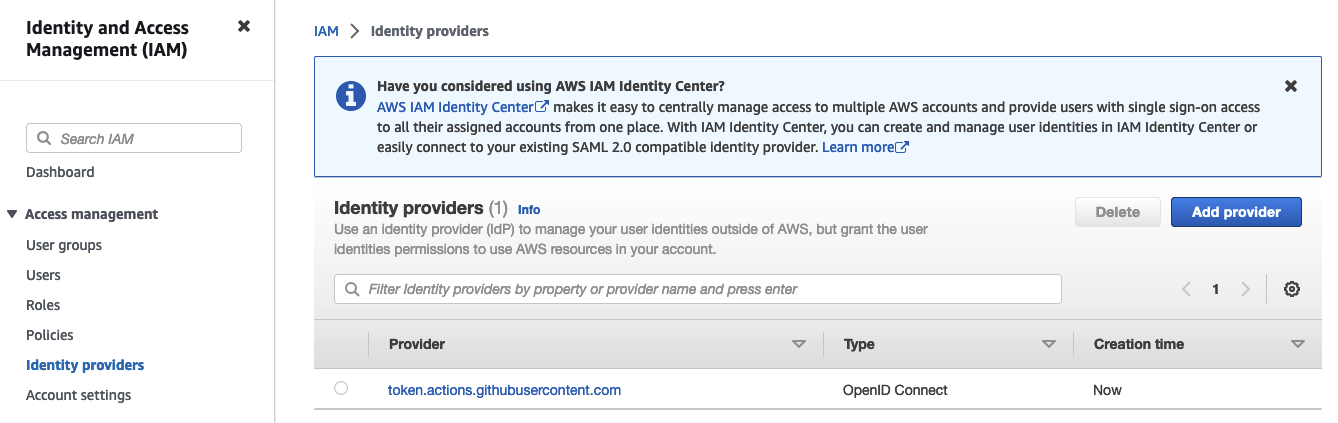
Run terraform init and terraform apply to deploy the Terraform configuration. You should see the OIDC provider appear in the IAM console in AWS.
The provider alone won’t be of much use on its own. We also have to create an IAM role that our GitHub Action will be able to assume to get the temporary AWS credentials. Copy the following snippet into your aws.tf as well.
################################################################################
# IAM Role for GitHub
################################################################################

resource "aws_iam_role" "this" {
  name = "github-actions"

  assume_role_policy = data.aws_iam_policy_document.assume_role_policy.json
}


data "aws_iam_policy_document" "assume_role_policy" {
  statement {
    actions = ["sts:AssumeRoleWithWebIdentity"]
    effect  = "Allow"

    principals {
      type        = "Federated"
      identifiers = [aws_iam_openid_connect_provider.this.arn]
    }

    condition {
      test     = "StringLike"
      variable = "token.actions.githubusercontent.com:sub"
      values = [
        "repo:${var.org_or_user_name}/${var.repository_name}:pull_request",
        "repo:${var.org_or_user_name}/${var.repository_name}:ref:refs/heads/main"
      ]
    }

    condition {
      test     = "StringEquals"
      variable = "token.actions.githubusercontent.com:aud"
      values   = ["sts.amazonaws.com"]
    }
  }
}

resource "aws_iam_role_policy_attachment" "this" {
  role = aws_iam_role.this.name

  policy_arn = "arn:aws:iam::aws:policy/AdministratorAccess"
}
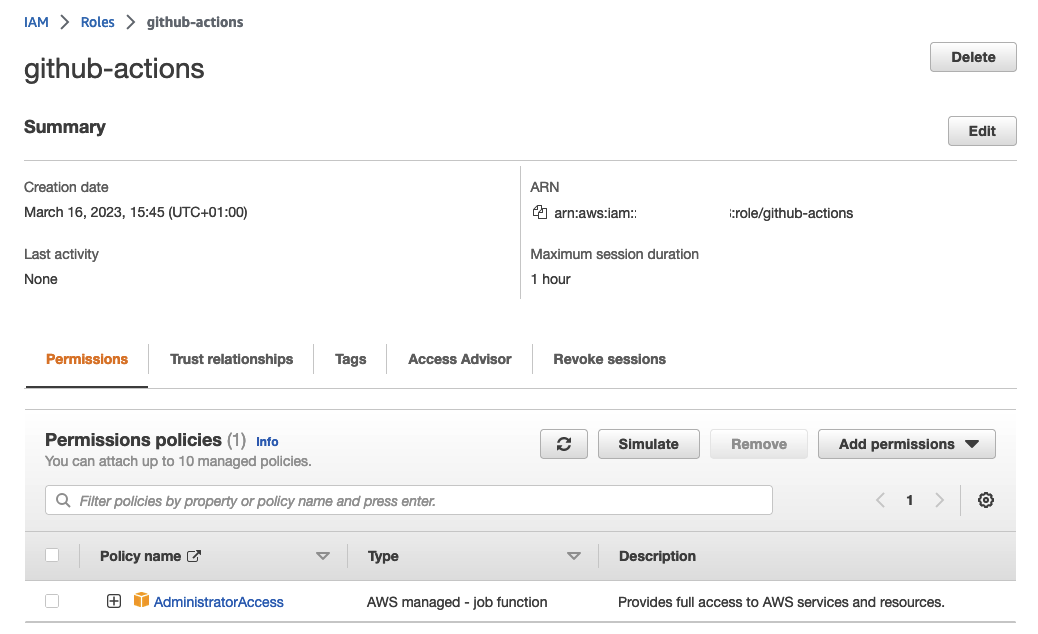
The Terraform configuration will create an IAM role which can be assumed by GitHub through our OIDC identity provider. By default, the maximum duration an IAM role can be assumed and therefore the default maximum validity of the AWS credentials is one hour. If you have long-running workflows, you can adjust the session duration via the max_session_duration input. The values have to be between 1 hour and 12 hours.
resource "aws_iam_role" "this" {
  name = "github-actions"

  max_session_duration  = 12
  assume_role_policy    = data.aws_iam_policy_document.assume_role_policy.json
}
The role has been granted administrator access as part of this example.
This is only for demonstration purposes. Please apply the principle of least privilege when working in production environments.
A token.actions.githubusercontent.com:sub condition has also been added to our assume role policy to make sure that only selected organizations or users and only specific repositories will be able to assume the role. This allows us to apply fine-grained access control based on repositories, branches, and much more. As you can see, the organization/user as well as the repository name were parameterized. Please add the two variables to your variables.tf.
variable "org_or_user_name" {
  description = "Name of GitHub Org or User that can assume IAM role"
  type        = string
  default     = "PUT_YOUR_ORG_OR_USER_HERE"
}

## The name of the repository MUST be a name that you currently DO NOT possess! The repository will be created using Terraform.

variable "repository_name" {
  description = "Name of GitHub repository that can assume IAM role"
  type        = string
  default     = "PUT_YOUR_REPO_NAME_HERE"
}
Feel free to work with a terraform.tfvars file to assign values to these variables. You can also assign a default value for simplicity. Please change the default value of both variables and assign your user name or org and select a name for a repository. Rerun terraform apply to create the IAM Role. You should see the role in the AWS console.
IMPORTANT:
The name of the repository MUST be a name that you currently DO NOT possess! We will create this repository via Terraform later on. If you want to implement the IAM OIDC identity provider on its own and use an existing repository, the repository_name can also be a pattern. Patterns can be used to allow multiple repositories to assume the role. An example is shown below, where instead of a specific repository, access is granted to all repositories via an asterix (*).
    condition {
      test     = "StringLike"
      variable = "token.actions.githubusercontent.com:sub"
      values = [
        "repo:${var.org_or_user_name}/*:pull_request",
        "repo:${var.org_or_user_name}/*:ref:refs/heads/main"
      ]
    }
Create GitHub Environment
After having implemented the OIDC identity provider including IAM role, we will continue by creating the GitHub environment. We will set up a brand new repository with two branches - dev and main. We will also create our GitHub Action secrets and push our example content to the dev branch. Once everything has been set up, we will create a Pull Request and Merge our content into main to showcase how our Terraform deployment pipeline behaves. Let’s start by creating our repository and uploading our GitHub Action workflow into our main branch. We will start with the Action. Copy the following snippet into the deployment.yml.
name: Deployment

on:
  push:
    branches: [ "main" ]
  pull_request:
    branches: [ "main" ]

env:
  AWS_REGION : "eu-central-1"

permissions:
  contents: read
  id-token: write

jobs:

  deployment:
    runs-on: ubuntu-latest

    steps:
    - name: Checkout
      uses: actions/checkout@v3

    - name: Setup Terraform
      uses: hashicorp/setup-terraform@v2

    - name: Configure AWS Credentials
      uses: aws-actions/configure-aws-credentials@v1
      with:
        aws-region: ${{ env.AWS_REGION }}
        role-to-assume: ${{ secrets.DEPLOYMENT_IAM_ROLE_ARN }}
        role-session-name: OIDCSession

    - name: Terraform Init
      id: init
      run: |
        echo "\`\`\`\n" >> $GITHUB_STEP_SUMMARY
        terraform init -no-color >> $GITHUB_STEP_SUMMARY
        echo "\`\`\`\n" >> $GITHUB_STEP_SUMMARY

    - name: Terraform Plan (On Pull Request)
      id: plan
      if: github.event_name == 'pull_request'
      run: |
        echo "\`\`\`\n" >> $GITHUB_STEP_SUMMARY
        terraform plan -no-color >> $GITHUB_STEP_SUMMARY
        echo "\`\`\`\n" >> $GITHUB_STEP_SUMMARY


    - name: Terraform Apply (On Merge)
      id: apply
      if: github.event_name != 'pull_request'
      run: |
        echo "\`\`\`\n" >> $GITHUB_STEP_SUMMARY
        terraform apply -no-color -auto-approve >> $GITHUB_STEP_SUMMARY
        echo "\`\`\`\n" >> $GITHUB_STEP_SUMMARY
This workflow will start by checking out our code, setting up Terraform, and assuming our IAM role via the OIDC identity provider. The ARN of the IAM role will be provided to the workflow via a GitHub Action secret that we will create. Once the setup process has been completed, the workflow will initialize Terraform and perform terraform plan in the case of a Pull Request and terraform apply in the case of a Merge. This allows us to review the changes Terraform intends to perform before the actual deployment.
Next, we will create the actual repository, actions, and secrets using Terraform. Continue by copying the following code into your github.tf.
################################################################################
# Set up GitHub Repository
################################################################################

resource "github_repository" "this" {
  name        = var.repository_name

  auto_init = true
  visibility  = "private"
}

resource "github_actions_secret" "this" {
  repository       = github_repository.this.name
  secret_name      = "DEPLOYMENT_IAM_ROLE_ARN"
  plaintext_value  = aws_iam_role.this.arn
}

resource "github_repository_file" "deployment_yml" {
  repository          = github_repository.this.name
  branch              = "main"
  file                = ".github/workflows/deployment.yml"
  content             = file("${path.module}/github-content/deployment.yml")
  overwrite_on_create = true
}
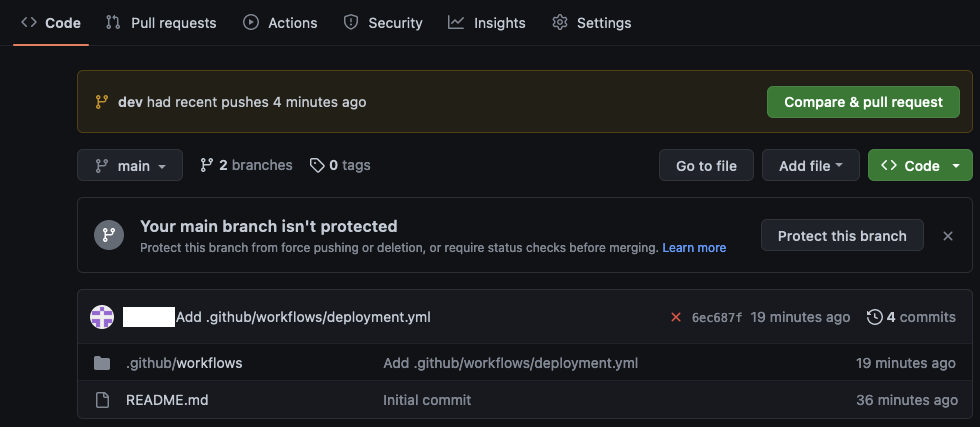
Execute terraform apply to create the repository and push the deployment.yml to the main branch. As mentioned in the official GitHub Action documentation, workflow files need to be stored in the directory .github/workflows/.
Check your GitHub account to see if everything has been deployed successfully. You will see that a GitHub Action has already run but failed during the Terraform apply step. This is due to the fact, that we currently have no Terraform files to apply. What might be more interesting is the fact, that the step Configure AWS Credentials has been executed successfully. That means, that our OIDC identity federation is working as intended.
Now it’s time to deploy some actual infrastructure. We will create a dev branch and push a simple Terraform configuration to dev. Afterward, we will create a Pull Request from dev to main and look at the behavior of our GitHub Action. By creating the dev branch and pushing the main.tf we simulate a new feature being added. We will start by copying the following code into our github-content/main.tf. The configuration is straightforward and will create a single S3 Bucket that will start with the prefix oidc-github-blog.
resource "aws_s3_bucket" "this" {
  bucket_prefix = "oidc-github-blog"
}
To set up the dev branch copy the following code into your github.tf.
################################################################################
# Create Dev Branch
################################################################################

resource "github_branch" "dev" {
  repository    = github_repository.this.name
  branch        = "dev"
  source_branch = "main"

  depends_on = [
    github_repository_file.deployment_yml
  ]
}

resource "github_repository_file" "sample_tf_config" {
  repository          = github_repository.this.name
  branch              = github_branch.dev.branch
  file                = "main.tf"
  content             = file("${path.module}/github-content/main.tf")
  overwrite_on_create = true
}
Execute terraform apply to create and deploy the changes. You should now have two branches,dev and main, in your repository.
Create Pull Request and Merge Changes
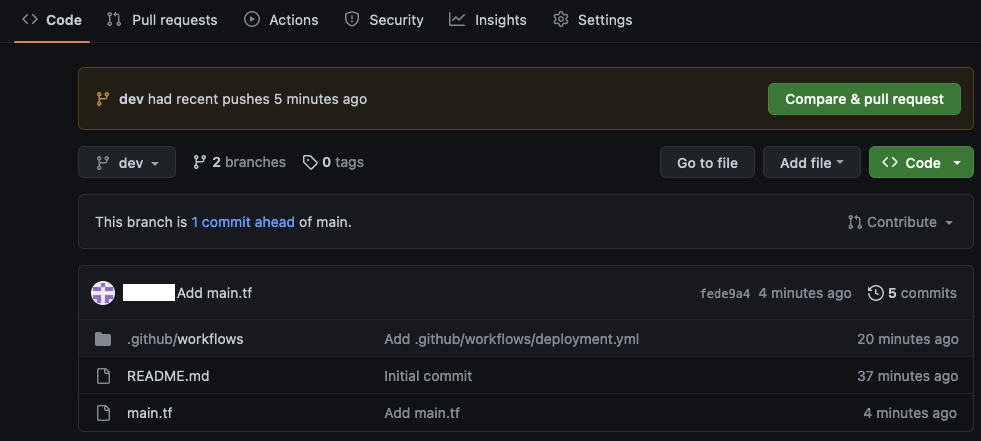
Now that we have created the infrastrcture for our deployment pipeline, we will finally deploy some infrastructure using our GitHub Action. Create a Pull Request with main as the base.

The GitHub Actions will start to run shortly after.
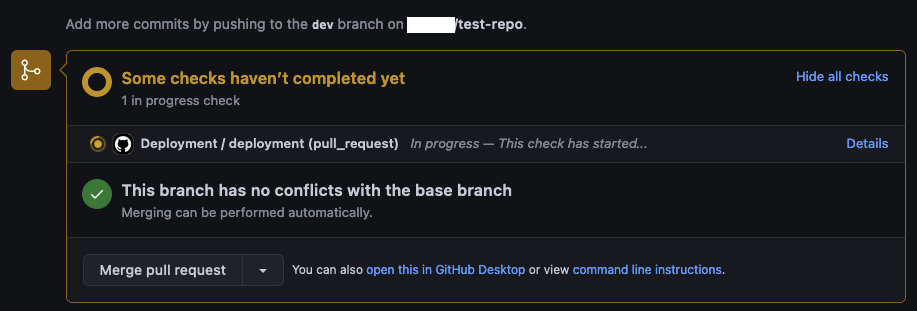
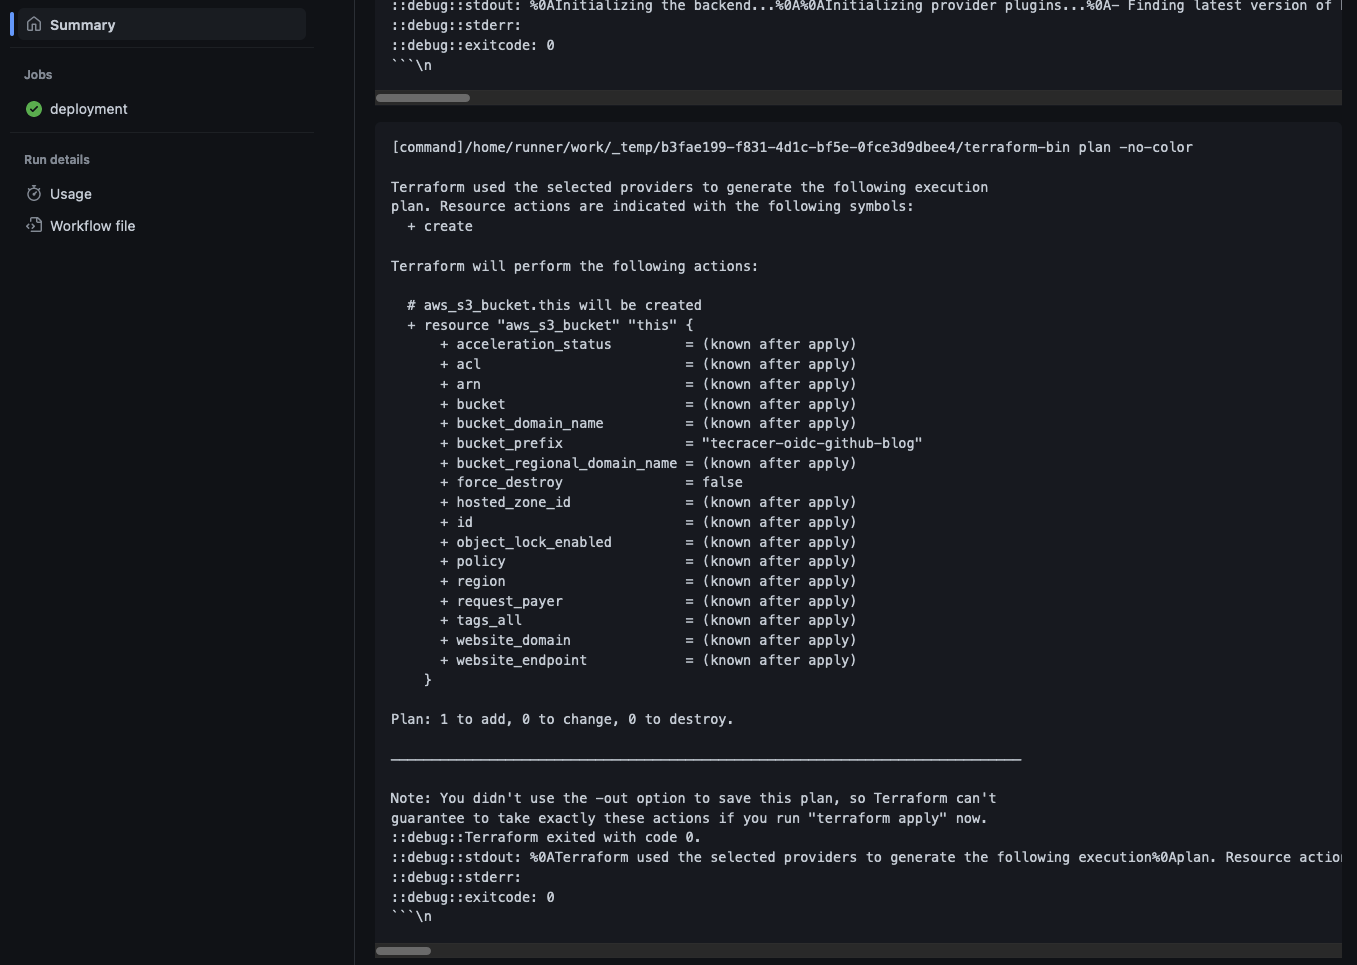
Once the Action has finished successfully, you should see the Terraform plan output in the job summary. As configured, Terraform intends to add one S3 Bucket to our AWS account.
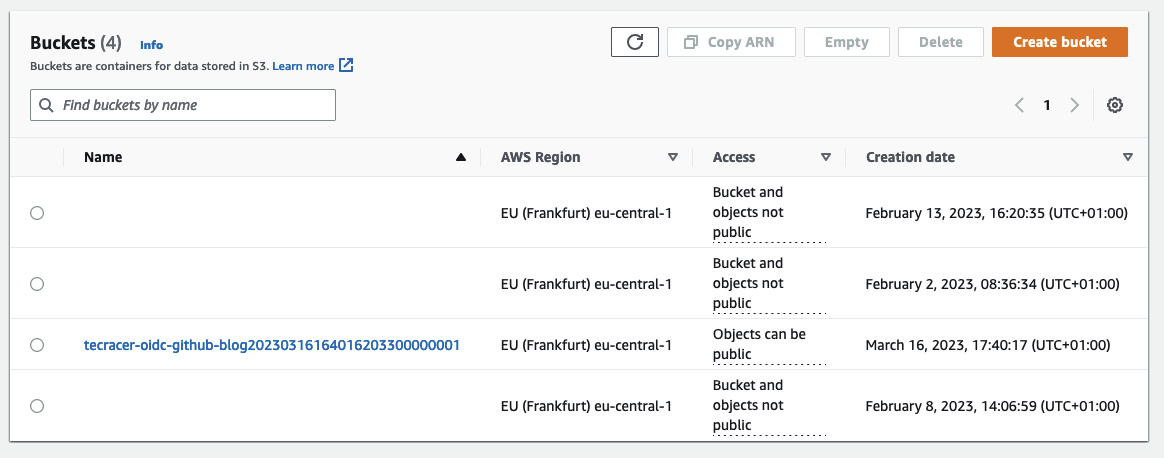
To deploy the infrastructure, Merge the Pull Request into main. Following the Merge another GitHub Action will start. This time to deploy our Terraform configuraiton. The job summary will show the successful deployment of our S3 Bucket. Check the AWS Console and you should see that your S3 Bucket has been created.
Summary
As you can see it is pretty straight forward to create a secretless deployment pipeline using AWS OIDC identity providers and GitHub Actions. One major advantage of this approach is the fact that we got rid of long-termin credentials. We no longer have to create IAM users and store access keys in GitHub to get access to AWS resources. Temporary credentials are created as needed on the fly for a specific GitHub Action. Therefore, The risk of a security breach due to leaked credentials is reduced.
Furthermore, we are able to configure fine-grained access control through IAM roles conditions. By defining IAM role conditions we can define which principals are allowed to assume said role. In the case of GitHub Actions, this can be done based on patterns or specific repositories, branches, actions and much more. Each project repository could receive its own IAM role with separate permissions for example. You could also restrict the permissions of dev and qa branches. The choice is yours. In the end, the goal is to make your IaC deployments safer and more secure.
I hope you had fun and learned something new while working through this short example. I am looking forward to your feedback and questions. If you want to take a look at the complete example code please visit my Github.
— Hendrik